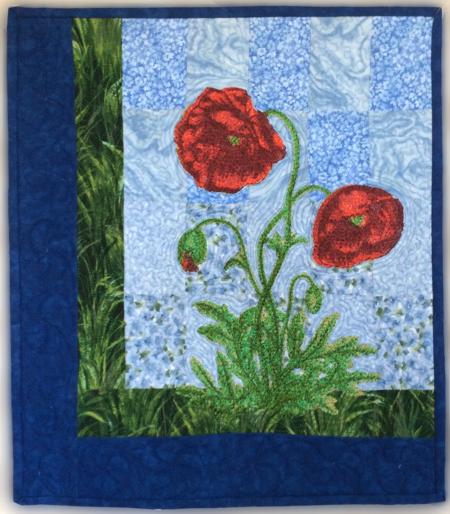
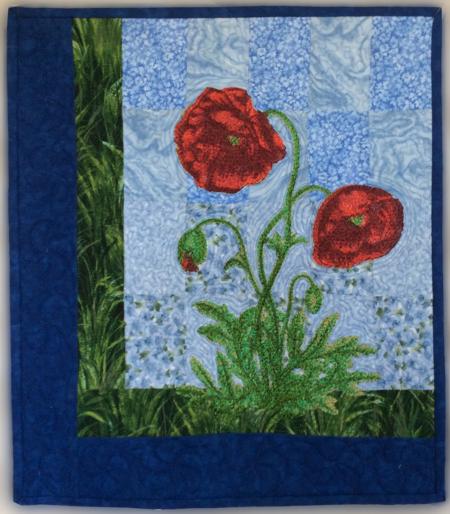
This small quilt (only 13" x 15") is an easy and quick project that's perfect for Memorial Day. We used the design of the Wild Poppy because the poppy has long been a symbol of soldiers who have died in wartime. We have an entire collection of different Poppy designs you can choose from.
Since you don't need a lot of fabric, this is a great opportunity to use up any scraps of green and blue that you may have in your stash.
|
|
Besides embroidery threads by the color card , you will need
- scraps of light blue fabrics
- 2 strips of green fabric,
- 1/4 yards of denim blue cotton fabric (we used it for the top, and binding),
- medium-weight cut-away embroidery stabilizer (we used polyester craft felt instead of stabilizer),
- batting,
- fabric for the backing (1 fat quarter is all you need).
- quilting threads (light blue, green and dark blue to match the border),
- quilter's ruler and rotary cutter (if you don't use a rotary cutter, you'll need a graphic pencil and sharp scissors).
|
Cutting:
|
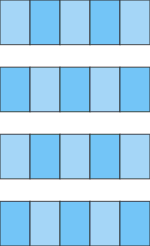
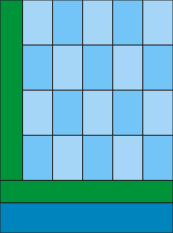
Out of scraps of light blue fabrics, cut rectangles measuring 2 1/2" x 3 1/2". You will need 20 rectangles in all.
Out of green fabric, cut
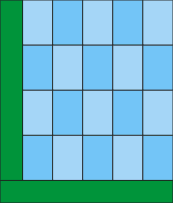
- a strip measuring 2" x 12 1/2" and
- a strip measuring 2" x 12".
Out of dark blue fabric cut
- a strip measuring 2 1/2" x 12" and
- a strip measuring 2 1/2" x 15 1/2".
Cut the rest of the dark blue fabric into strips for the binding. |
Assembly of the Top:
|
| To sew the watercolor background for the embroidery, arrange the light blue rectangles in 4 rows, 5 rectangles per row. Sew the rectangles in each row. Press seams. |
|
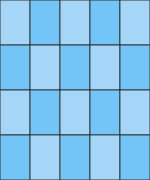
Sew the rows together. Press seams.
|
|
Sew the green 2" x 12 1/2" strip to the left edge of the working piece. Press seams. Sew the green 2" x 12" strip to the bottom edge of the working piece. Press seams.
|
|
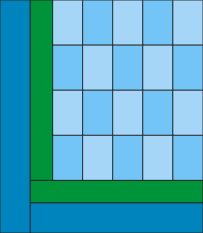
Sew the dark blue 2 1/2" x 12" strip to the bottom edge of the working piece. Press seams.
|
|
| Sew the dark blue 2 1/2" x 16" strip to the left edge of the working piece. Press seams. |
|
| Emboridery |
Spread the working piece on polyester felt, it will work both as stabilizer and batting. (If you don't like to embroider on felt, use medium-weight cut-away embroidery stabilizer.) Press the work lightly with your hands, it will cling to the felt.
Embroider the Wild Poppy or any other poppy design. Please dont forget to select threads according to the color card.
After the embroidery is finished, cut away the excess stabilizer/felt around the embroidery. |
| Quilting and Finishing: |
Now place the backing on a flat surface (table) face down. Cover with batting. Spread your working piece over it.
Pin all three layers together with 1" pins and start quilting. We quilted in a free motion style all over the quilt. |
After the quilting is finished, press the work with heavy steam and square the work -- all corners should be 90 degrees and opposite sides should be of the same length.
|
| Finish the raw edges with the binding. |
|
Your quilt is ready. Enjoy!
|
|
Enjoy!
|
|
Happy Stitching!
|
|
Back to Wild Poppy
|
Back to the Project Page
|


