These are instructions on how to embroider the Freestanding Flower.
There are 2 files in the set. You will need organza, water-soluble stabilizer and embroidery threads, either rayon or polyester. The choise of colors is yours.
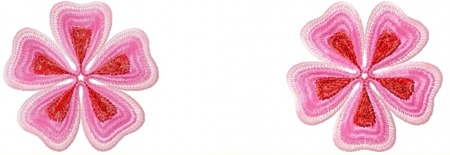
| Size: 94 mm x 90 mm (3.7" x 3.5") Stitches: 11,545 Colors: 3 |
Size: 84 mm x 80 mm (3.3 " x 3.1") Stitches: 9,846 Colors: 3 |
Stabilizers: We recommend to use water-soluble mesh, such as Vilene. Vilene D0102 is a non-woven dissolvable stabilizer which is imported into the US, is sold in large rolls and is sometimes packaged under different brand names. Some of these brand names are Fabri-Solvy by Sulky, Avalon Plus by Madeira, Wash-Away, and Aqua Magic.
You can also use film-like water soluble stabilizers, such as Solvy by Sulky, Avalon by Madeira and Badge Master. However, be very careful when hooping. We recommend to pin organza and stabilizer together along the edges.
Threads: For this project we recommend to use embroidery threads made of rayon or polyester.
To get two-sided embroidery, use threads of the same color in the needle and in the bobbin.
Needles: We used size 80/12 embroidery needles and 80/12 metallic needles for metallic thread.
Most Importantly: ALWAYS make a test stitch-out and wash away the stabilizer. This helps you to select the threads, needles, stabilizers and settings of your machine correctly. It's very important to select the correct thread tension!

Washing out the Stabilizer:
Rinsing away the stabilizer is an important step, because the stitch-outs can be stretched or distorted if this is done incorrectly. We recommend to use a foam board and stainless pins.
Cut away the excess organza and stabilizer close to the stitches. Take your time and carefully pin the outer edges of the stitch-outs to the board.
Now place the board into a bowl with luke-warm water.
Take the board out of the water and leave to air dry. While the stitch-outs are semi-dry, unpin and, with your fingers, give them the shape you need. Leave them to dry completely.
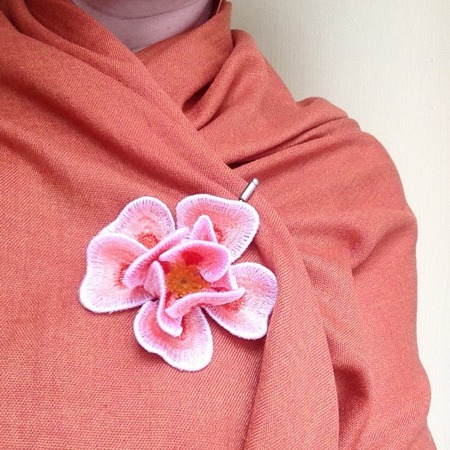
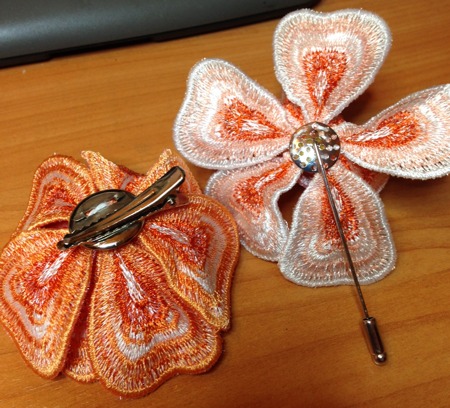
Making Pins or Brooches
Besides embroidery threads, organza and watersoluble stabilizer, you will need base pins for hairpins or brooches, fabric glue or sewing needle and threads.
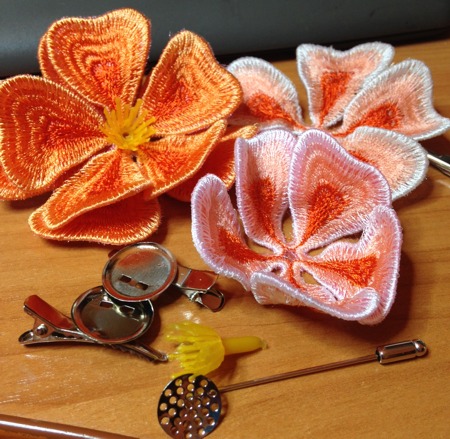
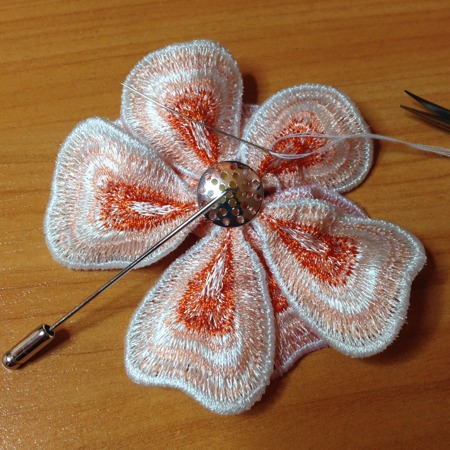
Position the smaller flower (the second design) inside the bigger one. Sew them together.
Then, depending on the base pin, either sew the flower to the pin,
Or use glue to attach it.
Enjoy!
We hope that you liked the free design and will come up with many ideas on how to use it.


