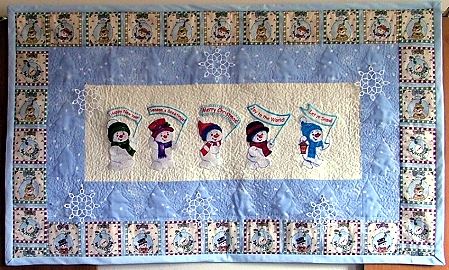
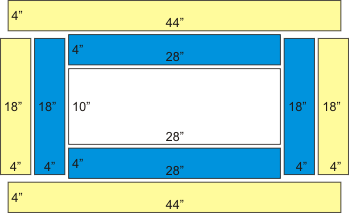
For this quilt we used three differently patterned cotton fabrics. The embroidery is made on light cream cotton measuring about 11" x 30". The final size will be 10" x 28".
For the first border, we used ice-blue cotton fabric with random white spots, which look like falling snow. The width of the first border is 4", so you'll need about 13" x 40" of fabric for the inner border.
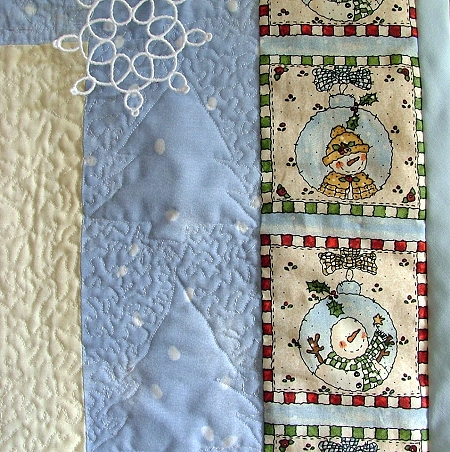
For the second border we used fabric featuring snowmen. The width is also about 4". We tried to keep the snowman pattern whole, so we took about half a yard of fabric and we were left with plenty of scraps.
Of course, the choice of fabric is up to you. We recommend to pre-wash all fabrics.You will also need 2 packs (about 150") of matching quilter's binding (we used ice blue), batting measuring about 28" x 45" and a piece of cotton fabric measuring 28" x 45" for backing.
Step One: Do the embroidery on the cream cotton fabric. You can arrange the snowmen in any order.We used Hydro-Stick tear-away stabilizer. After you finish, remove the stabilizer.


Step Two: Cut the piece to measure 10 1/4" x 28 1/4" (1/4" is for seam allowance). Press.
Step Three: Cut out the first border - 2 strips measuring 4 1/2" x 28 1/2" (these are the upper and lower borders) and 2 strips measuring 4 1/2" x 18 1/2" (these are the left and right borders). Stitch the upper and the lower borders on first, then stitch the left and the right borders on. Press the seams.
Step Four: Cut out the second border - 2 strips measuring 4 1/2" x 27 1/2" (these are right and left borders) and 2 strips measuring 4 1/2" x 44 1/2" (these are lower and upper borders). Stitch the left and the right borders on first, then stitch the upper and the lower borders on. Press the seams.
Step Five: Place the fabric for the backing on an even surface (table), cover it with the batting and then cover with the quilt top. Pin all three layers together every 3".
Step Six: Start quilting. We machine-quilted our piece with a stipling pattern around the embroidery. The first border was quilted with fir tree patterns. The second border was quilted along the straight lines of the fabric pattern and around the circles on the fabric.
Step Seven: Place your quilt on an even surface (table) and even up all the edges. Finish the edges with the quilt binding tape.
Step Eight: To the back of the quilt, attach a sleeve through which you can slide a pole.