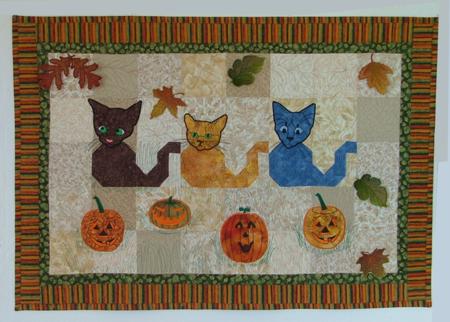
| This small Halloween-themed quilt is pretty easy to piece, even though it uses a few unconventional blocks. It's lots of fun to make for both the novice and the experienced quilter. This is a great way to use up left-over scraps. Embroidery designs used are from the Cat Applique Set, Pumpkin Applique Set and FSL Autumn Leaves Set.
|
Click to enlarge |
For the project you will need:
- cotton fabric in neutral tones (for the background)
- 1/4 yard of patterned green fabric for the first border
- 1/2 yard of patterned fabric in fall hues for the second border and the binding
- pieces of cotton fabric of different colors for the cats and pumpkins.
You will also need fabric for the backing and the batting. Use size 12/80 embroidery needle for embroidery and 12/80 quilting needle for sewing and quilting.
|
|
Cutting:
|
Out of the neutral-colored fabrics, cut
- 34 squares measuring 4 1/2" x 4 1/2"
- 18 squares measuring 1 1/2" x 1 1/2"
- 9 strips measuring 1 1/2" x 3 1/2".
Out of the fabric for the first cat (ours is brown), cut
- 1 square measuring 4 1/2"
- 2 strips measuring 1 1/2" x 2 1/2"
- 1 strip measuring 1 1/2" x 4 1/2", and
- 1 square measuring 1 1/2" x 1 1/2".
Out of the fabric for the second cat (ours is yellow), cut
- 1 square measuring 4 1/2"
- 2 strips measuring 1 1/2" x 2 1/2"
- 1 strip measuring 1 1/2" x 4 1/2", and
- 1 square measuring 1 1/2" x 1 1/2".
Out of the fabric for thethird cat (ours is a greyish blue), cut
- 1 square measuring 4 1/2"
- 2 strips measuring 1 1/2" x 2 1/2"
- 1 strip measuring 1 1/2" x 4 1/2", and
- 1 square measuring 1 1/2" x 1 1/2".
Out of green fabric, for the first border, cut
- 2 strips measuring 1 1/2" x 32 1/2" and
- 2 strips measuring 1 1/2" x 22 1/2".
Out of fabric for the second border, cut
- 2 strips measuing 2 1/2" x 34 1/2"
- 2 strips measuring 2 1/2" x 27 1/2"
- 3 strips measuring 2 1/2" and the length of the width of the fabric for the binding.
|
|
Piecing the blocks:
|
| Two blocks are used to make each cat. To piece the first block, take one of the 4 1/2" x 4 1/2" colored squares and three of the 1 1/2" x 1 1/2" neutral tone squares.
Position a 1 1/2" x 1 1/2" square in the upper left corner of a 4 1/2" x 4 1/2" colored square. Place the squares face to face. Align all sides. Sew along the diagonal as shown in the diagram below. Cut, leaving 1/4" seam allowance. Unfold the corner and press.
|

|
| Repeat with the upper right and lower left corners. Make 3 blocks with the three different colored squares. |

|
For the second block, which is the cat's tail, use all the strips and small squares.
Position a 1 1/2" x 2 1/2" colored strip on the left end of the 1 1/2" x 3 1/2" neutral strip, face to face, as shown in the diagram below. Sew along the diagonal. Cut, leaving 1/4" seam allowance. Unfold the new strip and press. |

|
| Now repeat the last step with another 1 1/2" x 2 1/2" colored strip and 1 1/2" x 3 1/2" neutral strip, but in mirror image, as shown below: |

|
| Position a 1 1/2" x 1 1/2" neutral square on the end of the 1 1/2" x 4 1/2" colored strip, face to face, as shown in the diagram below. Sew along the diagonal. Position another 1 1/2" x 1 1/2" neutral square on the other of the 1 1/2" x 4 1/2" colored strip, face to face, as shown in the diagram below. Sew along the diagonal.
Cut, leaving 1/4" seam allowance. Unfold the new strip and press.
|

|
| Sew the 1 1/2" x 1 1/2" colored square and 1 1/2" x 3 1/2" neutral strip. Press. |

|
| Assemble the block out of 4 new strips as shown: |

|
|
Top Assembly:
|
| Using the blocks and two 4 1/2" x 4 1/2" neutral squares assemble the central row of the quilt: |

|
| Out of neutral 4 1/2" x 4 1/2" sew four rows of the quilt, eight squares in each row: |

|
| Sew the rows together: |

|
| Sew the green strips (1 1/2" x 32 1/2") to the upper and lower edges of the quilt. Then sew the green strips (1 1/2" x 22 1/2") to the left and right edges of the quilt. |

|
| Sew the strips of the second border (2 1/2" x 34 1/2") to the upper and lower edges, then sew the strips of the second border (2 1/2" x 27 1/2") to the left and right edges of the quilt. |

|
|
Embroidery:
|
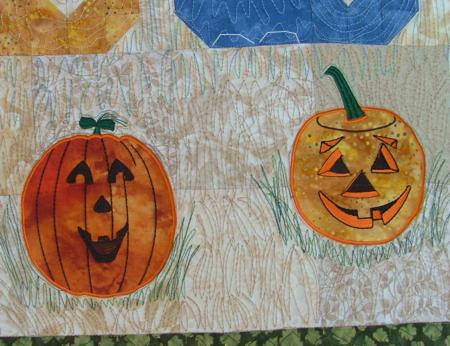
We used the Cat Applique Set and Pumpkin Applique Set.
Using your embroidery software, print out the screenshots of the designs. Cut them out and use as templates to determine the position of the applique. |

|
| Make the applique using the instructions from the sets. First embroider the cats' heads. Then embroider the pumpkins. |
| Embroider the freestanding leaves as recommended in the instructions for embroidering freestanding lace ornaments. |
|
Quilting and Finishing
|
| Now place the backing on a flat surface (table) face down. Cover with batting. Spread your working piece over it. Pin all three layers together with 1" pins and start quilting. We quilted in a free-motion style.
After the quilting is finished, press the work with heavy steam and square the work -- all corners should be 90 degrees and opposite sides should be of the same length.
Finish the raw edges with the binding.
|
| Embellish the quilt top with the freestanding leaves. |
|
|
|
Happy Stitching!
|
|

|

|

|

|
|
Back to Cat Applique Set
|
|
Back to Pumpkin Applique Set
|
|
Back to Projects Page
|


