Mobile Menu IconMenu
Advanced Embroidery Designs -- Online Center for Machine Embroidery Designs
Earth Day Sale! 40% off Floral, Landscapes, Redwork Flowers and Seasons!

Spring Tablerunner with Redwork Embroidery

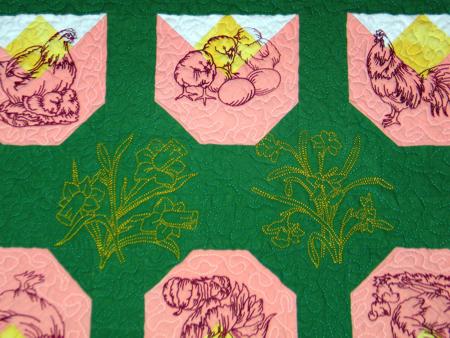
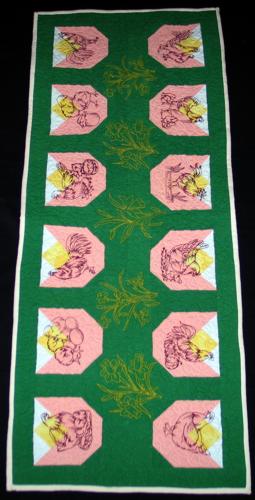
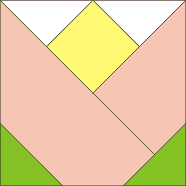
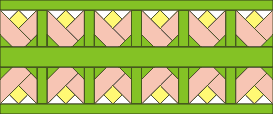
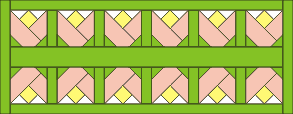
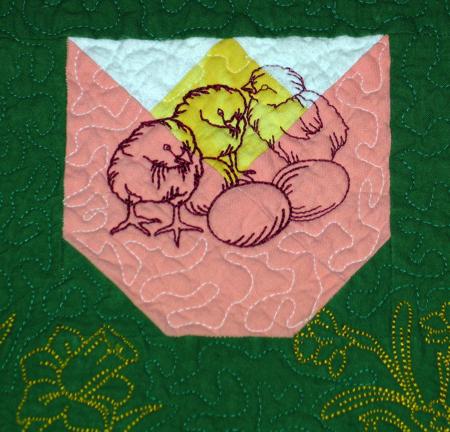
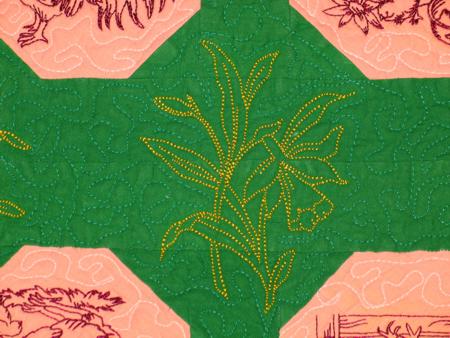
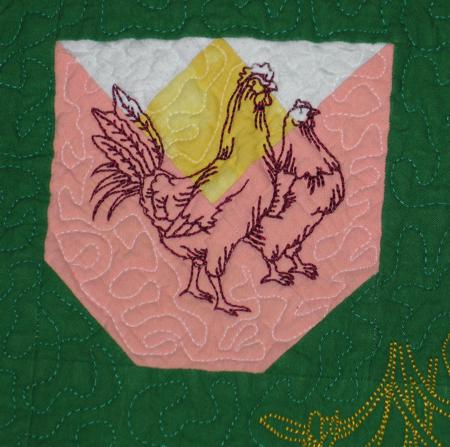
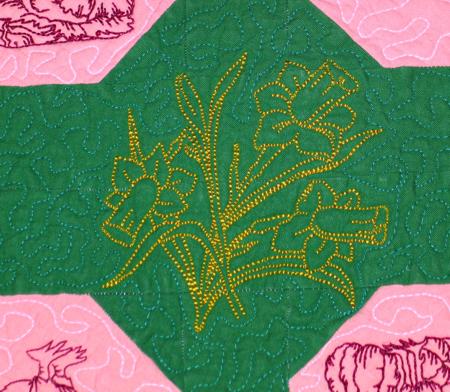
This quilted table runner features a cheery Spring theme: the pink quilted blocks represent the heads of tulips; on top of them, we embroidered hens and chicks; in the green grassy space in the middle, we embroidered daffodils, which are just starting to come up.

We used designs from two redwork sets - Rooster and Hen Set and Daffodil Set.

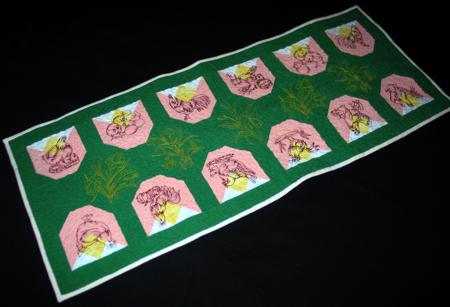
The finished size of the tablerunner is about 20" x 50".

Spring Tablerunner with Redwork Embroidery image 1

You will need: scraps of white and yellow fabrics, 1/4 yard of pink fabric and 1/2 yard of green fabric.

You will also need low loft batting or polyester craft felt for batting, fabric for backing and binding.

For embroidery, we used embroidery polyester threads.

Cutting:

Out of pink fabric, cut

  • 12 squares measuring 6 5/8" x 6 5/8"; cut them along the diagonal to get 24 triangles.


Out of yellow fabric, cut

  • 12 squares measuring 2 5/8" x 2 5/8";


Out of white fabric, cut

  • 12 squares measuring 2 5/8" x 2 5/8" ; cut them along the diagonal to make 24 triangles.


Out of green fabric cut

  • 24 squares measuring 2 1/2" x 2 1/2";
  • 4 strips measuring 2 1/2" and the length of the width of the fabric. Subcut the strips into:
    • 10 strips measuring 2 1/2" x 6 1/2",
    • 2 strips measuring 2 1/2" x 20 1/2",
    • 2 strips measuring 2 1/2" x 46 1/2";
  • 1 strip measuring 4 1/2" x 46 1/2"

Assembling the Block

Sew white triangles to two sides of the yellow square. Make 12 units.

Spring Tablerunner with Redwork Embroidery image 2

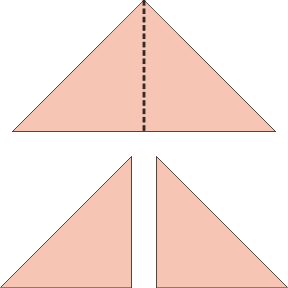
Take 6 pink triangles and cut each of them in 2, to get 12 smaller triangles.

Spring Tablerunner with Redwork Embroidery image 3

Sew the small pink triangle to the white-yellow triangle. Make 12 units.

Spring Tablerunner with Redwork Embroidery image 4

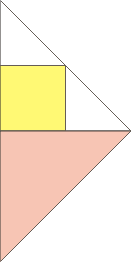
Sew the units to the large pink triangles. Make 12 squares.

Spring Tablerunner with Redwork Embroidery image 5

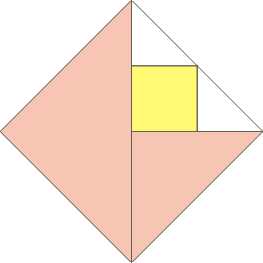
Rotate the working piece until the yellow-and-white triangle is at the top. Place a green 2 1/2" square onto the lower left corner of the square, face down. Draw a diagonal.

Spring Tablerunner with Redwork Embroidery image 6

Stitch along the diagonal. Cut away the corner with 1/4" seam allowance. Unfold the green corner and press.

Spring Tablerunner with Redwork Embroidery image 7

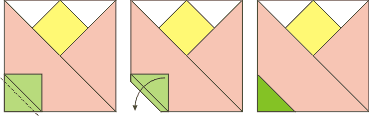
Repeat for the lower right corner.

Spring Tablerunner with Redwork Embroidery image 8

Make 12 blocks total.

Assembling the Top

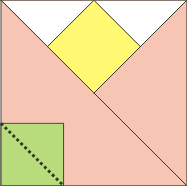
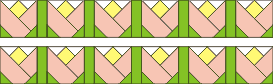
Using the blocks and the 2 1/2" x 6 1/2" green strips, sew them into 2 rows:

Spring Tablerunner with Redwork Embroidery image 9

Sew the 4 1/2" x 46 1/2" green strip between the rows.

Spring Tablerunner with Redwork Embroidery image 10

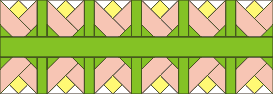
Sew the 2 1/2" x 46 1/2" green strips to the long edges of the working piece.

Spring Tablerunner with Redwork Embroidery image 11

Sew the 2 1/2" x 20 1/2" green strips to the short edges of the working piece.

Spring Tablerunner with Redwork Embroidery image 12

Embroidery

Press the top and place it over a piece of polyester craft felt. The felt piece should be slightly larger than the top. Baste the quilt top to the felt along the green stripes. After the embroidery is finished, rip the baste.

Embroider one block at a time. Embroider designs from the Rooster and Hen Set on the blocks and the Daffodil designs on the wide green stripe.

Spring Tablerunner with Redwork Embroidery image 13

Spring Tablerunner with Redwork Embroidery image 14

Spring Tablerunner with Redwork Embroidery image 15

Spring Tablerunner with Redwork Embroidery image 16

Quilting:

Now place the backing on a flat surface (table) face down. Spread your working piece (top with batting) over it.

Pin all three layers together with 1" pins and start quilting. We quilted in a free motion style all over the tablerunner.

After the quilting is finished, press the work with heavy steam and square the work -- all corners should be 90 degrees and opposite sides should be of the same length.

Finish the raw edges with the binding.

Spring Tablerunner with Redwork Embroidery image 17

The table runner is ready. Enjoy!

Spring Tablerunner with Redwork Embroidery image 18

Happy Stitching!

Back to Projects Page

Back to Rooster and Hen Redwork Set

Back to Daffodil Redwork Set

Mailing List
Enter your e-mail for news, discounts and exclusive special offers.


Find us on Twitter

Special Offers
Bonus design on all orders over $30
Ivy Vine Border Set

Shop Now!

Announcement
Best Project Contest
The results are in!
Featured Project
Check out our latest project Birds and Blooms Quilted Tablerunner
Tutorials
Never heard of photo stitch? - Check out our What is Photo Stitch? page
Most Popular Designs
|| Home || Shop || Free Designs || New Designs ||
|| Projects || Tutorials || Links || About Us || Contact Us ||
|| Store Policy || Licensing || Accessibility ||

Social Media:

Copyright © Advanced Embroidery Designs. All Rights Reserved.