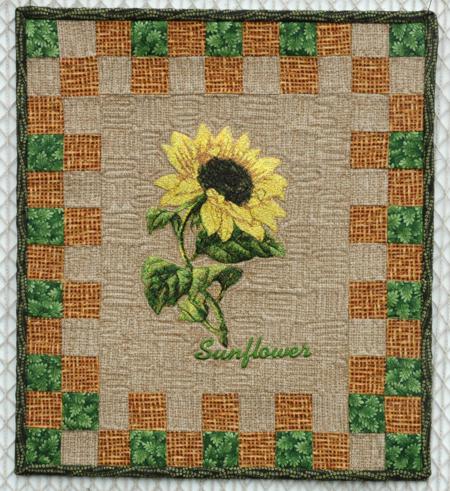
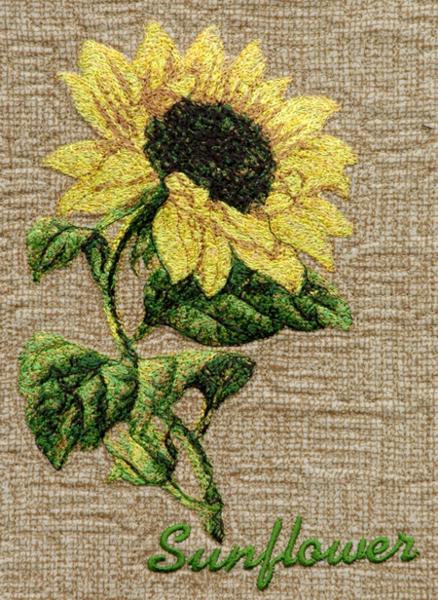
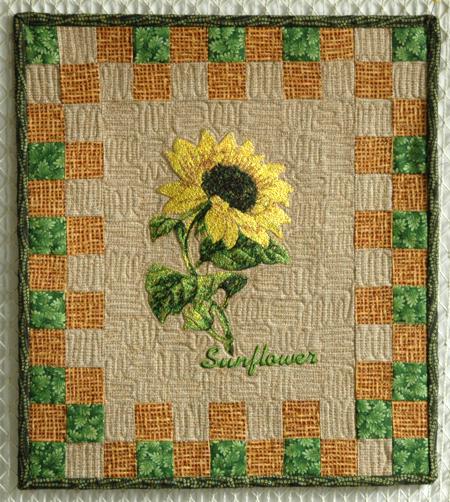
| Small, simple quilts featuring just one design make a great decorative seasonal accent for your home. At the same time, they're quick and easy to make. We made several of these quilts using the designs California Blue Bells, Columbine and Fuchsia. In this tutorial, we describe one that features the Sunflower design in the photo-stitch technique.
The finished size of the quilt is about 11 1/2" x 13".
|
|
| For the quilt you will need about 1/4 yard of pale beige fabric, and scraps of green and brown fabrics. You will also need batting or polyester craft felt and the fabric for backing and binding. |
|
Cutting:
|
Out of pale beige fabric, cut
- a rectangle measuring 7 1/2" x 8 1/2",
- a strip measuring 1 1/2" x 27", and
- 4 squares measuring 1 1/2" x 1 1/2";
out of golden brown fabric, cut
- a strip measuring 1 1/2" x 27" and
- a strip measuring 1 1/2" x 24" ;
out of green fabric, cut
- a strip measuring 1 1/2" x 24" and
- 4 squares measuring 2 1/2" x 2 1/2".
|
|
Sewing and Assembly:
|
| Take the 27" beige strip and the 27" brown strip. Place them face to face and stitch them together along one long edge. Press the seam. Open the new strip. |

|
| Subcut the new strip into 18 small brown-beige strips 1 1/2" wide. |

|
| Take the 24" brown strip and the 24" green strip. Place them face to face and sew along one long edge. Press the seam. Open the new strip. |

|
| Sunbcut the strip into 16 small brown-green strips 1 1/2" wide. |

|
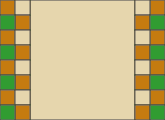
| To make the left border, sew 4 beige-brown and 4 green-brown strips into a new strip: start with a beige-brown strip and finish with a green-brown strip. All beige squares should be on the right, and all green squares on the left. |

|
| The right border is a mirror image of the left border. All the beige squares should be on the left, and all green squares on the right. |

|
| Sew the left border to the left edge of the central rectangle. Sew the right border to the right edge of the central rectangle. |
|
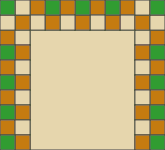
| To assemble the upper border, sew together 4 beige-brown strips and 3 green-brown strips. Start and finish with the beige-brown strips. All beige squares should be on the bottom, and all green squares should be at the top. |

|
| Sew a beige-brown strip to each end of the upper border, with the beige square up and the brown square down. |

|
| Sew the 1 1/2" green and beige squares to get 4 strips. |

|
| Sew a green-beige strip to each end end of the upper border, green squares up. |

|
| Sew the upper border to the upper edge of the block. |
|
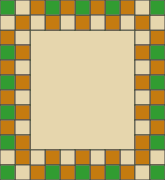
| The lower border is identical to the upper border, except you have to turn it around so the green squares point down. |

|
| Sew the lower border to the working piece. |
|
|
Embroidery:
|
| Cut a piece of polyester craft felt measuring about 13" x 15". Place the quilt top on the piece of felt. It will work as both a stabilizer and batting for the quilt. Embroider the Sunflower in the center of the quilt. If you do not like to use felt as a stabilizer, stabilize the fabric with your favorite cut-away or tear away stabilizer.
|
|
|
Quilting and Finishing:
|
| Now place the backing on a flat surface (table) face down. Spread your working piece over it. If you did not use felt for embroidery, cover the backing with batting and then with the quilt top. Pin all three layers together with 1" pins. We quilted around the embroidery and all over the quilt in a free-motion style. Remove the pins while quilting.
Press the work with heavy steam and square the work -- all corners should be 90 degrees and opposite sides should be of the same length.
Finish the raw edges with binding.
|
|
|
Enjoy!
|
|
Happy Stitching!
|
|
Back to Sunflower
|
|
Back to Projects Page
|


