Mobile Menu IconMenu
Advanced Embroidery Designs -- Online Center for Machine Embroidery Designs
Earth Day Sale! 40% off Floral, Landscapes, Redwork Flowers and Seasons!

Quilted Rose Cushions

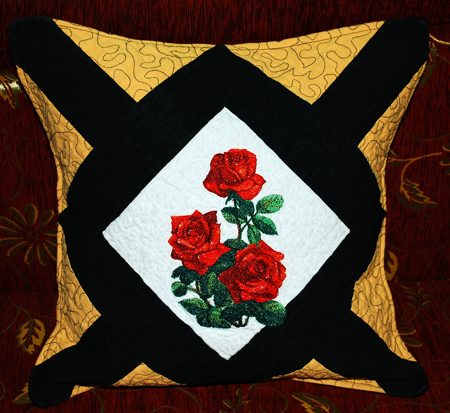
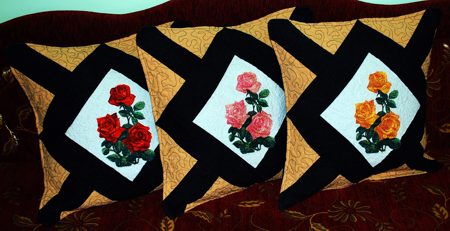
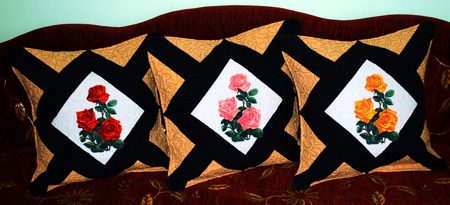
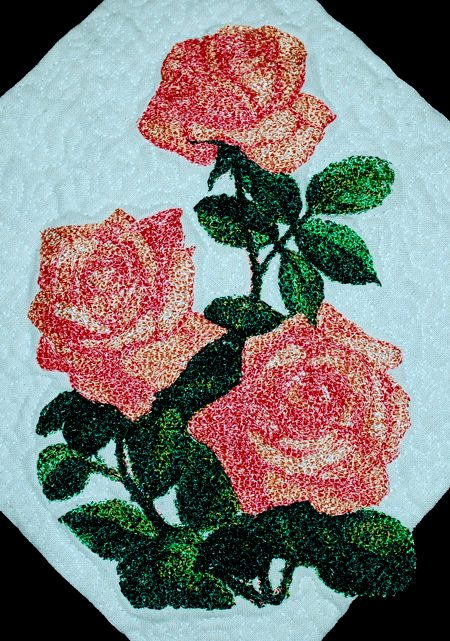
For this charming set of matching cushions we used the design Three Roses with 3 color cards.

The finished size of each cushion is about 22" x 22".


Quilted Rose Cushions image 1

Besides embroidery threads (either polyester or rayon), you will need polyester craft felt, which works as stabilizer and batting.

For each cushion, you will need:

  • about 9" x 9" of silver white fabric (you can use scraps)
  • a half-yard of black fabric (this will also be used for binding and backing) and
  • about 11" x 11" of golden fabric.
You will also need either a 20" x 20" pillow form or polyester stuffing.

Cutting:

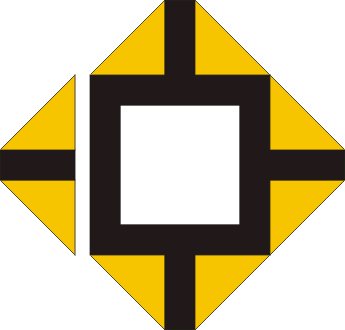
Out of silver white fabric, cut a square measuring 8 1/2" x 8 1/2".

Out of black fabric,

  • cut a strip 2 1/2" wide and the length of the width of the fabric. Subcut the strip into following pieces:
    • 2 strips measuring 2 1/2" x 8 1/2",
    • 2 strips measuring 2 1/2" x 12 1/2";
    • 4 strips measuring 2 1/2" x 5 1/2",
  • 1 square measuring 23" x 23" ( for the back of the pillow).
  • for the binding, cut 2-3 strips 2 1/2" wide and the length of the width of the fabric.
Out of golden yellow fabric, cut 4 squares measuring 5 1/2" x 5 1/2". Draw a diagonal across each square and cut it in half along this line. You will have a total of 8 triangles.

Out of polyester felt, cut 2 squares measuring 23" x 23".

Assembly:

Sew the black 2 1/2" x 8 1/2" strips to the upper and lower edges of the silver-white square.

Quilted Rose Cushions Step 1

Sew the black 2 1/2" x 12 1/2" strips to the left and right edges of the working piece.

Quilted Rose Cushions Step 2

Sew two golden triangles to the left and right edges of the 2 1/2" x 5 1/2" strip. Repeat with the remaining triangles and strips. You will get 4 parts like this:

Quilted Rose Cushions Step 3

Sew the parts to the central piece one by one.

Quilted Rose Cushions Step 4

Embroidery:

Place the top on the felt square. Smooth the fabric with hands - the felt will cling to the fabric. Mark the position of the roses inside the silver square. Hoop both layers and embroider design of the Three Roses in any color choice:

Quilted Rose Cushions image 2

Quilted Rose Cushions image 3

Quilted Rose Cushions image 4

Quilting and Finishing:

We quilted 2 layers (embroidered top and the polyester craft felt backing) without backing. We quilted in a free-motion style.

When you are done with the front panel of the pillow, take the other piece of felt and the black square. Spread the felt on your working table, cover with the fabric. Smooth the fabric, so the felt clings to the fabric. Quilt the 2 layers in a free-motion style.

Press both quilted pieces with steam. Square both pieces and check that they are of the same size.

Place the back panel face down, and cover with the front panel face up. Align all edges. Pin them together. Sew them together along the edges with seam allowance 1/4". Leave an opening about 10" long.

Through the opening insert a pillow form.

Sew the opening closed.

Finish the raw edges with the binding. The pillow is ready.

Quilted Rose Cushions image 5

Enjoy!

Quilted Rose Cushions image 6

Happy Stitching!

Back to Three Roses

Back to Projects Page

Mailing List
Enter your e-mail for news, discounts and exclusive special offers.


Find us on Twitter

Special Offers
Bonus design on all orders over $30
Ivy Vine Border Set

Shop Now!

Announcement
Best Project Contest
The results are in!
Featured Project
Check out our latest project Birds and Blooms Quilted Tablerunner
Tutorials
Never heard of photo stitch? - Check out our What is Photo Stitch? page
Most Popular Designs
|| Home || Shop || Free Designs || New Designs ||
|| Projects || Tutorials || Links || About Us || Contact Us ||
|| Store Policy || Licensing || Accessibility ||

Social Media:

Copyright © Advanced Embroidery Designs. All Rights Reserved.