You will need a fat quarter of fabric, light-weight tear-away stabilizer, embroidery and sewing threads, an elastic tape for the belt and a narrow satin ribbon (optional).
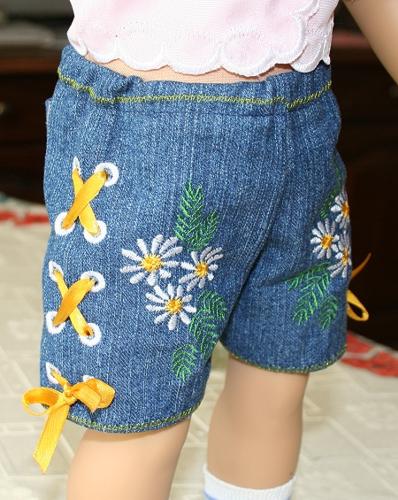
Step One: Hoop the fabric with light-weight tear away stabilizer. Embroider the files ShortsFrontR and ShortsFrontL. Remove the stabilizer. Cut the parts out close to the outline along the sides and inseam, but leaving 1" seam allowance along the hem and waist line.
With a punch or awl make holes inside the embroidered eyelets.
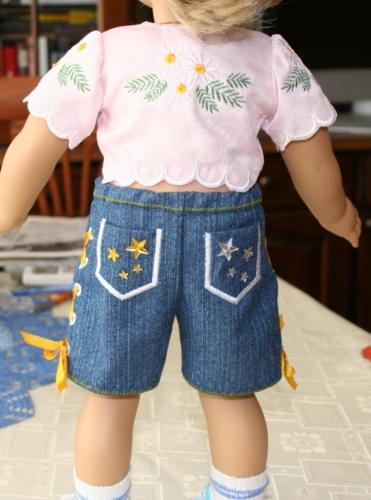
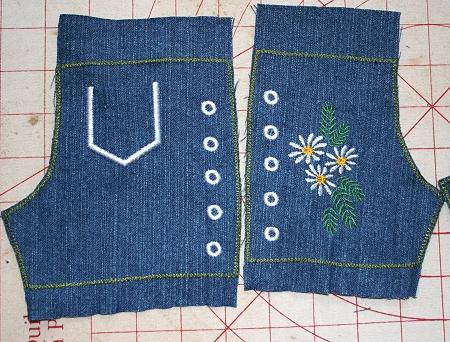
Step Two: Hoop the fabric with light-weight tear away stabilizer. Embroider the files ShortsBackR and ShortsBackL.
First, the machine will embroider the outline of the part.
Then, tt will embroider the outline of the pocket and stop.
Take a scrap of fabric, fold and press the upper edge. Cover the pocket outline with this scrap.
Return the hoop to the machine and start it. The machine will make the outline of the pocket again. Take the hoop out and cut the excess fabric away as close to the outline as possible.
Return the hoop to the machine and finish the pocket. The machine will embroider the eyelets.
Step Three: Remove the stabilizer. Cut the parts out close to the outline along the sides and inseam, but leaving 1" seam allowance along the hem and waist line.
With a punch or awl make holes inside the embroidered eyelets.
Step One: Join the the two left parts along the sides with the eyelets. The seam allowance is 1/8". Press the seams open.
Repeat for the two right parts.
Step Two: Finish the hem on each half of the shorts. Fold the fabric back along the zig-zag line, press, then either stitch in place, or use a fusible web to "glue" in place.
Step Three: Fold each half, right side inwards. Join the inseams on each half of the shorts.
Step Four: To join the two halves of the shorts, turn one half right side out. Place the right-side-out half into the wrong-side-out half.
Now match the raw edges and join the halves with a straight stitch.
Turn the shorts right side out.
Step Five: Turn the upper edge of the shorts inside and stitch in place, leaving an opening for the elastic tape. Insert the elastic tape, join the ends and slip-stitch the opening.
Step Six: Thread a ribbon through the eyelets, and lace and tie the ends. Add embellishments to the pockets, if you wish. We used hot-fix stars.