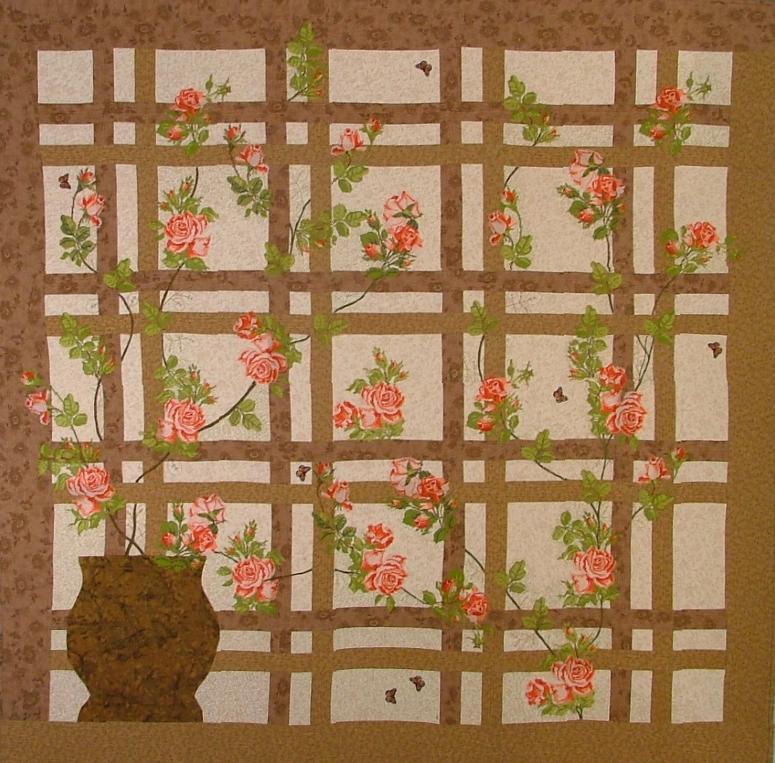
This quilt was a semi-finalist of the 23rd Annual Quilt Show and Contest in Paducah, Kentucky. You can find this quilt in the show's catalog, page 92. The finished size of this wall quilt is 53" x 52 1/2".
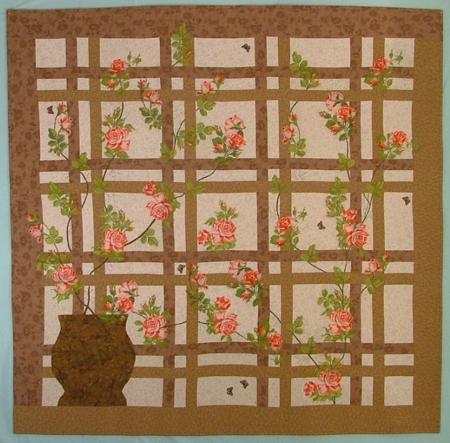
The top of the quilt is pieced and embellished with embroidery. The embroidery designs used are from the Garden of Roses Set.
You will need 1 yard of pale blue or light cream fabric for the background (we used light cream), 1 yard of medium brown fabric and 1 yard of light brown fabric for the lattice and borders, about 1 fat quarter of terra-cotta or dark brown fabric for the appliqué of the flower pot. You will also need batting and backing. For the embroidery, you will need embroidery threads and low-loft DreamPoly batting, which we used as stabilizer.
You might also need brown and dark green satin ribbons for stems.
All measurements are based on 40" wide fabric and 1/4" seam allowance.
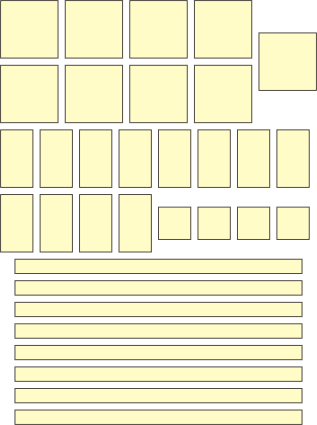
Out of cream (background) fabric, cut:
1. nine squares measuring 8" x 8";
2. twelve rectangles measuring 8" x 4 1/2";
3. four squares measuring 4 1/2" x 4 1/2";
4. eight strips measuring 2" x 40" (cut along the width of the fabric).
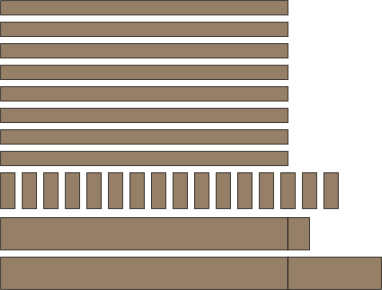
Out of medium brown fabric, cut ten strips 2" wide along the width of the fabric. You should get 10 strips measuring 2" x 40".
Sub-cut 2 of the strips into 16 strips 5" long.
For the borders, you will need one strip measuring 4 1/2" x 43" and one strip measuring 4 1/2" x 53". Cut 3 strips 4 1/2" wide along the width of the fabric, stitch the strips together, then cut out a piece 57" long and a piece 48 1/2" long.
You will also need to piece a strip measuring 2 1/2" x 110" for binding out of the medium brown fabric.
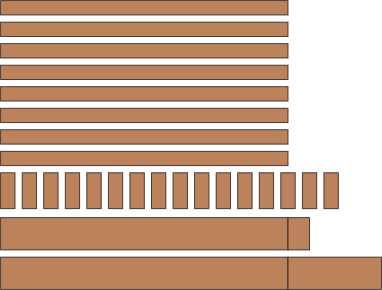
Out of light brown fabric, cut the same parts as described for the medium brown fabric. You should end up with 8 strips measuring 2" x 40", 16 strips measuring 2" x 5", one strip measuring 4 1/2" x 48 1/2", one strip measuring 4 1/2" x 57" and a strip 2 1/2" x 110" for binding.
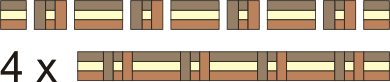
Step One: Take eight 2" x 40" strips of each color and stitch them together along the long edges, to get eight three-color strips 5" wide.
Step Two: Sub-cut the three-color strips into the following parts:
24 pieces 8" wide (A), 16 pieces 4 1/2" wide (B) and 16 pieces 2" wide (C).

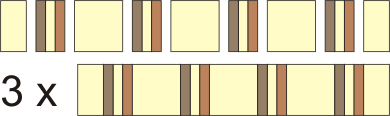
Step Three: Take the 16 2" x 5" strips of light brown fabric and 16 2" x 5" strips of medium brown fabric, and attach them to the 16 2" x 5" C strips to make 16 5" x 5" squares. See the diagram below.

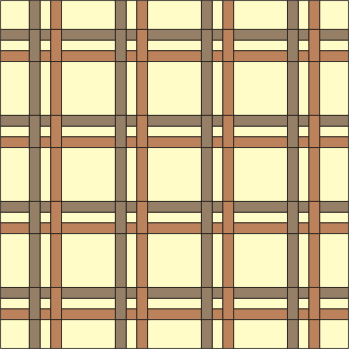
Step Four: To assemble the first and the ninth rows of the quilt, join the following parts in the following order:
4 1/2" x 4 1/2" cream square - 4 1/2" x 5" three-color B strip - 4 1/2" x 8" cream rectangle - 4 1/2" x 5" three-color B strip - 4 1/2" x 8" cream rectangle - 4 1/2" x 5" three-color B strip - 4 1/2" x 8" cream rectangle - 4 1/2" x 5" three-color B strip - 4 1/2" x 4 1/2" cream square.
Note: It's important that the medium brown strip in the three-color rectangles is always on the left.

Step Five: To assemble all the even rows (the 2nd, 4th, 6th and 8th), join the following parts in the following order:
4 1/2" x 5" three-color B strip - 5" x 5" three-color square - 8" x 5" three-color A strip - 5" x 5" three-color square - 8" x 5" three-color A strip - 5" x 5" three-color square - 8" x 5" three-color A strip - 5" x 5" three-color square - 4 1/2" x 5" three-color B strip.
Note: Keep the medium brown strip in the three-color strips on the top. Keep the medium brown strip in the 5" x 5" squares to the left.
Step Six: To assemble the 3rd, 5th and the 7th rows, join the following parts in the following order:
8" x 4 1/2" cream rectangle - 8" x 5" three-color A strip - 8" x 8" cream square - 8" x 5" three-color A strip - 8" x 8" cream square - 8" x 5" three-color A strip - 8" x 8" cream square - 8" x 5" three-color A strip - 8" x 4 1/2" cream rectangle.
Note: The medium brown strip in the three-colors strips should be on the left.
Step Seven: Join the rows.
Step Eight: Attach the borders. First attach the medium brown 4 1/2" x 43" strip to the left of the quilt top, and the light brown 4 1/2" x 43" strip to the right of the quilt top. Then attach 4 1/2" x 53" strips, the darker strip to the top and the lighter strip to the bottom.
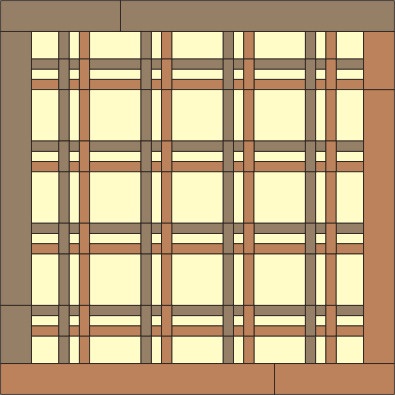
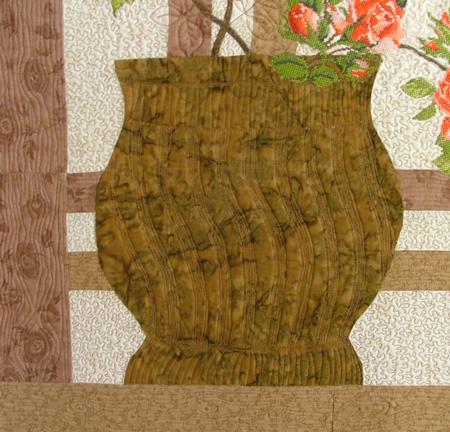
On a piece of freezer paper draw a flower pot measuring about 10" x 11". Cut the template out. Place on the wrong side of the dark brown fabric. Press. Cut the pot out with a seam allowance of 1/4". Fold and press the seam allowances over the freezer paper. Withdraw the freezer paper from the pot shape. Place the pot appliqué in the lower left corner of the quilt top. Pin. Slipstitch in place.
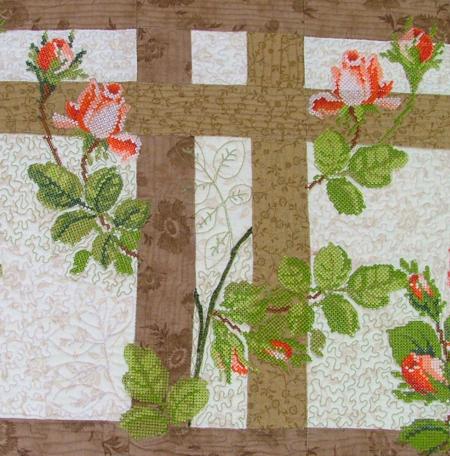
Now the top is ready for embroidery.
From your embroidery software, print out screenshots of the designs. Use them to decide where exactly you would like to place the embroidery. When you are satisfied, pin the paper templates to the top.
Hoop the top with craft felt or low-loft DreamPoly batting. It will work as a stabilizer. Tighten the hoop. Note that cross-stitch designs are very dense and pull the fabric a lot harder than other designs. If you do not tighten the hoop enough, you can ruin the embroidery. Embroider the designs one by one. With sharp scissors cut away the excess felt as close to the embroidery as possible after each design.
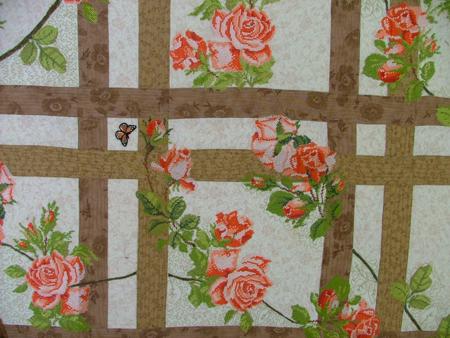
Step Seven: After the embroidery is finished, press the top, add the stems between the roses to make the vines. You can either embroider the stems or topstitch narrow ribbons to the quilt.
Add the batting and backing to the quilt top, pin all three layers together and start quilting. Quilt with matching threads starting from the center. Here are some close-ups of the quilting.
Press the quilt with steam. Square. Join the light brown and medium brown strips for binding. Finish the raw edges attaching the light part of the binding to the light borders and the darker part of the binding to the darker borders.
We hope that you liked our idea and will come up with many of your own.


