Our summer bag features the design of Chinese Peony embroidered twice. A mirror image was used for the second embroidery.
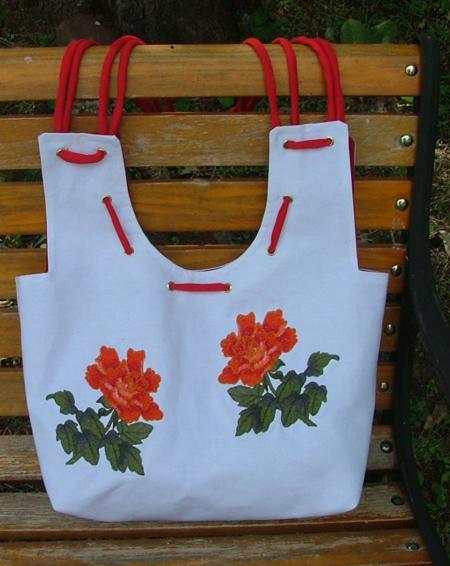
The finished size of the bag is about 12" x 16" x 4".
You will need 1/2 yard of white canvas fabric for the outer bag, 1/2 yard of red cotton fabric for the lining. You will also need 14 brass grommets of 5/16" size, iron-on sewing interfacing, and 3 yards of red cord for the handles. If you cannot find red cord, you can use 3 yard of white drapery cord wrapped with red bias tape.
Make a paper pattern based on the diagram below. Start with a square measuring 18" x 18". Cut out two 2" x 2" squares in the lower corners. Then cut two 2" x 5" rectangles in the upper corners. In the center of the upper edge, cut an elliptical shape 6" wide and 5" deep.
Fold a piece of canvas in half widthwise. Lightly press the fold line to mark the center of the bag's bottom. Pin the paper pattern over the folded fabric. Trace the pattern onto the fabric. Do not cut out yet. Unfold the fabric.
Mark the position of the embroidery and make the embroidery. Use any iron-on stabilizer.
When the embroidery is finished, fold the fabric in half again, using the crease you had created earlier. Pin the two layers together so they do not shift. Cut the pattern out according to the marked lines.

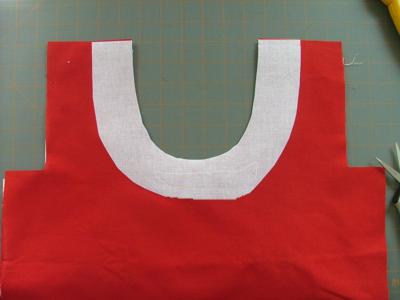
Fold the fabric for the lining widthwise in half, face inwards. Use the same paper pattern. Pin the pattern over the fabric. Trace the upper part of the pattern onto the fabric. Do not trace the two 2" x 2" squares from the bottom part. Instead, make the bottom line 1" longer than the pattern. Cut out the lining.
Out of iron-on sewing interfacing, cut out a U-shape to reinforce the elliptical opening of the lining. Attach according to the manufacturer's instructions.
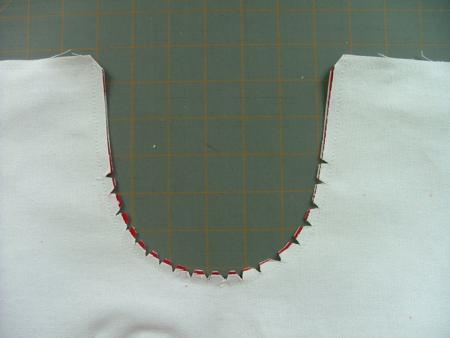
Place one half of the lining on top of the front panel of the bag, face to face. Sew together the "shoulders" and the U-shape opening. The seam allowance is about 1/2".
Press. With sharp scissors, clip the curve every 1/2". Cut away the corners.
Turn right side out and press with steam.
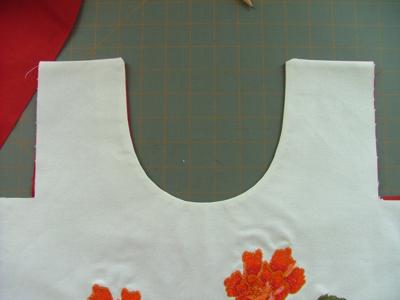
Turn inside out again. Stitch the upper corners of the bag. The seam should end about 1/2" from the edge, as shown in the diagram below. Turn the bag right side out and press with steam.
Repeat for the second half of the lining and back panel of the bag.
Fold the lining upwards, place the outer panels of the bag face to face and stitch together their sides. Then, align the edges of the two parts of the lining and stitch together their sides. See the diagram below.
Now pinch the corners as shown in the diagram below. Pin. Stitch them closed. The seam allowance should be 1/2".
Turn the entire bag right side out through the opening in the bottom of the lining.
Fold the raw edges of the lining bottom 1/2" inside. Press. Either slipstitch by hand or machine-stitch the opening.
Make box corners at the bottom of the lining. For this, separate the front and back sides at the corners. Center the side seam on each side of the corner on top of each other. Measure 2" along the seam from the corner and machine-stitch perpendicular to the seam across the corner. Do not trim the seam. Fold it onto the bottom and attach with several manual stitches. Repeat for the second corner. See the diagram below.
Tuck the lining inside the bag.
Mark the placement of the grommets and attach them according to the manufacturer's instructions.
To decorate the front of the bag, take about 16" of the red cord and thread it through the lower 6 grommets. Tie knots in the ends of the cord to keep it in place. To make the handles, take the remainder of the cord and cut it in two. Each piece should measure 45-48". Thread one length of cord through the top 4 grommets of the front and the other length of cord through the 4 grommets of the back. Tie or sew the ends of the cord to keep it in place.

We hope that you liked our idea and will come up with many of your own.


