
This beautiful, one-of-a-kind tote is an instant eye-catcher. Using different combinations of colors, you can match the tote to any outfit. It also makes an excellent gift that is sure to be appreciated by your friends or family.
For it, we used the redwork designs from the Spring Garden Set, but you can use any other redwork flower set from our vast collection.
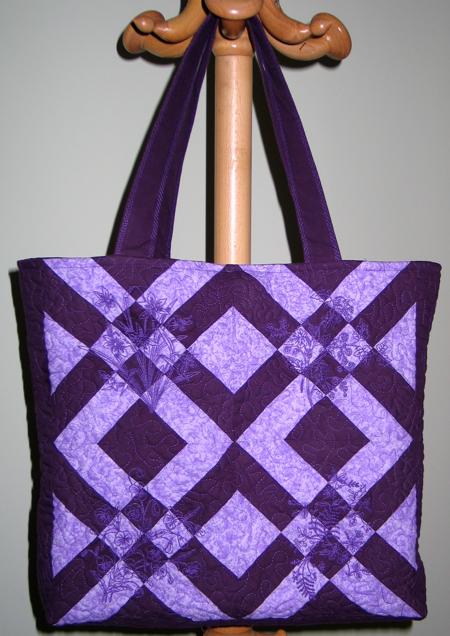
The finished size of the tote is about 11" x 11" x 4".
For the project, you will need a light and a dark fabric. For the light fabric, we used lilac, and for the dark fabric, we used purple.
You will also need fabric for the lining, iron-on sewing intefacing, webbing for handles (we used purple webbing) and low-loft batting. The optional accessories are 7" zippers for the inner pockets (you can use Velcro tape instead), and a magnet snap.
All measurements are based on 40" wide fabric. 1/4" seam allowances are included.
Out of purple fabric, cut 3 strips 1 1/2" wide and the length of the width of the fabric. Subcut the strips into:
16 squares measuring 1 1/2" x 1 1/2";
8 strips measuring 1 1/2" x 2 1/2" and
24 strips measuring 1 1/2" x 3 1/2".
Also cut:
12 squares measuring 2 1/2" x 2 1/2"
one strip measuring 4 1/2" x 17"
4 strips 3" x 11 1/2" and
2 strips measuring 3" x 17".
Out of lilac fabric, cut 12 squares measuring 2 1/2" x 2 1/2" and 3 strips 1 1/2" wide and the length of the width of the fabric. Subcut the strips into:
16 squares measuring 1 1/2" x 1 1/2";
8 strips measuirng 1 1/2" x 2 1/2" and
24 strips measuring 1 1/2" x 3 1/2".
Using one 2 1/2" x 2 1/2" purple square, two 1 1/2" x 1 1/2" purple squares, two 1 1/2" x 2 1/2" lilac strips and two 1 1/2" x 3 1/2" lilac strips, assemble one block as shown below:
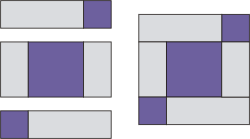
Assemble another block identical to the first.

Using one 2 1/2" x 2 1/2" lilac square, two 1 1/2" x 1 1/2" lilac squares, two 1 1/2" x 2 1/2" purple strips and two 1 1/2" x 3 1/2" purple strips, assemble the second block as shown below:
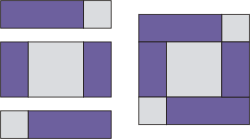
Assemble another identical block.

Stitch the blocks together into two rows. Start the first row start with the lilac block and the second row with the purple block.
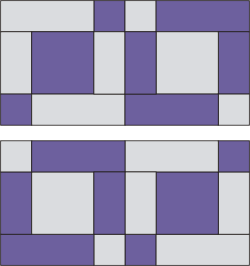
Stitch the rows together and put them aside for a while.
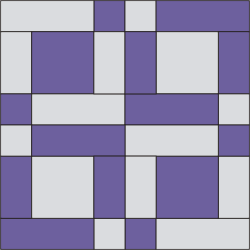
Using one 2 1/2" x 2 1/2" lilac square, one 2 1/2" x 2 1/2" purple square, one 1 1/2" x 1 1/2" lilac square, one 1 1/2" x 1 1/2" purple square, two 1 1/2" x 3 1/2" purple strips and two 1 1/2" x 3 1/2" lilac strips, assemble the unit shown below:

Assemble another unit identical to this.
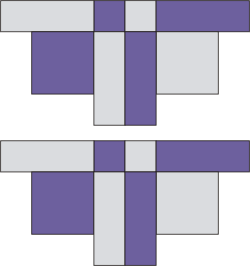
Attach the units to the top and bottom edges of the working piece.

Using one 2 1/2" x 2 1/2" lilac square, one 2 1/2" x 2 1/2" purple square, one 1 1/2" x 1 1/2" lilac square, one 1 1/2" x 1 1/2" purple square, two 1 1/2" x 3 1/2" purple strips and two 1 1/2" x 3 1/2" lilac strips, assemble the unit shown below:

Assemble another unit identical to this.
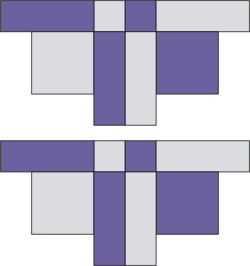
Attach the units to the left and right edges of the working piece.

Place the working piece on the cutting table. Using a ruler and rotary cutter, cut along the diagonal of the squares as shown. You will get a square measuring about 11 1/2" x 11 1/2".

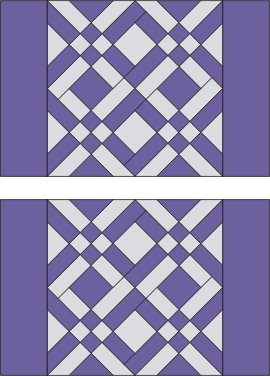
Stitch the 3" x 11 1/2" purple strips to the left and right edges of the panel.
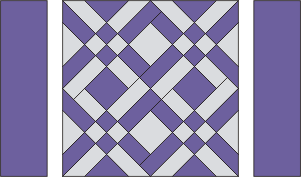
Make the second panel in the same way.
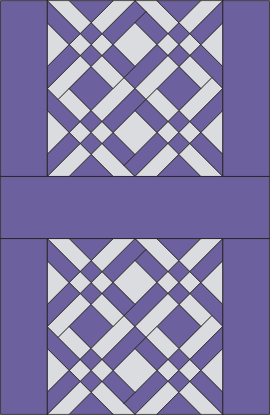
Stitch the 4 1/2" x 17" purple strip between the 2 panels.
Place the top over a piece of low-loft backing. Quilt all over the top with free motion wide meandering. Press with heavy steam when finished.
Hoop the top and make the embroidery. You do not need any additional stabilizer.
Cut away (with a rotary cutter) the excess backing. Press again.

Now fold the bag's top in half lengthwise, face inwards. Align all raw edges. Pin them together. Stitch the side seams twice - about 1/4" and about 3/8" from the edge.
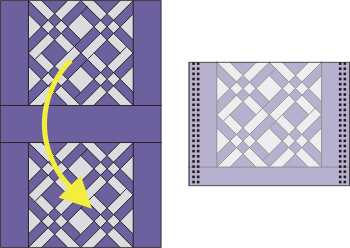
Stitch box corners at the bottom of the bag. For this, separate the front and back sides at the corners. Center the seams on each side of the corner on top of each other. Measure 2" along the seam from the corner and draw a line perpendicular to the seam across the corner and machine-stitch it. Do not trim the seam. Fold the "ears" to the side seams and hand-stitch the tips to the side seams.
Turn the bag out.
Fold the raw upper edge 1/2"- 3/4" inside and pin.
Out of fabric for the lining, cut a rectangle measuring 22 1/2" x 17" and 2 rectangles measuring 12" x 10".
Take the 3" x 17" purple strips left over from the original cutting. For reinforcement, iron on strips of hot-fix sewing stabilizer.
Sew the purple strips to the upper and lower edges of the 22 1/2" x 17" rectangle. Press the seams towards the purple.

Fold the purple edges 1/2" to the wrong side and press.
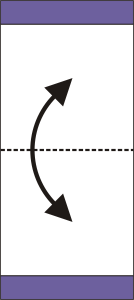
Fold the lining in half , face inwards, and press lightly to mark the center line. Unfold.
Finish the raw edges of the 2 rectangles measuring 12" x 10". For this, fold the short edges 1/4" back and press. Fold back another 1/4", press and topstitch in place.
Fold the long edges 1/4" back and press. Fold back another 1/4", press and topstitch in place.
Position the rectangles on top of the lining, 2" from the center line and 2 1/2" from the sides. Pin. Topstitch in place.

Fold the lining face inwards. Align the raw edges. Pin them together. Stitch the side seams twice - about 1/4" and about 3/8" from the edge.
Stitch box corners at the bottom of the lining.
If you want to use a magnetic snap, you need to add it now, before the lining is permanently attached to the bag.
Insert the lining into the tote. Aling the side seams and the upper edges. Pin them together.
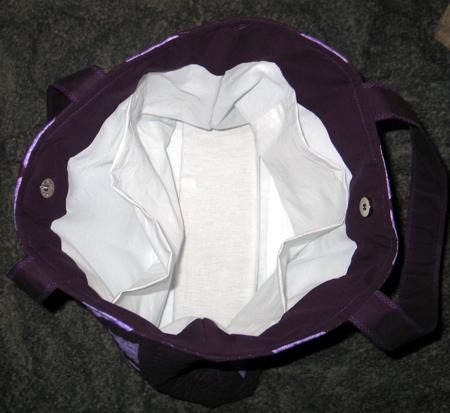
Cut the webbing into two pieces 22" long. We managed to find webbing of a matching purple color. However, we additionally stitched on strips of our purple fabric. For this, cut fabric strips 22" long and 1/4" wider than the webbing. Fold the long edges of the strips back 1/4" and press, then topstitch onto the webbing.
Insert the ends of the handles 1" deep between the bag's top and the lining 4"- 4 1/2" from the side seams. Pin. Topstitch over the lining 1/4" from the edge, securing the lining and the handles. Turn the bag right side in. Topstitch again 1/8" from the edge.
Turn the right bag side out.