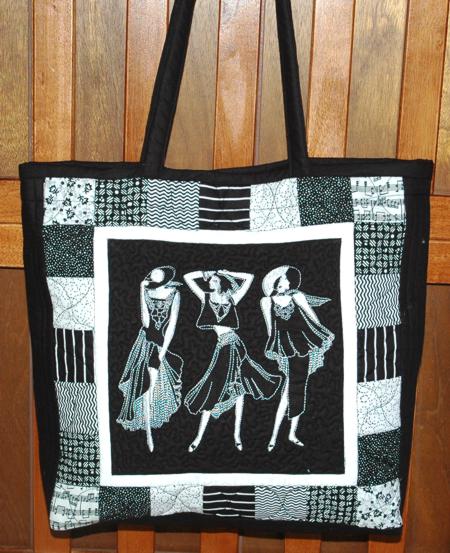
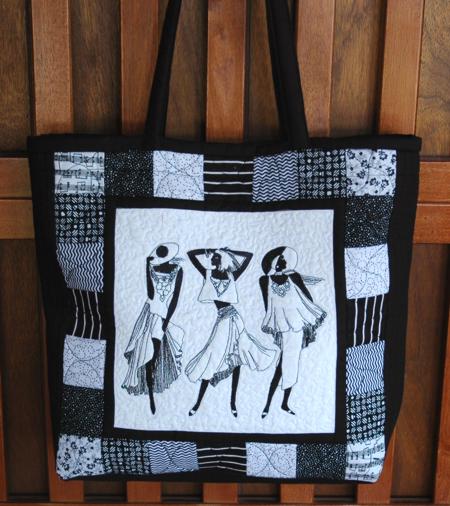
This black-and-white themed tote features the Summer Fashion designs. Its simplicity and elegance makes it suitable for any season and any occasion, however casual or dressy.
The finished size of the tote is about 14" (wide) x 15" (high) x 4" (deep).
You will need solid black fabric (about 1/2 yard), solid white fabric (1 fat quarter and scraps of black-and-white patterned fabrics. You will also need backing and batting, each piece measuring about 20" x 38", sewing iron-on interfacing and a magnet closure (optional).
Out of white fabric, cut
1 square measuring 9 1/2" x 9 1/2",
2 strips measuring 1" x 9 1/2" and
2 strips measuring 1" x 10 1/2".
Out of black fabric, cut
1 square measuring 9 1/2" x 9 1/2",
2 strips measuring 1" x 9 1/2",
2 strips measuring 1" x 10 1/2",
1 strip measuring 4 1/2" 18 1/2" (for the bottom) ,
4 strips mearing 2 1/2" x 14 1/2" (for the sides),
2 strips measuring 3" x 26" (for the handles),
1 strip measuring 4" and the length of the width of the fabric for the upper edge binding,
1 strip measuring 2" and the length of the width of the fabric for the inner seam binding.
Out of scraps of black-and-white fabrics, cut 48 squares measuring 2 1/2" x 2 1/2" .
Out of sewing iron-on interfacing cut 2 strips 3" x 26" (for the handles).
Sew the white 1" x 9 1/2" strips to the upper and lower edges of the black 9 1/2" x 9 1/2" square.
Sew the black 1" x 9 1/2" strips to the upper and lower edges of the white 9 1/2" x 9 1/2" square.

Sew the white 1" x 10 1/2" strips to the left and right edges of the black square.
Sew the black 1" x 10 1/2" strips to the left and right edges of the white square.

Out of 2 1/2" x 2 1/2" squares make 4 strips containing 5 squares and 4 strips containing 7 squares.
Sew the 5-square strips to the upper and lower edges of the central squares.
Sew the 7-square strips to the lef and right edges of the central squares.

Sew the 2 1/2" x 14 1/2" black strips to the left and right sides of each working piece.

Join the two panels at the lower edges using the 4 1/2" x 18 1/2" black strip.

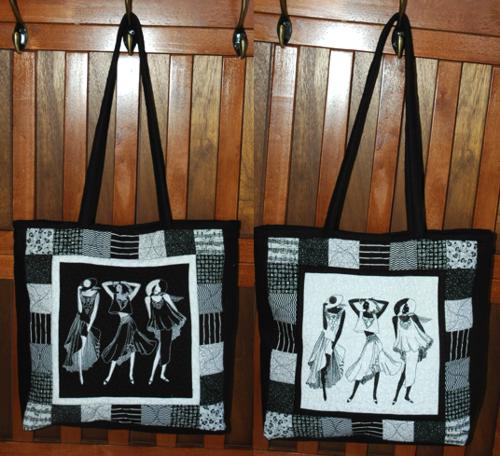
Stabilize the central part of each panel with iron-on cut-away stabilizer. Embroider the white square with black threads and black square with white threads. Make sure that you align the fabric properly in the machine. The black strip bridging the two panels will be the tote's bottom. Cut away the excess stabilizer.
Now place the backing on a flat surface (table) face down. Cover with batting. Spread your working piece over it.
Pin all three layers together with 1" pins and start quilting. We quilted along the lines of the embroidery and made stippling all over the central squares, made curved lines on the black-and-white squares and straight parallel lines on the black parts.
After the quilting is finished, press the work with heavy steam and square the work -- all corners should be 90 degrees and opposite sides should be of the same length.
Fold the working piece in half widthwise, face to face, aligning all edges. Stitch the sides together.
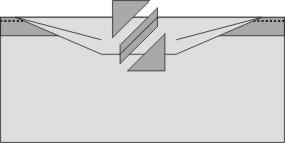
Cut away 2" x 2" squares in the lower coners. Finish the side seams with binding.
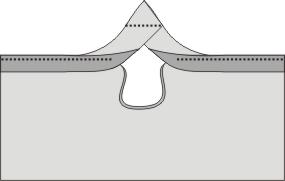
Now pinch the corners as shown in the diagram below. Pin. Stitch them closed. Finish the seams with binding.
Turn the bag right side out.
Take the strip measuring 4" and the legth of the width of the fabric for the upper edge binding, fold it in half lengthwise, wrong side inside and raw edges even. Press.
Place along the upper edge of the bag, align the raw edge of the binding with the raw edge of the bag. Pin in place. Do not cut the excess end of the binding.
Start to machine stitch the binding leaving the first 5-6" of the binding unstitched. Seam allowance should be ¼ " from the raw edges. Stop aproximately 10"-12" from where you started stitching.
Position the raw edges of the beginning and end of the binding even with the bag's raw edge.
Position the remaining end on top. On the lower strip, trim away the excess, leaving a 4" allowance (the width of the unpressed binding strip).
Open out both ends of the binding and align as shown. Pin the ends together
and draw a 45 degree angle line from corner to corner.
Stitch on the line.
Trim the seam to 1/4", then press the seam open.
Refold the binding and stitch to the bag, overlapping the beginning and ending stitches.
Unfold the binding and press.
Turn the bag the right side inside.
Fold the binding over the raw edge and pin to the wrong side of the bag.
To make the handles, fuse the interfacing strips onto the back side of the 3' x 26" black strips.
Fold the strips in half lengthwise wrong side inside and press. Fold the long raw edges inside towards the crease. Press. Now top-stitch 1/8" and 1/4" from each edge.
Tuck the ends of the handles under the binding approximately 6" from the side seams. Pin in place.
If you want a magnet closure, install it now.
Topstitch the binding and the handles to the bag.
Turn the bag the right side out. Pull the handles out.
Topstitch along the upper edge of the bag 1/4" from the edge. Topstitch back and forth over the handles.