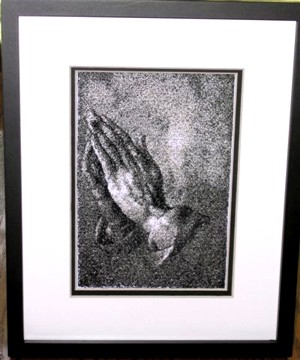
Her instructions go like this:
I embroidered it on a pre-washed piece of white, cotton denim-type fabric, cut 12" X 14". Hoop it in the large hoop with Viking's Hoop Ease and tighten the hoop as much as you can without breaking it. This is a very dense embroidery and will pull if not virtually cemented into the hoop.
Fix, and stitch file A, then B. Note again: This is a full evening's worth of work -- two 80/12 needles and one full pre-wound embroidery-thread bobbin... but it's also about the most fun an embroider can have!
Thread colors:
1. Robison-Anton #2297 - Snow White (resist temptation to use anything but Snow White ~ the best highlights come from the whitest white and will serve you well on this piece)
2. Robison-Anton #2538 - Stainless Steel
3. Robison-Anton #2404 - Cinder
4. Sulky #1040 (medium grey)
5. Sulky #1220 (charcoal grey)
6. Sulky # 1234 (black that's blue-black not brown-black)
Essentially, it's white, four escalating values of grey and black
Regarding the framing:
I bought the frame at A.C. Moore. It's a Burnes of Boston #117080 -- $19.99 (less a JoAnn 50% off coupon) -- that is 8" X 10" with an opening in the mat for a 2.5" X 3.5" photograph. However, it's one photograph frame that actually has room for the embroidery. I also bought an extra 8" X 10" double mat -- white outside with black inside.
To frame it, I took the spacers off of the mats that came with the frame and glued them onto the back of the mats I purchased. I cut an extra piece of acid-free mat board (I had some on hand from my other framing, but any framing store can cut you an 8" X 10" piece from their scraps), after which I wrapped the embroidery around that (centering it with the mat board for the frame) and secured it with framer's tape (acid- and everything-free tape).
After cleaning the glass, I layered it: glass, white mat, black mat, embroidery taped to mat and backing.
If you can't get that frame, a shadow-box frame would work with a couple of mats, separated with foam-core board glued to all four sides of the back.
Sarah Sykes


