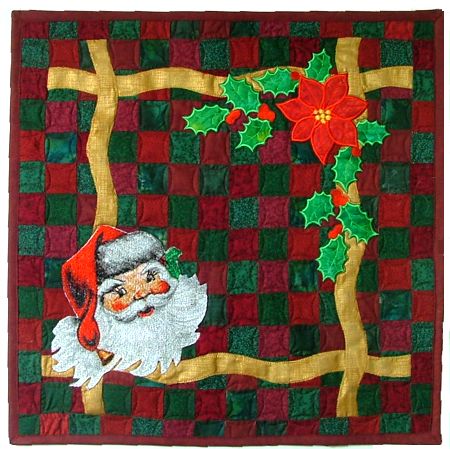
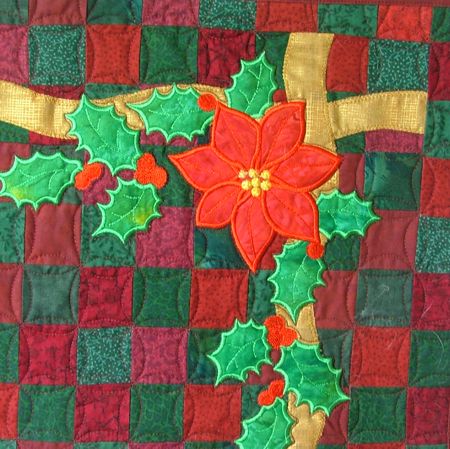
| Christmas is quite some time away, but we had some red and green batiks in our stash, and this seemed like the perfect use for them. This cute Christmas wall hanging would look great in a living or dining room. The embroidery designs used are the Smiling Santa and Poinsettia and Holly applique from the Christmas Quilt Applique Set.
The finished size is about 20" x 20".
|
|
You will need:
- dark red and dark green scraps of cotton fabric,
- gold, bright red and bright green fabric for the applique,
- low-loft batting,
- fabric for the backing and binding,
- iron-on adhesive tape for no-sew hem projects.
For the embroidered applique, we used polyester embroidery threads, and polyester felt as stabilizer under the base fabric. For the Santa embroidery we used polyester embroidery threads, light-weight cut-away stabilizer as a topping and polyester felt as a stabilizer under the fabric.
|
|
Cutting:
|
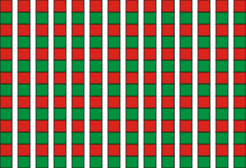
| Cut your fabrics into 7 green strips measuring 2" x 28" and 7 red strips measuring 2" x 28". |

|
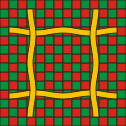
| Out of gold colored fabric cut 4 wavy strips measuring 1" x 18". |

|
|
Assembling the Top
|
| Take 4 red and 3 green strips and sew them together lengthwise, alternating the colors. Start and finish with red strips. |

|
| Take 4 green and 3 red strips and sew them together lengthwise, alternating the colors. This time, start and finish with green strips. |

|
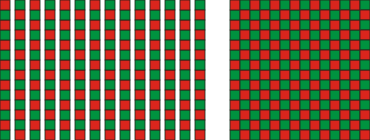
| Press both pieces. Cut each of the pieces into 14 strips 2" wide. |

|
| Sew the strips in pairs to get 14 longer strips. |
|
| Alternately, you can just sew all 14 red and green strips together, alternating the colors, and then cut them into 14 strips 2" wide. However, it can be rather difficult to cut a piece of fabric 21" long. |

|
| Sew the new strips into a checkerboard piece. |
|
| Press the top. Place the golden strips over the piece about 3 cells from each edge. When you like the position of the strips, place iron-on adhesive tape under the strips and iron to attach them to the background. With zig-zag, or decorative blanket stitch, sew along the edges of the golden strips.
|
|
|
Embroidery
|
| We made the Poinsettia and Holly applique in the upper right corner and embroidered the Smiling Santa in the lower left corner. Stabilize the upper right corner with a piece of polyester craft felt. Baste the quilt top to the felt outside the embroidery area. Make the applique as explained in the instructions. After the embroidery is finished, rip the baste and cut away the excess felt around the embroidery.
|
|
| To embroider the photostitch design of the Smiling Santa, stabilize the right lower corner with polyester craft felt under the fabric and place light-weight cut-away stabilizer as a topping. Embroider the first color, which is white. Cut away the topping along the embroidered outline.
|
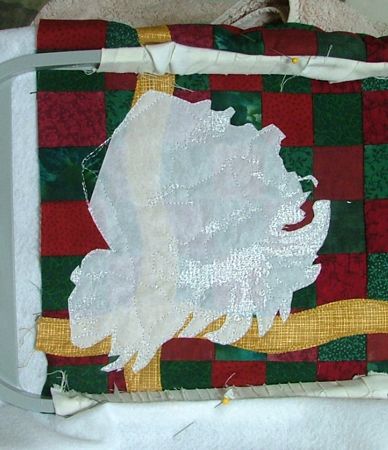
|
| Finish embroidering the design to the end. |

|
|
|
|
Quilting:
|
| Now place the backing on a flat surface (table) face down. Cover it with batting. Spread your working piece over it. Pin all three layers together with 1" pins and start quilting.
|
| We quilted in a free-motion style. After the quilting is finished, press the work with heavy steam and square the work -- all corners should be 90 degrees and opposite sides should be of the same length.
Finish the raw edges with the binding.
|
|
The quilt is ready. Enjoy!
|
|
|
|
|
|
Happy Stitching!
|
|
Back to Smiling Santa
|
|
Back to Christmas Quilt Applique Set
|
|
Back to Projects Page
|


