Mobile Menu IconMenu
Advanced Embroidery Designs -- Online Center for Machine Embroidery Designs
Christmas Sale! 35% Off all our designs! Shop Now

Quilted Christmas Placemats with Embroidery

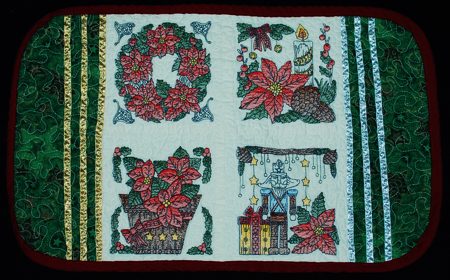
We used the designs from the Ponsettia Quilt Block Set to make these colorful Christmas placemats. This is a quick and easy project that can be completed over a weekend or two.

The finished size of each placemat is 12 1/2" x 22".

Quilted Christmas Placemats with Embroidery image 1

You will need

  • 1/2 yard of white cotton fabric,
  • 1/2 yard of forest green fabric,
  • golden and silver ribbons,
  • red binding,
  • fabric for the backing, and
  • temporary fabric adhesive or heat-activated adhesive film.
For embroidery you will need light- to medium-weight cut-away stabilizer and embroidery threads.

Embroidery:

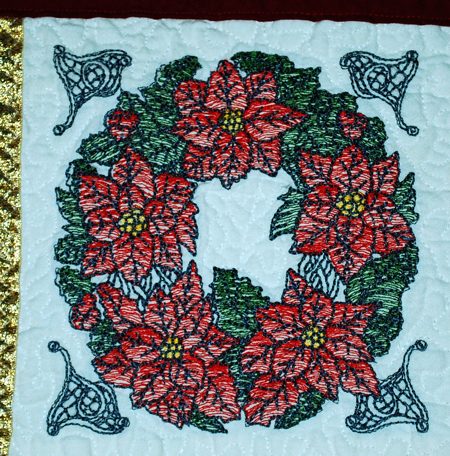
Stabilize the white fabric with light-weight cut away stabilizer and embroider the designs from the Colored Ponsettia Set

Cut away the excess stabilizer.

Trim each embroidery to 6 1/2" x 6 1/2". For each mat you will need 4 embroidered squares.

Quilted Christmas Placemats with Embroidery image 2

Cutting:

For one mat:

  • out of green fabric, cut 2 strips measuring 5 1/2" x 13";
  • cut the gold and silver ribbons into 3 pieces each 12 1/2" long.

Assembly:

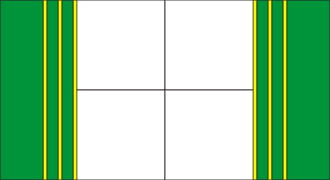
Sew 2 embroidered squares together in a row. Sew another 2 squares in a row.

Quilted Christmas Placemats with Embroidery image 3

Sew the rows together.

Quilted Christmas Placemats with Embroidery image 4

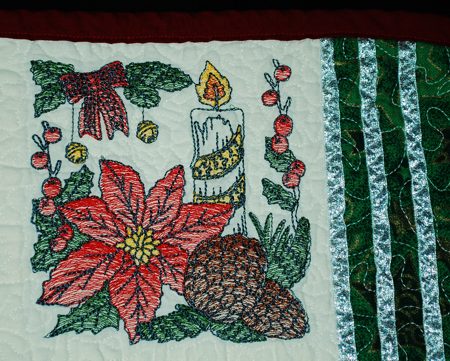
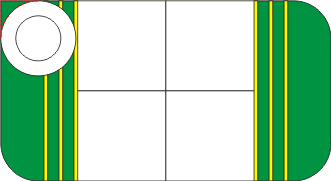
Sew the green strips to the left and right edges of the embroidered piece.

Quilted Christmas Placemats with Embroidery image 5

Apply temporary adhesive to the ribbon pieces and adhere them to the green borders space approximately 1" apart:

Quilted Christmas Placemats with Embroidery image 6

Quilting:

Now place the backing on a flat surface (table) face down. Cover with batting. Spread your working piece over it.

Pin all 3 layers together with 1" pins. We quilted around the embroidery and all over the mats in a free-motion style. Remove the pins while quilting.

Quilted Christmas Placemats with Embroidery image 7

When you are finished, press with heavy steam and square the mat - all corners should be 90 degrees and the opposite sides should be equal.

To round the corners, we used a small plate to draw a curved line at each corner. Then, we cut along the line.

Quilted Christmas Placemats with Embroidery image 8

Finish the raw edges with binding.

The placemat is ready.

Quilted Christmas Placemats with Embroidery image 9

Enjoy!

Happy Stitching!

Back to Ponsettia Quilt Block Set

Back to Projects Page

Mailing List
Enter your e-mail for news, discounts and exclusive special offers.


Find us on Twitter

Special Offers
Bonus design on all orders over $25
Snowflake Set

Shop Now!

Announcement
Best Project Contest
The results are in!
Featured Project
Check out our latest project Birds and Blooms Quilted Tablerunner
Tutorials
Never heard of photo stitch? - Check out our What is Photo Stitch? page
Most Popular Designs
|| Home || Shop || Free Designs || New Designs ||
|| Projects || Tutorials || Links || About Us || Contact Us ||
|| Store Policy || Licensing || Accessibility ||

Social Media:

Copyright © Advanced Embroidery Designs. All Rights Reserved.