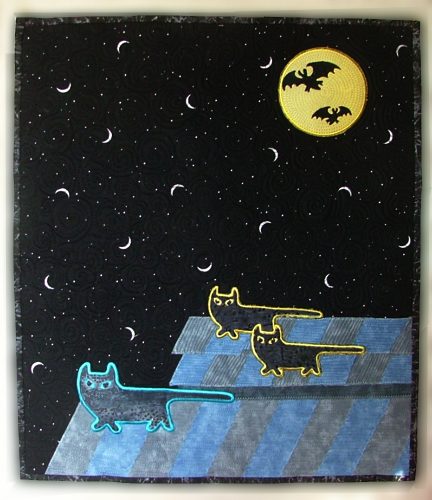
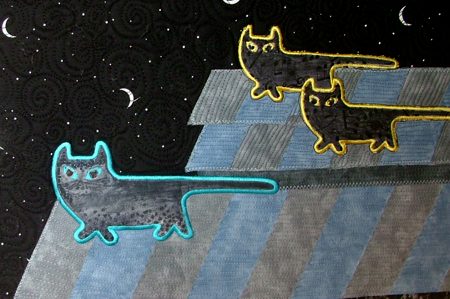
For this quick and easy wall quilt, we used the applique designs from the Halloween Moon and Walking Cat Set.
The finished size is about 17 1/2" x 20 1/2".
|
|
You will need:
- a fat quarter of almost black fabric (we used fabric patterned with small white dots and crescents),
- scraps of gray and gray-blue fabrics for the roofs,
- black or dark gray and yellow scraps for the applique.
- fabric for backing, batting and binding.
For embroidery, besides the applique fabric and embroidery threads you will need fusible heat-activated mesh, or fabric glue. You can use either cut-away light-weight stabilizer, or polyester craft felt. |
Making Roof Applique.
|
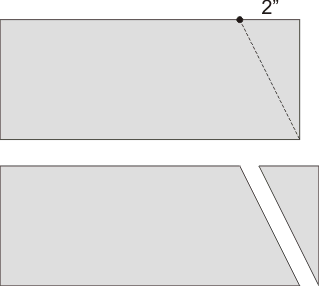
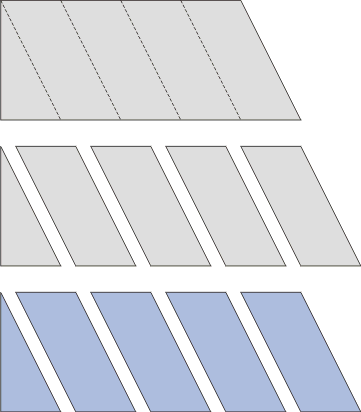
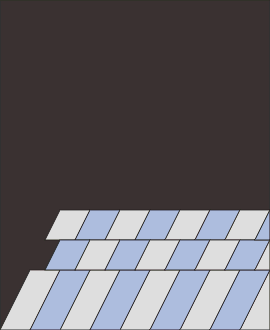
Out of gray and gray-blue fabric, cut a strip 4" wide and 10" long, one of each color. Place the strips one over another, both strips face up. Align all edges.
Measure 2" from the upper left corner and make a mark. With your ruler, connect the mark to the lower left corner. Cut along this line. |
|
| Measure 2" along the lower and the upper edges. Connect the marks with the ruler and cut. Continue to the end of the strips. |
|
Alternating gray and blue strips, lay them out on the lower part of the fat quarter to form a roof.
Using fusible net or fabric glue, attach the strips in place. |

|
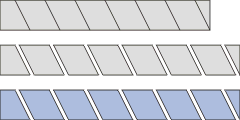
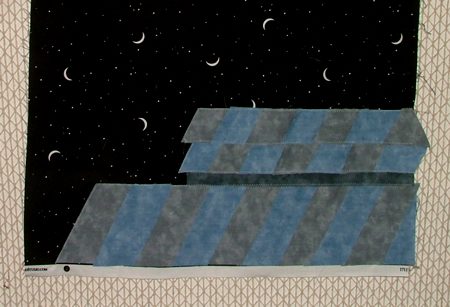
Out of gray and gray-blue fabric, cut a strip 2" wide and 14" long out of each fabric. You're going to do essentially the same thing, but this time the tiles will be smaller.
Place the strips one over another, both strips face up. Align all edges.
Measure 1" from the upper left corner and make a mark. With your ruler, connect the mark to the lower left corner. Cut along this line.
Measure 2" along the lower and the upper edges. Connect the marks with the ruler and cut. Continue to the end of the strips. |
|
| Use these "tiles" to make more roofs. |
|
| Stitch along the outer edges of the roofs with zig-zag stitch on your sewing machine. |
|
|
Embroidery:
|
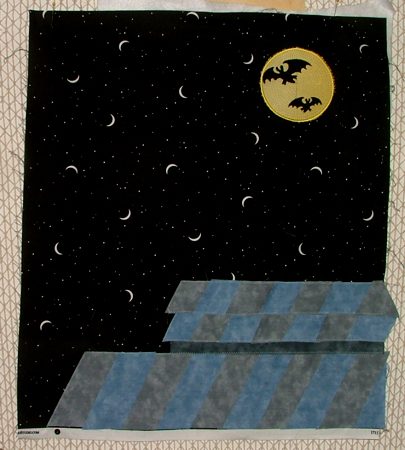
Mark the position of the moon and embroider it first.
|
|
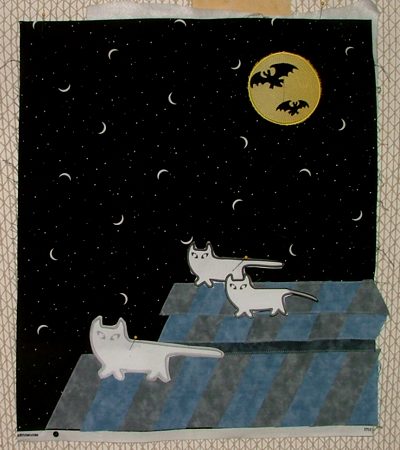
| Then mark the position of the cats. Embroider them one by one. |
|
Instead of regular-cut-away stabilizer we used polyester craft felt. It makes the applique puffy and trapunto like.
If you use felt, after the embroidery is finished, cut away the excess felt around the embroidery. |

|
| Quilting and Finishing: |
| Now place the backing on a flat surface (table) face down. Cover with batting. Spread your working piece over it. Pin all three layers together with 1" pins. We quilted around the embroidery and all over the quilt in a free-motion style. Remove the pins while quilting. Press the work with heavy steam and square the work -- all corners should be 90 degrees and opposite sides should be of the same length.
Finish the raw edges with binding. |
| Your wall hanging is ready! Enjoy! |
|
|
Enjoy!
|
|
Happy Stitching!
|
|
Back to Halloween Moon and Walking Cat Set
|
|
Back to Projects Page
|


