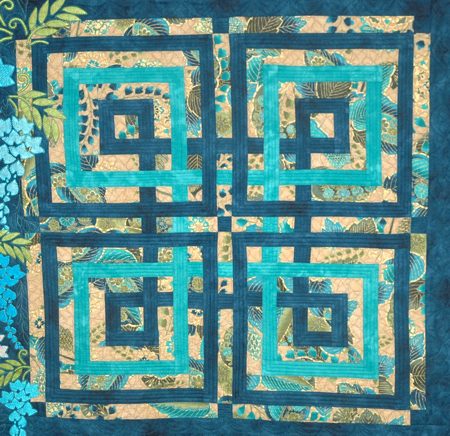
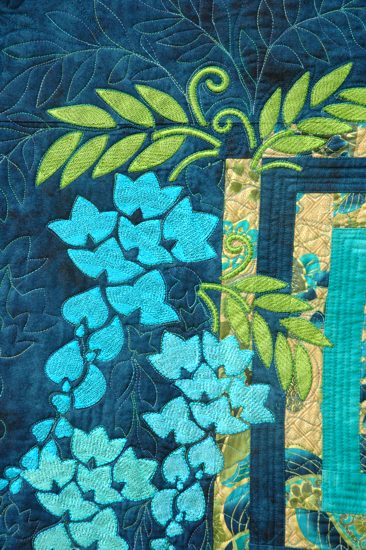
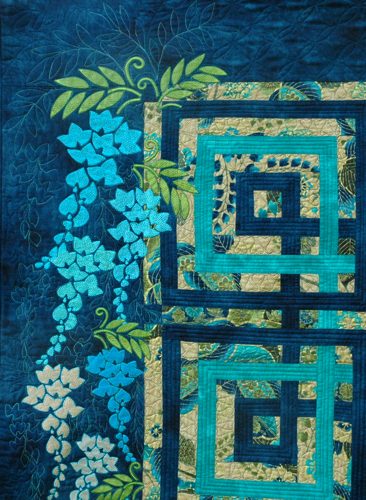
This charming geometric quilt uses the embroidery design Wisteria in all 3 available sizes - for a large, mega and commercial hoops.
The finished size of the quilt is 39" x 36".
The quilt will participate in traveling expositions during 2013-2014. If you're planning on attending any quilt shows you might run into it!
|

|
We used:
- about 3/4 yard of the Challenge fabric,
- about 1/2" of sea-green fabric and
- about 2 yards of dark blue fabric.
We chose the complimentary fabrics after we received the main fabric. |
|
Cutting:
|
Note: The width of all strips/elements is 1" finished, 1 1/2" cut. As there will be many small parts, please prepare pins, small pieces of paper and a pen to mark all the parts.
For the block,
out of the patterned/Hoffman challenge fabric, cut
- 4 squares measuring 2" x 2", put them together in a pile and mark them #1;
- several strips 1 1/2" wide and as long as the width of the fabric. Subcut them into:
- 4 strips measuring 1 1/2" x 3", mark them #5
- 4 strip measuring 1 1/2" x 5", mark them #6
- 4 strips measuring 1 1/2" x 5", mark them #8
- 4 strips measauring 1 1/2" x 4", mark them #9
- 4 strips measuring 1 1/2" x 5", mark them #12
- 4 strips measuring 1 1/2" x 9, mark them #14
- 4 strips measuring 1 1/2" x 9, mark them #16
- 4 strips measuring 1 1/2" x 6", mark them #17
- 4 squares measuring 1 1/2" x 1 1/2", mark them A
out of dark blue fabric, cut several strips 1 1/2" wide and as long as the width of the fabric. Subcut them into the following strips:
- 4 strips measuring 1 1/2" x 2, mark them #2
- 4 strips measuring 1 1/2" x 3, mark them #3
- 4 strips measuring 1 1/2" x 3, mark then #4
- 4 strips measuring 1 1/2" x 5", mark them #7
- 4 strips measuring 1 1/2" x 10, mark them #18
- 4 strips measuring 1 1/2" x 11", mark them #19
- 4 strips measuring 1 1/2" x 11", mark them #20
- 4 strips measuring 1 1/2" x 12", mark them # 21
- 3 squares measuring 1 1/2" x 1 1/2", mark them A1
out of light blue/sea-blue fabric, cut several strips 1 1/2" wide and as long as the width of the fabric. Subcut them into the following strips:
- 4 strips measuring 1 1/2" x 6", mark them #10
- 4 strips measuring 1 1/2" x 7", mark them #11
- 4 strips measuring 1 1/2" x 7", mark them #13
- 4 strips measuring 1 1/2" x 9", mark them #15
- 1 square measuring 1 1/2" x 1 1/2", mark it A2
For the sashing, out of patterned fabric cut
- 8 strips measuring 1 1/2" x 12" , mark them S1
- 4 strips measuring 1 1/2" x 7", mark them S2
- 4 strips measuring 1 1/2" x 2 1/2", mark them S3
- 4 squares measuring 1 1/2" x 1 1/2", mark them SA
- Out of dark blue fabric, cut 11 squares measuring 1 1/2" x 1 1/2", mark them SA1
- Out of sea-blue fabric, cut 4 squares measuring 1 1/2" x 1 1/2", mark these SA2.
For the borders, out of dark blue fabric cut
- 1 strip measuring 7" x 26 1/2, mark it B1;
- 2 strips measuring 7" x 33", mark them B2 and B3, and
- 1 strip measuring 10" x 41 1/2", mark it B4.
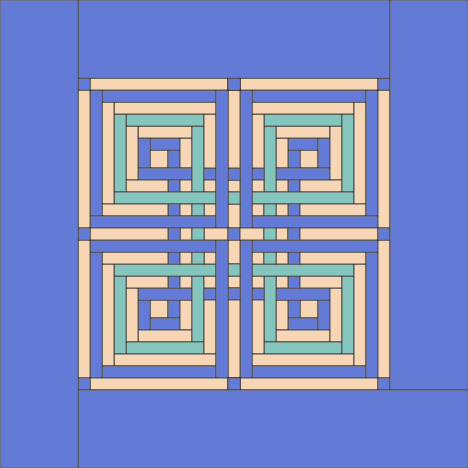
The finished width of the left border is 8", the width of the other borders is 6", we cut them wider for better hooping of embroidery . |
|
|
|
Blocks:
|
Prepare all the parts you will need for the blocks: strips #1-#21 and squares A, A1, A2.
Please don't forget to press each seam after you make it. |
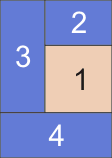
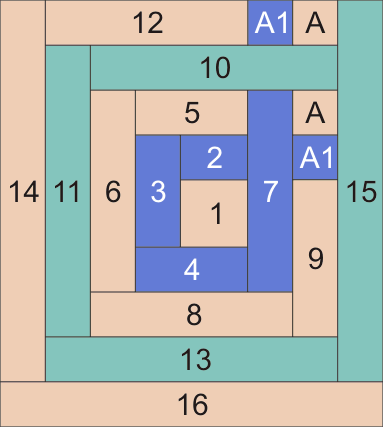
| Take parts #1, #2, #3 and #4 and sew them together as shown on the picture: #2 to the upper edge of #1, #3 to the left edge, #4 to the bottom. |
|
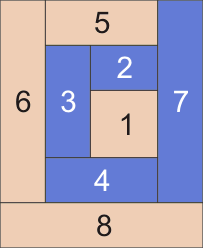
| Take parts #5, #6, #7, #8 and sew them to the working piece as shown on the picture: #5 to the upper edge, #6 to the left edge, #7 to the right edge, #8 to the bottom. |
|
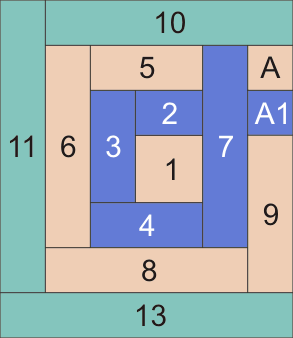
| Take part #9, and 4 each of the A and A1 squares. Sew A1 to strip #9. Sew A to A1. |

|
| Sew the strip to the right edge of the block. Square A should be at the top as shown. |

|
| Take strips #10, #11 and #13 and sew them to the working piece as shown: #10 to the upper edge, #11 to the left edge, #13 to the bottom. |
|
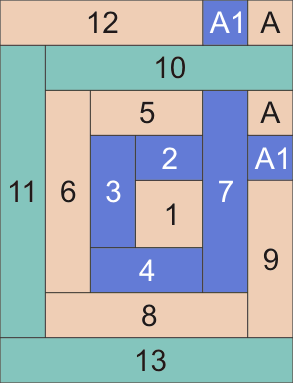
| Take strip #12 and squares A and A1. Sew A1 to the strip. Then sew A to A1. |

|
| Sew the new strips to the upper edges of the blocks, as shown. |
|
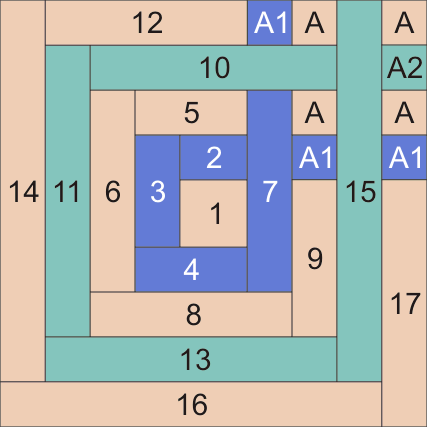
| Take strips #14, #15 and #16 and sew them to the block as shown: #14 to the left edge, #15 to the right edge, and #16 to the bottom. |
|
| Take strip #17, 2 A squares, an A1 square and an A2 square. Sew them together in the following order: strip #17 - A1 - A - A2 - A. |

|
| Now sew the new strip to the right edge of the block: |
|
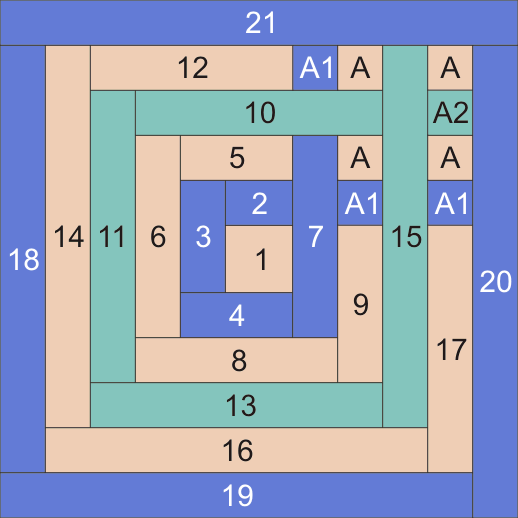
| Sew strip #18 to the left edge of the block, #19 to the bottom, #20 to the right edge and #21 to the upper edge. |
|
| Repeat for the other blocks. You will need 4 blocks total. |
|
Assembly of the Sashing:
|
Take strips S2 and S3, four squares SA, four squares SA1 and 4 squares SA2.
Out of the above parts sew four strips in the following order: S2 - SA1 -SA - SA2 - S3: |

|
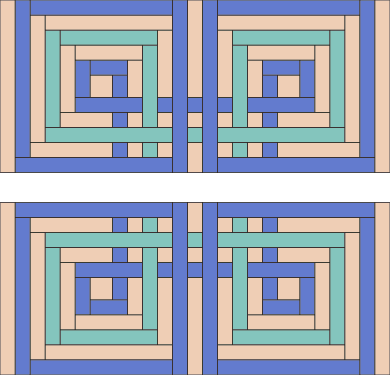
| Take 2 of the new strips and 3 squares SA1. Sew them together into a long strip as shown: SA1- new strip - SA1 - new strip - SA1. This will be the central sashing between the upper and lower rows of the blocks. |

|
Take 2 strips S1 and 3 squares SA1 and sew them into a long strip
SA1 - S1 - SA1 - S1 - SA1.
Make 2 strips like this |

|
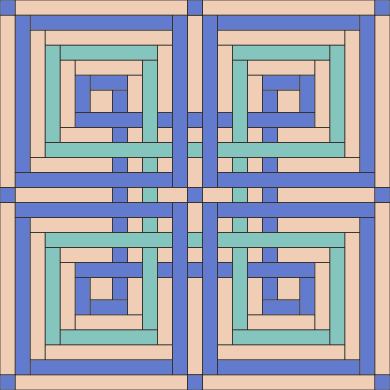
| Assemply of the Top: |
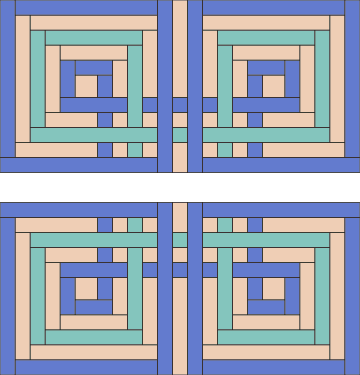
| Either on a designer wall, or on your working table position all 4 blocks so that the "knot" is directed to the center. |
| Place two of the "S2-SA1-SA-SA2-S3" strips between the two upper blocks and between the two lower blocks as shown. |
|
| Attach the S1 strips to the left and right edges of each row. |
|
| Sew the sashing strip "SA1- new strip - SA1 - new strip - SA1" between the two rows. |

|
| Sew the sashing strips "SA1 - S1 - SA1 - S1 - SA1" to the upper and lower edges of the top. |
|
|
| Attaching the Borders: |
| Sew the border B1 to the upper edge of the quilt. |
| Sew the border B2 to the right edge of the quilt. |
| Sew the border B3 to the bottom of the quilt. |
| Sew the border B4 to the left edge of the quilt. |
|
|
Embroidery:
|
| Open the Wisteria design in your embroidery software and make several print-outs. Arrange the paper templates how you want your embroidery. Stabilize the fabric with cut-away stabilizer and make the embroi dery. We selected threads for embroidery to match the colors of the patterned fabric. |
|
|
|
|
|
Quilting and Finishing:
|
| Now place the backing/lining on a flat surface (table) face down. Cover with batting. Spread your working piece over it. Pin all three layers together with 1" pins. We quilted around the embroidery and all over the quilt in a free-motion style. Remove the pins while quilting.
Press the work with heavy steam and square the work -- all corners should be 90 degrees and opposite sides should be of the same length.
|
| Finish the raw edges with binding. |

|
|
Enjoy!
|
|
Happy Stitching!
|
|
Back to Wisteria
|
|
Back to Projects Page
|


