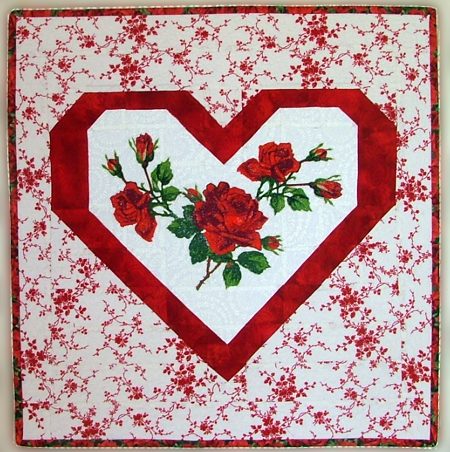
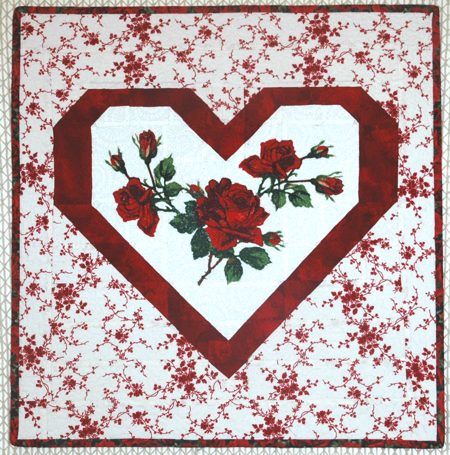
Try your hand at making this gorgeous Valentine Heart Quilt! We used 2 designs from the Scarlet Rose Set.
The finished size of the quilt is about 22" x 22". |
Click to enlarge
|
You will need:
- 1/2 yard of white-and-red patterned fabric,
- 1 fat quarter of white fabric,
- 1 fat quarter of red fabric.
- fabric for the backing and binding
You will also need polyester craft felt which we used both as a stabilizer and batting. |
Cutting:
|
Out of white-and-red patterned fabric, cut:
- 2 squares measuring 2 7/8" x 2 7/8"
- 1 square measuring 2 1/2" x 2 1/2"
- 2 strips measuring 2 1/2" x 4 1/2"
- 2 strips measuring 2 1/2" x 6 1/2"
- 4 strips measuring 2 1/2" x 8 1/2"
- 4 squares measuring 1 1/2" x 1 1/2"
- 1 strips measuring 1 1/2" x 2 1/2"
- 2 strips measuring 2 1/2" x 16 1/2"
- 1 strip measuring 2 1/2" x 22 1/2"
- 1 strip measuring 4 1/2" x 22 1/2"
|
Out of white fabric, cut:
- 1 square measuring 6 1/2" x 6 1/2"
- 2 squares measuring 4 1/2" x 4 1/2"
- 4 squares measuring 2 1/2" x 2 1/2"
- 2 squares measuring 2 7/8" x 2 7/8"
- 1 strips measuring 2 1/2" x 6 1/2"
- 5 strips measuring 1 1/2" x 2 1/2"
- 2 squares measuring 1 1/2" x 1 1/2"
|
Out of red fabric, cut:
- 4 squares measuring 2 7/8" x 2 7/8"
- 11 squares measuring 2 1/2" x 2 1/2"
- 2 strips measuring 2 1/2" x 4 1/2"
- 6 strips measuring 1 1/2" x 2 1/2"
- 8 squares measuring 1 1/2" x 1 1/2"
|
|
Assembling the Top:
|
| Part 1 of 5: |
| Element 1: |
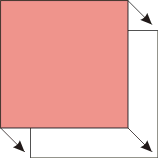
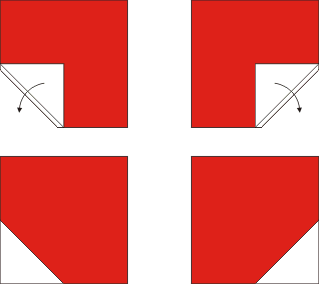
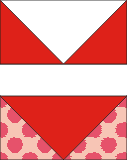
First, make the half-triangles. Take all the 2 7/8" x 2 7/8" squares. Pair up the two white-and-red squares with red squares. Pair up the two white squares with the remaining red squares, you will have 2 pairs.
|
|
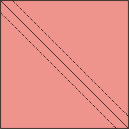
| With a pencil, draw a diagonal on the lighter square. Stitch 1/4" from the pencil line on both sides. |
|
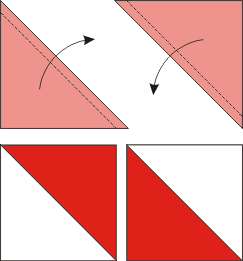
| Cut along the line. Open the new squares. Press the seam towards the red. Trim the "ears". Repeat for all the pairs. You should get 4 white-and-red/red color squares, and 4 white/red squares measuring 2 1/2" x 2 1/2". |
|
| Element 2: |
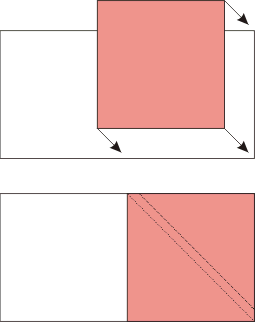
The second element we'll need are white strips with red corners. Take two 1 1/2" x 2 1/2" white strips and two 1 1/2" x 1 1/2" red squares. Position one of the strips face up, place one of the squares on the right edge of it. Align the edges. Draw a diagonal on the right square from the left upper corner to the right lower corner.
Topstitch along the diagonal of the square.
|
|
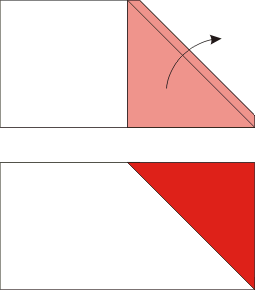
| Cut 1/4" away from the stitch. Open and press with seam toward red. |
|
| Repeat for the second strip, but this time put the red square on the left side of the strip. |

|
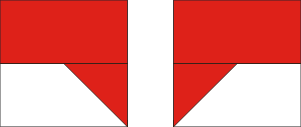
| Take the 2 red 1 1/2" x 2 1/2" strips and sew the red-cornered strips to the lower edge of the red strips. |
|
| Element 3: |
| Take another 2 red 1 1/2" x 2 1/2" strips and 2 white 1 1/2" x 2 1/2" strips. Sew the white strips to the lower edges of the red strips. |

|
| Element 4: |
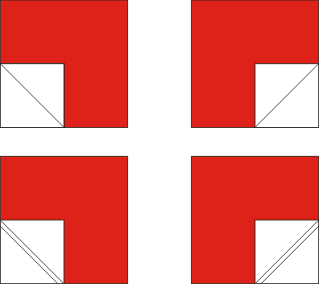
Take the two 2 1/2" x 2 1/2" red squares, two 1 1/2" x 1 1/2" white and two 1 1/2" x 1 1/2" white-and-red squares.
Place the red squares face up. Cover the lower left corner of the left square with the small white square, face down. Cover the lower right corner of the right square with the small white square, face down.
In the left square draw a diagonal from the upper left corner to the lower right corner. In the right square draw a diagonal from the upper right corner to the lower left corner.
Topstitch along the diagonal. |
|
| Cut 1/4" away from the stitch. Open and press. |
|
| Now place the white-and-red 1 1/2" x 1 1/2" square in the upper right corner of the left square and in the upper left corner of the right square, face down. Repeat the procedure |

|
| Element 5: |
| Take the 2 1/2" x 2 1/2" white-and-red square and two 1 1/2" x 1 1/2" red squares. Place the larger square face up. Position one of the small squares, face down, in the lower left lower corner. Attach as described above to form a red corner. |

|
| Position the second small square, face down, in the lower right corner. Attach as described above to form a second red corner. |

|
| Final Assembly of Part 1: |
Take the above elements lay them out on your table or designer wall in the order shown below. Stitch together. This the first strip of the top.
|

|
| Parts 2 & 3 of 5 |
| Element 1 |
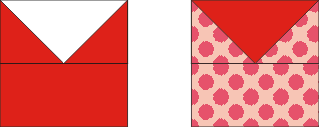
Take the red 2 1/2" x 4 1/2" strips and white 4 1/2" x 4 1/2" squares. Sew the strips to the squares.
|

|
| Element 2 |
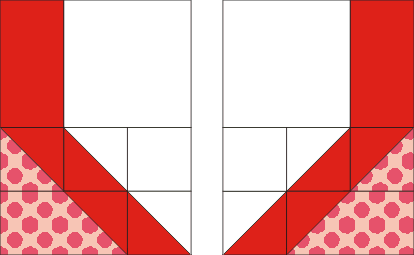
| Take 2 white-and-red / red half-triangles, 2 white / red half-triangles and 2 white 2 1/2" x 2 1/2" squares. Arrange them in the order shown below. Sew 2 strips. |

|
| Element 3 |
| Take the 2 white-and-red 2 1/2" x 4 1/2" strips and 2 red squares. Use them to make two white-and-red strips with red corners, as described above. |

|
| Using these new elements and the remaining half-triangles, sew 2 strips. |

|
| Final Assembly of Parts 2 and 3 |
| Now using all the new strips arrange them and sew them into 2 blocks. The left block is part 2 and the right block is part 3. Label them: pin a peace of paper with the number. |
|
| Part 4 of 5: |
| Element 1: |
| For the next element take the two 2 1/2" x 2 1/2" white squares and two 1 1/2" x 1 1/2" red squares. Use them to make white squares with a red corner. |

|
| Element 2: |
| Take the red 2 1/2" x 2 1/2" square and 2 white 1 1/2" 1 1/2" squares. Use them to make a red square with two white corners: |

|
| Final Assembly of Part 4 |
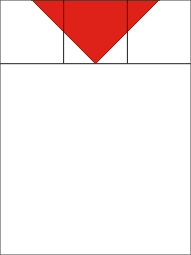
| Using the new squares arrange and sew the strip as shown: |

|
| Sew the new strip to the upper edge of the 6 1/2" x 6 1/2" white square. Mark this block as part 4. |
|
| Part 5 of 5: |
| Elements 1 & 2: |
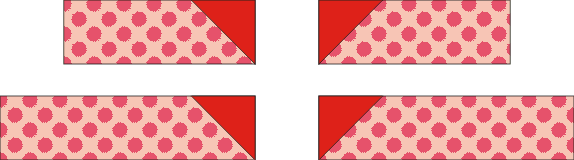
| For the next parts, take the white-and-red 2 1/2" x 6 1/2" and 2 1/2" x 8 1/2" strips and four 2 1/2" x 2 1/2" red squares. Use the red squares to give each white-and-red strip a red corner: |
|
| Element 3: |
| Take the white 2 1/2" x 6 1/2" strip and 2 red 2 1/2" x 2 1/2" squares. Use the squares to give the white strip two red corners along the bottom edge. |

|
| Elements 4 & 5: |
| For the next element, take the white 1 1/2" x 2 1/2" strip and two 1 1/2" x 1 1/2" red squares; and the red 1 1/2" x 2 1/2" strip and two 1 1/2" x 1 1/2" red-and-white squares. Use the red squares to make a "flying geese" block from the white strip. Use the red-and-white squares to make a "flying geese" block from the red strip: |
|
| Sew the white strip with red corners to the upper edge of the red 1 1/2" x 2 1/2" strip. Sew the red strip with white-and-red corners to the upper edge of the white-and-red 1 1/2" x 2 1/2" strip. Press the new squares. |
|
| Final Assembly of Part 5: |
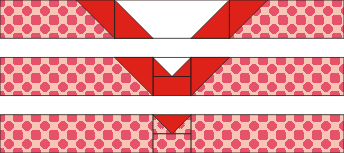
| Lay the individual elements of part 5 out as shown below. These are elements 1-5 decribed above, plus two 2 1/2" x 8 1/2" strips. Sew the elements into rows. |
|
| Sew the rows together to form Part 5. |
|
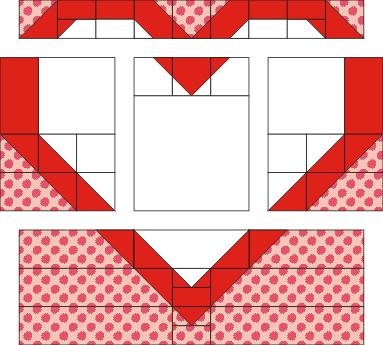
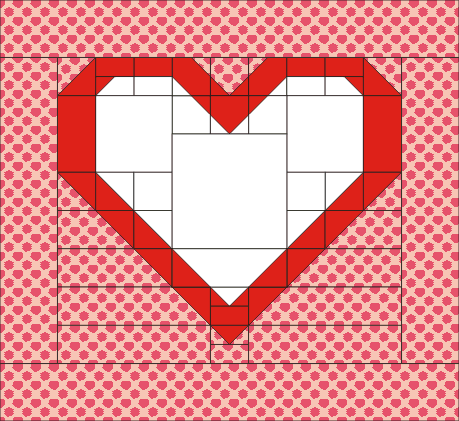
| Final Assembly of the Quilt Top: |
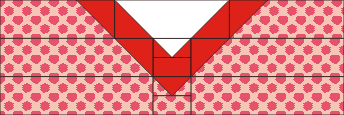
| Lay the 5 parts of the quilt top out as shown below: |
|
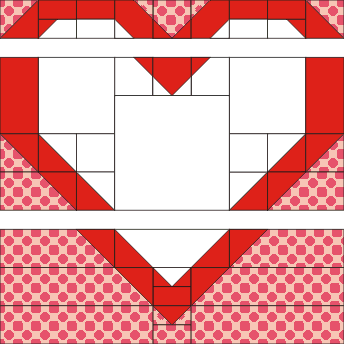
| Sew together parts 2, 3 and 4 (these are the blocks that form the central row): |
|
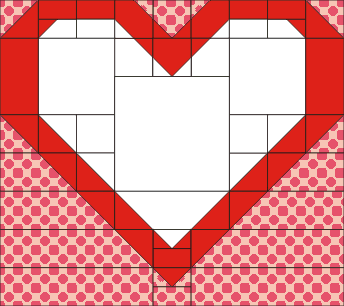
| Sew the the three rows together: |
|
| Sew the 2 1/2" x16 1/2 white-and-red strips to the left and right edges of the quilt top. |
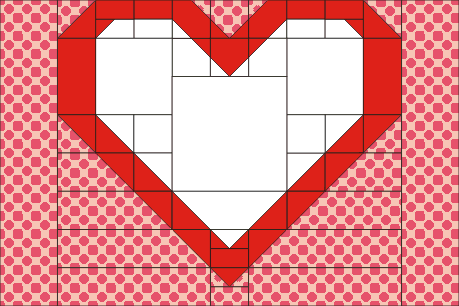
|
| Sew the 4 1/2" x 22 1/2" white-and-red strips to the upper edge and the 2 1/2" x 22 1/2" strip to the lower edge of the quilt top. |
|
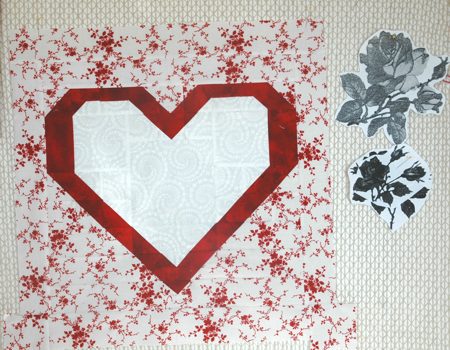
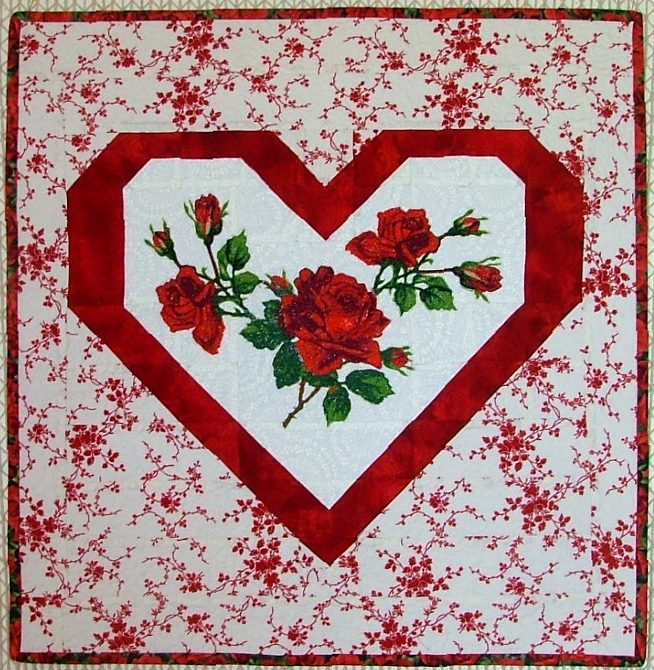
| Embroidery: |
| For our quilt we chose 2 roses from the Scarlet Rose Set for a large hoop. You can choose any other rose from our collection. It's a good idea before your start embroidery, to print out a screenshot of the rose and check how it will look on your quilt. |
|
| Cut a piece of polyester felt slightly larger than your quilt top. With your hands smooth the top on the felt. The felt will cling to the fabric. Hoop the fabric, the felt will work as the stabilizer, and make the embroidery. We had to hoop and re-hoop the fabric 3 times to embroider all roses we wanted. |
Quilting and Finishing:
|
Spread the backing on your table, face down. Cover with the working piece. The felt will work now as batting. Pin all three layers together with 1" pins.
We quilted around the embroidery and all over the quilt in a free-motion style. Remove the pins while working.
Press the work with heavy steam and square the work -- all corners should be 90 degrees and opposite sides should be of the same length.
Finish the raw edges with binding. |
|
|
Enjoy!
|
|
Happy Stitching!
|
|
Back to Scarlet Rose Set
|
|
Back to Projects Page
|


