Mobile Menu IconMenu
Advanced Embroidery Designs -- Online Center for Machine Embroidery Designs
Earth Day Sale! 40% off Floral, Landscapes, Redwork Flowers and Seasons!

Quilted Christmas Place Mats

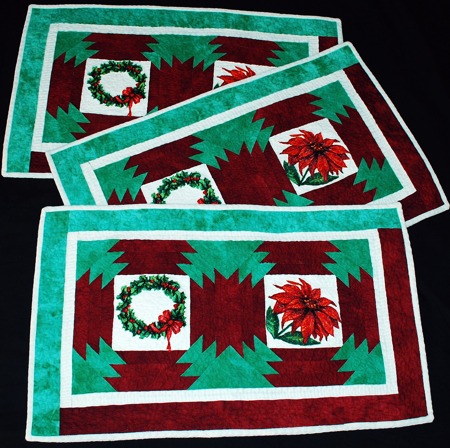
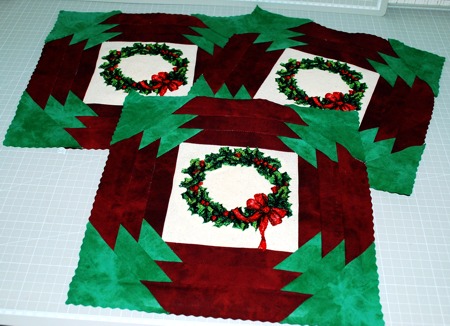
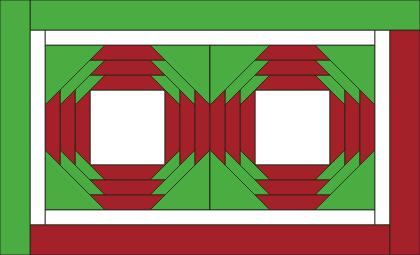
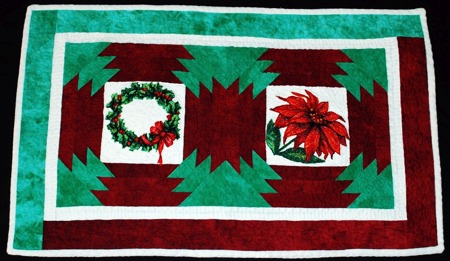
These charming quilted place mats look unusual, but they are actually easy and quick to put together.

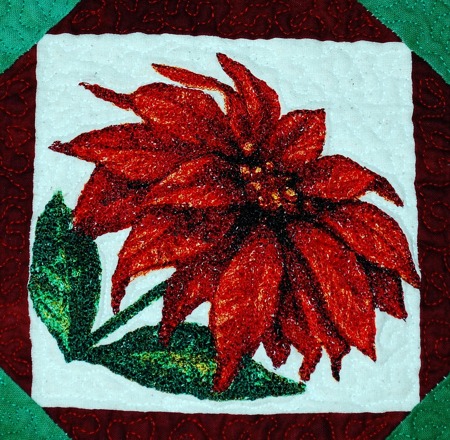
We used the photo-stitch machine embroidery designs Christmas Wreath and Poinsettia for the large hoop (5" x 7").

The finished size is about 17" x 28".

Quilted Christmas Place Mats image 1

You will need:

  • embroidery threads according to the color cards of the designs,
  • medium-weight cut-away stabilizer,
  • white, green and red fabrics,
  • backing and batting,
  • sewing and quilting thread,
  • quilter's ruler and rotary cutter (or washable fabric marker and scissors).

Cutting (for one placemat):

Out of white fabric, cut

  • 2 squares measuring 5 1/2" x 5 1/2",
  • 2 strips measuring 1 1/2" x 13 1/2" and 1 1/2" x 22 1/2",
  • 2 strips 2 1/2" wide and the length of the width of the fabric for the binding.
Out of the red fabric, cut
  • 4 strips measuring 1 1/2" x 5 1/2",
  • 8 strips measuring 1 1/2" x 7 1/2",
  • 8 strips measuring 1 1/2" x 9 1/2".
  • 4 strips measuring 1 1/2" x 11 1/2"
  • 1 strips measuring 2 1/2" x 24 1/2" and 1 strips measuring 2 1/2" x 15 1/2",
Out of green fabric, cut
  • 8 squares measuring 2 1/4" x 2 1/4"
  • 8 squares measuring 3 1/4" x 3 1/4"
  • 8 squares measuring 4 1/4" x 4 1/4"
  • 1 strip measuring 2 1/2" x 26 1/2 and
  • 1 strip measuring 2 1/2" x 17 1/2.

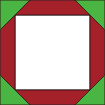
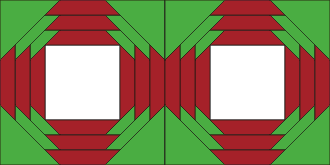
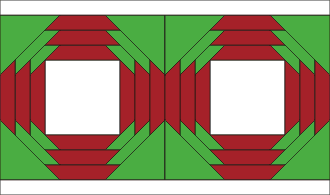
Assembly of the Block:

Note: seam allowance is 1/4". Press every seam immediately after you make it.

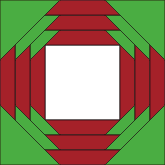
Step 1: Sew the red 1 1/2" x 5 1/2" strips to the upper and lower edges of the white 5 1/2" x 5 1/2" square.

Christmas Placemats Machine Embroidery Project

Step 2: Sew the red 1 1/2" x 7 1/2" strips to the left and right edges of the working piece.

Christmas Placemats Machine Embroidery Project

Step 3: Position a 2 1/4" green square face down over one corner of the working piece. Draw a diagonal and stitch on the line. Trim seam allowance to 1/4", unfold and press.

Christmas Placemats Machine Embroidery Project

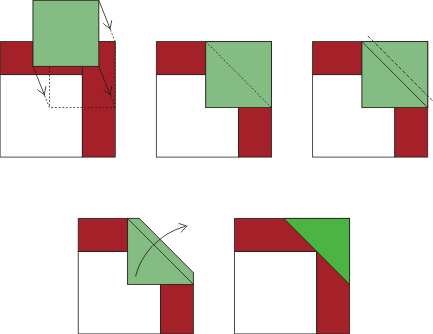
Repeat for all corners of the square.

Christmas Placemats Machine Embroidery Project

Step 4: Sew the red 1 1/2" x 7 1/2" strips to the upper and lower edges of the working piece. Sew the red 1 1/2" x 9 1/2" strips to its right and left edges.

Christmas Placemats Machine Embroidery Project

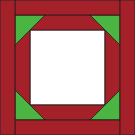
Step 5: Repeat Step 3 using the 3 1/4" green squares.

Christmas Placemats Machine Embroidery Project

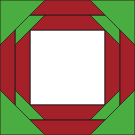
Step 6: Sew the red 1 1/2" x 9 1/2" strips to the upper and lower edges of the working piece. Sew the red 1 1/2" x 11 1/2" strips to its right and left edges.

Christmas Placemats Machine Embroidery Project

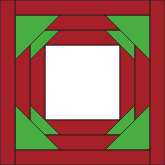
Step 7: Repeat Step 3 using the 4 1/4" green squares..

Christmas Placemats Machine Embroidery Project

Embroidery:

Upload the embroidery designs Christmas Wreath and Poinsettia into your machine and embroider them in the white centers of the blocks.
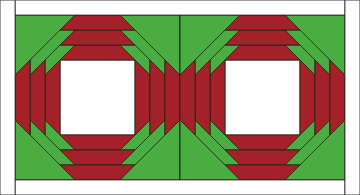
Quilted Christmas Place Mats image 2

Assembly of the Top

Sew together two blocks with the two different embroidered patterns:

Christmas Placemats Machine Embroidery Project

Sew the white 1 1/2" x 22 1/2" strips to the long sides of the working piece.

Christmas Placemats Machine Embroidery Project

Sew the white 1 1/2" x 13 1/2" strips to the short sides of the working piece.

Christmas Placemats Machine Embroidery Project

Sew the red 2 1/2" x 24 1/2 strip to the lower edge of the working piece.

Christmas Placemats Machine Embroidery Project

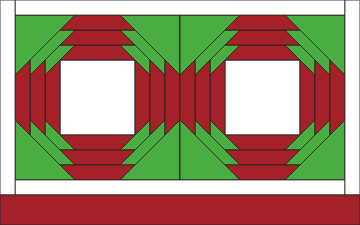
Sew the red 2 1/2" x 15 1/2" strip to the right edge of the working piece.

Christmas Placemats Machine Embroidery Project

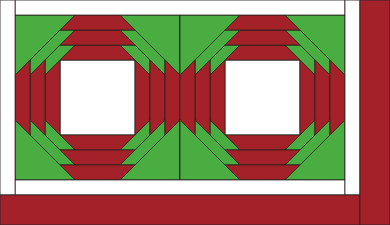
Sew the green 2 1/2" x 26 1/2" strip to the upper edge of the working piece.

Christmas Placemats Machine Embroidery Project

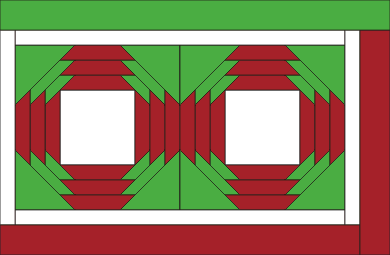
Sew the green 2 1/2" 17 1/2" strip to the left edge of the working piece.

Christmas Placemats Machine Embroidery Project

Quilting and Finishing:

Now place the backing on a flat surface (table) face down. Cover with batting. Spread your working piece over it.

Pin all three layers together with 1" pins and start quilting. We quilted with a meandering pattern around the embroidery and all over the place mat.

Quilted Christmas Place Mats image 3

After the quilting is finished, press the work with heavy steam and square the work -- all corners should be 90 degrees and opposite sides should be of the same length.

Finish the raw edges with the binding.

Quilted Christmas Place Mats image 4

The place mat is finished. Enjoy!

Back to Christmas Wreath and Poinsettia

Back to the Project Page

Mailing List
Enter your e-mail for news, discounts and exclusive special offers.


Find us on Twitter

Special Offers
Bonus design on all orders over $30
Ivy Vine Border Set

Shop Now!

Announcement
Best Project Contest
The results are in!
Featured Project
Check out our latest project Birds and Blooms Quilted Tablerunner
Tutorials
Never heard of photo stitch? - Check out our What is Photo Stitch? page
Most Popular Designs
|| Home || Shop || Free Designs || New Designs ||
|| Projects || Tutorials || Links || About Us || Contact Us ||
|| Store Policy || Licensing || Accessibility ||

Social Media:

Copyright © Advanced Embroidery Designs. All Rights Reserved.