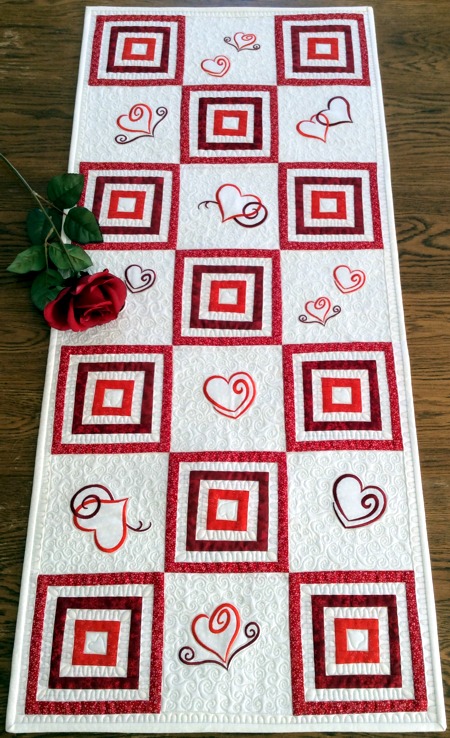
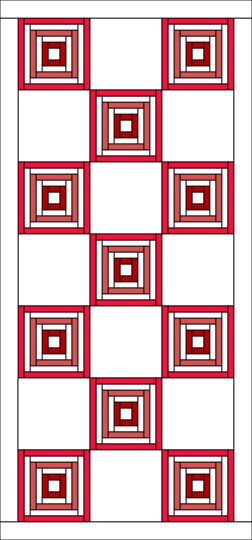
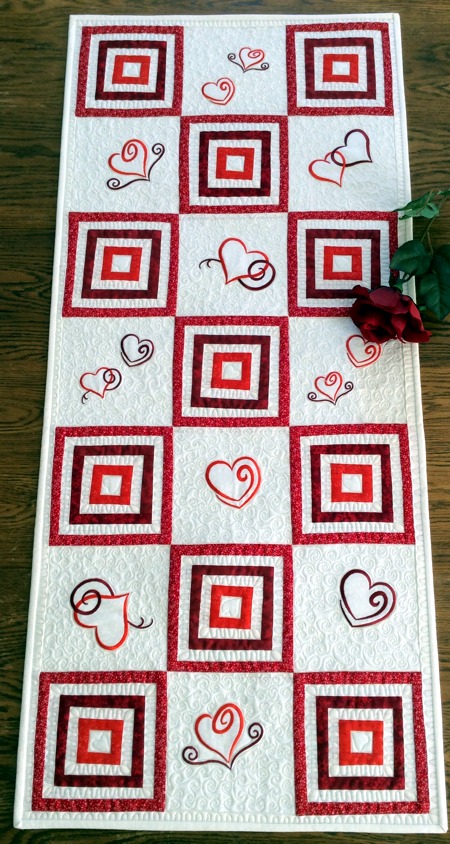
This table runner is easy to make and looks stylish and attractive. It uses the traditional Courthouse block. It's great for using up any scraps of red fabric you may have laying around from other projects.
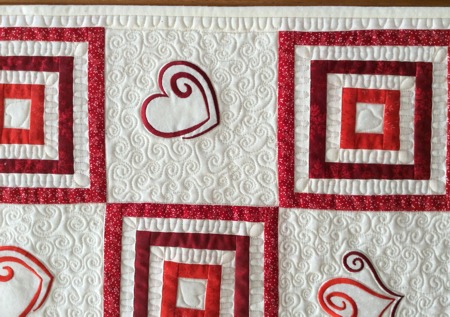
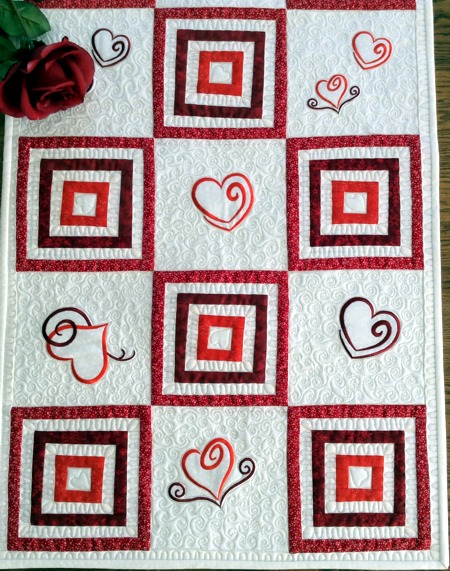
The table runner is embellished with the designs from the Valentine Hearts set.
The finished size is about 20" x 43". You can make the table runner longer or shorter by adding or removing rows.
|
|
|
You will need :
- embroidery threads (either polyester or rayon) of red shades,
- 1 yard of light colored (white, cream, pale yellow) cotton fabric,
- scraps of different red fabrics,
- light-weight iron-on cut-away stabilizer for the embroidery,
- batting,
- fabric for the backing,
- quilting thread,
- quilter's ruler and rotary cutter, or pencil and scissors.
|
Cutting:
|
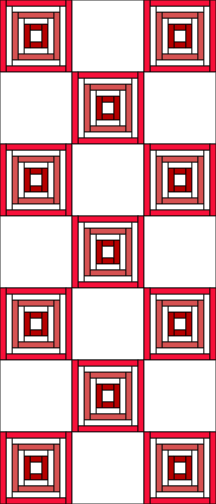
| For this table runner, you need 11 Courthouse blocks and 10 plain blocks. |
Out of light fabric, cut
- 10 squares measuring 6 1/2" x 6 1/2";
- 11 squares measuring 1 1/2" x 1 1/2",
- 2 strips measuring 2" x 21 1/2" and
- 2 strips measuring 2: x 42 1/2".
Cut several strips 1" wide and the length of the width of the fabric.
Subcut these strips into:
- 22 strips measuring 1" x 2 1/2",
- 22 strips measuring 1" x 3 1/2",
- 22 strips measuring 1" x 4 1/2" and
- 22 strips measuring 1" x 5 1/2".
Use the remaining fabric for the binding: 3 strips 2 1/2" wide and the length of the width of the fabric (each strip 42" - 43" long).
|
Out of scraps of the red fabrics, cut
- 22 strips measuring 1" x 1 1/2",
- 22 strips measuring 1" x 2 1/2",
- 22 strips measuring 1" x 3 1/2",
- 22 strips measuring 4 1/2",
- 22 strips measuring 5 1/2" and
- 22 strips measuring 1" x 6 1/2".
|
Assembly of the Courthouse Block.
|
| Note: seam allowance is 1/4", press each seam after you made it. |
| Sew the red 1" x 1 1/2" strips to the upper and lower edges of the white 1 1/2" x 1 1/2" squares. |

|
| Sew the red 1" x 2 1/2" strips to the left and right edges. |
 |
Sew the white 1" x 2 1/2" strips to the upper and lower edges of the working piece.
|
 |
Sew the white 1" x 3 1/2" strips to the left and right edges.
|
 |
| Sew the red 1" x 3 1/2" strips to the upper and lower edges. |
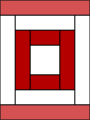 |
| Sew the red 1" x 4 1/2" strips to the right and left edges. |
 |
| Sew the white 1" x 4 1/2" strips to the upper and lower edges. |
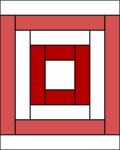 |
| Sew the white 1" x 5 1/2" strips to the left and right edges. |
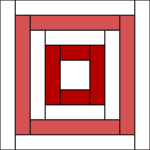 |
| Sew the red 1" x 5 1/2" strips to the upper and lower edges. |
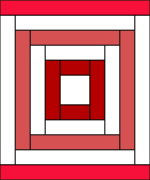 |
| Sew the red 1" x 6 1/2" strips to the right and left edges. |
 |
| Assembly of the Top: |
| Make 4 rows with 2 Courthouse blocks and 1 plain block: |
 |
| Make 3 rows with 1 Courthouse block and 2 plain blocks: |
 |
| Alternating the rows, assemble the top. Start and finish with the rows containing 2 Courthose blocks. |
 |
| Sew the white 2" x 42 1/2" strips to the long sides of the working piece. |
 |
| Sew the white 2" x 21 1/2" strips to the short sides of the working piece. |
 |
| Embroidery: |
If you have embroidery software on your computer, open the files from the Valentine Hearts set and make print-outs. With the paper print-outs decide the position of each design on the top.
Upload the files into the embroidery machine. Stabilize the plain blocks with light-weight stabilizer. Embroider the files; we embroidered the smaller designs two per block and the larger designs one per block. |
| Quilting and Finishing: |
Now place the backing on a flat surface (table) face down. Cover with batting. Spread your working piece over it.
Pin all three layers together with 1" pins and start quilting. We quilted around the embroidery and all over the table runner in a freemotion style. |
|
| After the quilting is finished, press the work with heavy steam and square the work -- all corners should be 90 degrees and opposite sides should be of the same length. |

|
| Finish the raw edges with the binding. |
|
| Your table runner is ready to decorate your house in February. Enjoy! |
|
|
|
Back to Valentine Hearts
|
Back to Projects Page
|


