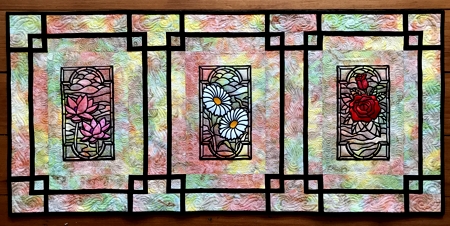
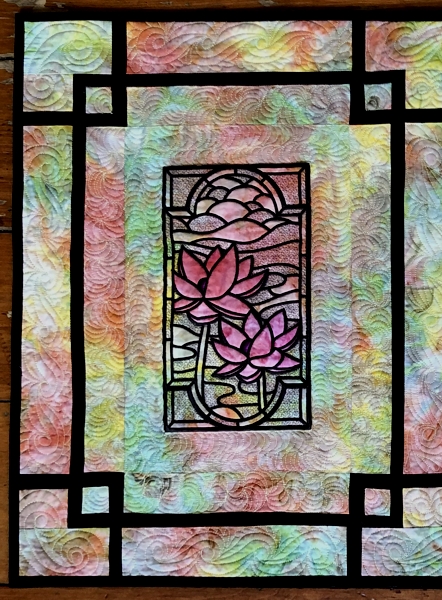
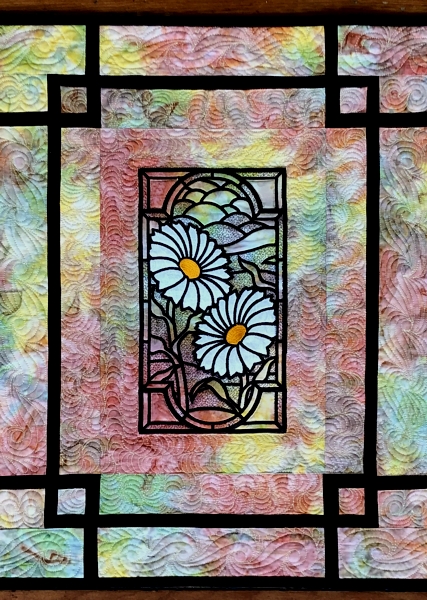
We made this attractive wall quilt using the designs from the Stained Glass Flower Panel Set. The multi-hued batik that we used for the background enhances the stained glass effect.
The finished size is about 21" x 43 1/2".
We used the designs for the commercial hoop (8"x 12").
|
|
You will need :
- embroidery threads either polyester or rayon, the choice of colors is up to you,
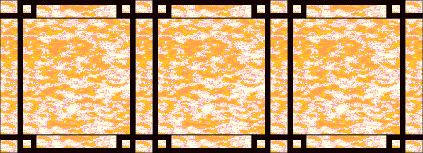
- about 1 yard of base fabric for the quilt, (we used a multi-colored batik),
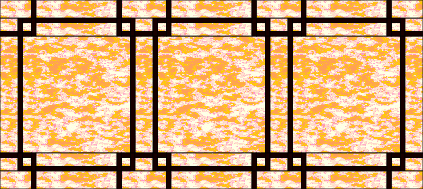
- about 1/2" yard of black of dark brown fabric for the sashing and binding,
- fabric for the applique,
- medium-to-heavy weight embroidery stabilizer,
- fabric for the backing,
- batting,
- applique scissors,
- iron,
- quilting threads of matching colors.
|
Embroidery:
|
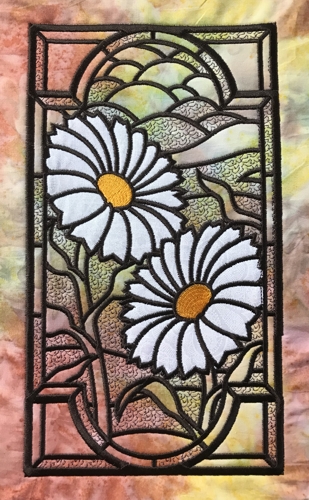
| Embroider the designs from the Stained Glass Flower Panel Set following the instructions. |
|
After the embroidery is done, trim each panel to 12 1/2" (wide) x 13 1/2" (high).
|
Cutting:
|
To make assembly easier, we've divided the cutting according to parts of the quilt.
For the middle row with embroidery:
Out of base fabric, cut 4 strips measuring 2 1/2" x 13 1/2".
Out of dark-colored (black or brown) fabric, cut 6 strips measuring 1" x 13 1/2".
For the first border, which will be attached to the upper and lower edges of the middle row:
Out of base fabric, cut
- 8 strips measuring 2" x 2 1/2",
- 12 squares measuring 1 1/2" x 1 1/2" and
- 6 strips measuring 2 x 9 1/2"
Out of dark fabric, cut
- 8 strips measuring 1" x 2 1/2",
- 24 strips measuring 1" x 1 1/2",
- 24 strips measuring 1" x 2 1/2" and
- 6 strips measuring 1" x 9 1/2".
For the second border:
Out of base fabric, cut
- 4 strips measuring 2 1/2" x 4",
- 6 strips measuring 2 1/2" x 9 1/2" and
- 4 strips measuring 2 1/2" x 5 1/2".
For convenience, keep all cut pieces marked and sorted.
Use the remaining dark fabric for the binding.
|
Assembly:
|
| Note: Seam allowance is 1/4", press all seams immediately after you make them. |
Middle Row:
|
Decide in which order you'd like to place the stitch-outs.
Sew 1" x 13 1/2" dark strips to the right and left edges of each stitch-out.
|
|
| Sew the embroidered panels and 2 1/2" x 13 1/2" base fabric strips into a row, alternating the pieces. Start and end with the base fabric strip. |
|
First Border:
|
The first border consists of 3 different units. We're going to assemble them first.
Sew the 1" x 2 1/2" dark strips and 2" x 2 1/2" base fabric strips to get 8 units. Mark them as unit 1:
|

|
| For the second unit, sew the 1" x 1 1/2" dark strips to the upper and lower edges of the 1 1/2" x 1 1/2" squares. Then sew 1" x 2 1/2" strips to the left and right edges. You'll get 12 of these units: |

|
| For the third unit, sew the 2" x 9 1/2" base fabric strips to the 1" x 9 1/2" dark strips. You'll get 6 such units. |

|
Sew all the units together in the following order:
Unit 1 - unit 2 - unit 3 - unit 2. Repeat 3 times. Finish with unit 1. You will need to make 2 borders. |

|
| Sew the borders to the upper and lower edges of the middle row. Note the alignment of the borders. |
|
| Second border: |
Sew all parts of the second border in the following order:
base fabric 2 1/2" x 4" - (dark strip 1" x 2 1/2" - base fabric strip 2 1/2" x 9 1/2" - dark strip - base fabric strip 2 1/2" x 5 1/2") three times - dark strip - base fabric strip 2 1/2" x 4". |

|
| Sew the second border to the upper and lower edges of the quilt top. |
|
| Quilting and Finishing: |
Now place the backing on a flat surface (table) face down. Cover with batting. Spread your working piece over it.
Pin all layers together.
We quilted in a free-motion style all over the wall quilt. |
|
| Press with heavy steam. Square the quilt. Finish the raw edges with the binding. |
|

|
Have fun!
|
|
Back to Stained Glass Flower Panel Set
|
Back to Projects Page
|


