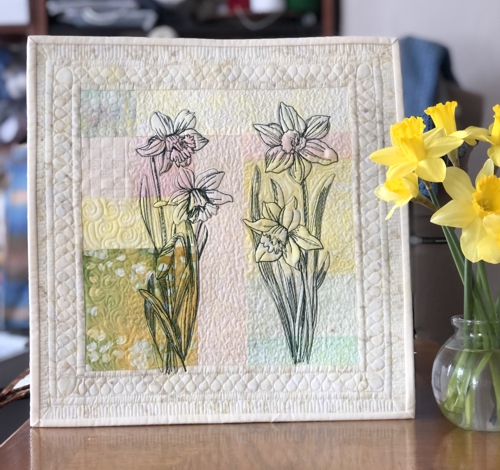
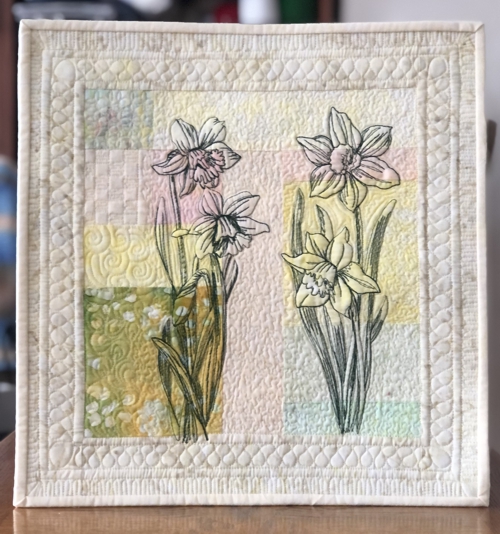
Usher in the Spring with this small, charming wall quilt. The construction of the quilt is very simple: the background is pieced of pastel-colored fabrics and beige borders.
Designs are from the One-Color Daffodil Set for the mega hoop. The finished size of the quilt is about 14" x 14 1/2".
|
|
You will need :
- embroidery threads either polyester or rayon - black, or very dark green,
- 1/4 yard of beige fabric for the borders and binding,
- scraps of pastel colored fabrics for the background (we used batiks in very light hues),
- light-weight cut-away embroidery stabilizer,
- fabric for the backing,
- batting,
- quilter's ruler,
- rotary cutter,
- iron,
- #12 universal needle,
- #12-#14 quilting needle
- a pencil or pen and small pieces of paper to mark the cut shapes.
|
Cutting:
|
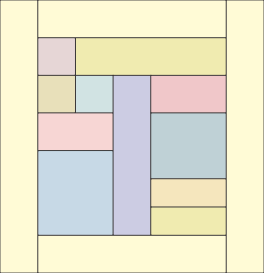
We used scraps of 11 different hues. Note that each piece should be a different color. Cut:
- 3 squares measuring 2 1/2" x 2 1/2", each a different color. Mark them 1, 3 and 4.
- a strip measuring 2 1/2" x 8 1/2", mark it 2.
- 2 strips measuring 2 1/2" x 4 1/2", each a different color, mark them 5 and 7.
- a piece measuring 4 1/2" x 5", mark it 6.
- a square measuring 4 1/2" x 4", mark it 8.
- 2 strips measuring 2" x 4 1/2", each a different color, mark them 9 and 10.
- a strip measuring 2 1/2" x 9", mark it 11.
Out of the fabric for the borders, cut:
- 2 strips measuring 2 1/2" x 10 1/2" and
- 2 strips measuring 2 1/2" x 14 1/2".
|
|
Assembly:
|
Note: seam allowance is 1/4", press the seam immediately after you make it. In the instructions below, we'll refer to the numbers of the cut shapes.
|
Sew square 1 to strip 2. Set aside.
|

|
Sew squares 3 and 4 together.
|

|
Sew strip 5 to squares 3 and 4.
|

|
Sew rectangle 6 to the lower edge of strip 5.
|

|
Sew strip 11 to the right edge of the working piece.
|
|
Sew the shapes 7, 8, 9 and 10 together.
|

|
Sew this unit to the right edge of strip 11.
|
|
Sew the first strip to the upper edge of the working piece.
|
|
Sew the 2 1/2" x 10 1/2" borders to the upper and lower edges of the working piece.
Sew the 2 1/2" x 14 1/2" borders to the left and right edges of the working piece.
|
|
Embroidery:
|
Mark the position of the embroidery on the central part. If you have a printer and embroidery software, print-outs of the designs can be helpful. If you do not, you can cut out rectangles of the same size as the designs and arrange them on the fabric to determine the position of the embroidery.
Stabilize the chosen area. Hoop the fabric tightly and embroider the designs one by one.
|
|
Quilting and Finishing
|
Now place the backing on a flat surface (table) face down. Cover with batting. Spread your working piece over it.
Pin all layers together.
We quilted in a free-motion style all over the quilt. |
| Press with heavy steam. Square the quilt. Finish the raw edges with the binding. |
|
| Have fun! |
|
|
Back to Daffodil Set
|
Back to Projects Page
|


