|
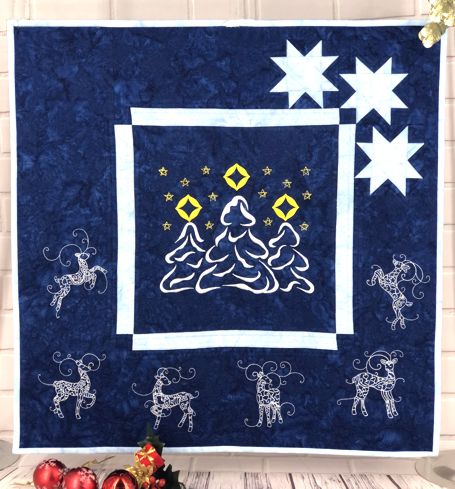
Welcome to the Christmas Night in the Woods Wall Quilt tutorial, where you’ll learn to sew a festive wall quilt from start to finish. This guide will walk you through the steps to create the quilt top, add machine embroidery for a holiday touch, and quilt the layers together. Follow along to bring this cozy, woodland-themed design to life for your home this season. We used the design of the Christmas Woods in the center of the quilt and one-color deer designs from the Reindeer Set on the borders.
The finished size of the quilt is about 23 1/2" x 24".
|
|
You will need :
- embroidery threads either polyester or rayon - golden yellow and white;
- about 1 yard of light-coloreddark blue solid fabric for the central part and borders;
- small amount of ice-blue fabric for the borders, and binding;
- fabric for the backing;
- light-weight cut-away embroidery stabilizer;
- batting;
- quilter's ruler;
- rotary cutter;
- iron;
- #12 universal needle;
- quilting threads of matching colors;
- #12-#14 quilting needle.
|
Cutting:
|
Out of the ice-blue fabric, cut
- 4 strips measuring 1 1/2" x 12 1/2";
- 4 squares measuring 2 1/2" x 2 1/2";
- 24 squares measuring 1 1/2" x 1 1/2"
Use the remaining fabric for the backing. |
Out of the dark blue fabric, cut
- 1 square measuring 12 1/2 x 12 1/2,
- 2 strips measuring 5 1/2" x 9 1/2",
- 1 strip measuring 5 1/2" x 19 1/2" and
- 1 strip measuring 5 1/2" x 24 1/2".
Cut the remaining fabric into several strips 1 1/2" and the length of the width of the fabric.
Subcut these strips into the following parts:
- 14 squares measuring 1 1/2" x 1 1/2",
- 13 strips measuring 1 1/2" x 2 1/2",
- 1 strip measuring 1 1/2" x 10 1/2",
- 2 strips measuring 1 1/2" x 5 1/2" and
- 1 strip measuring 1 1/2" x 4 1/2".
|
Assembly:
|
| Note: seam allowance is 1/4", press the seam immediately after you make it. |
| Central Part: |
Sew the ice-blue 1 1/2" x 12 1/2" strips to the upper and lower edges of the dark blue 12 1/2" x 12 1/2" square.
|

|
| Sew the dark blue 1 1/2" x 1 1/2" to each end of the remaining ice-blue 1 1/2" x 12 1/2" strips. Sew these new strips to the left and right edges of the central part. |

|
Borders - Star Block:
|
For the stars, you will need:
- 4 ice-blue squares measuring 2 1/2" x 2 1/2",
- 24 ice blue squares measuring 1 1/2" x 1 1/2",
- 12 dark blue strips measuring 1 1/2" x 2 1/2" and
- 12 dark blue squares measuring 1 1/2" x 1 1/2".
|
|
| With the dark blue 1 1/2" x 2 1/2" strips and ice blue 1 1/2" x 1 1/2" squares make 12 flying geese units: |
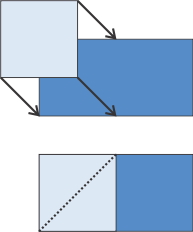
Position a 1 1/2" x 2 1/2" strip on your working table, face up. Position one of the 1 1/2" squares, face down, on the left of the rectangle. Align the sides.
With a thin graphic pencil, draw a diagonal to connect the upper right corner and the lower left corner. |
|
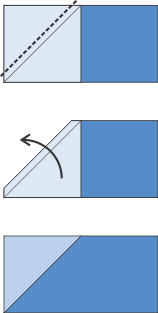
Machine stitch along the diagonal.
Cut the excess fabric, leaving scant 1/4" seam allowance.
Unfold the square and press. |
|
| Repeat for the other side of the strip. |

|
Star Block:
|
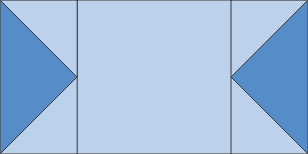
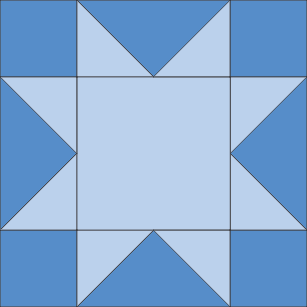
| Sew two of the "flying geese" units to the left and right edges of the ice-blue 2 1/2" x 2 1/2" squares. |
|
Take two "flying geese" strips and four 1 1/2" x 1 1/2" squares. Sew a square to each end of the "flying geese"unit.
NOTE: Set aside 1 "flying geese" unit and don't attach the end squares! This will be used for the 3rd star. |

|
Sew these strips to the top and bottom edges of the central part of the block.
Finish 2 star blocks. |
|
| When sewing the third star, DO NOT attach the bottom strip to the block, leave that edge unfinished. |

|
| Right Border: |
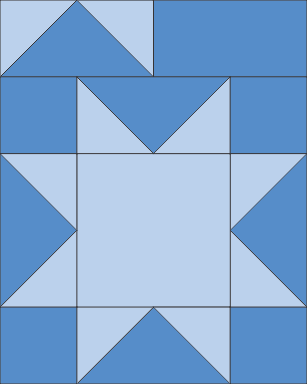
| Sew the 1 1/2" x 2 1/2" strip to the right edge of the remaining "flying geese" unit. The points of the star should be pointing down. |

|
| Sew this strip to the upper edge of one of the finished star blocks. |
|
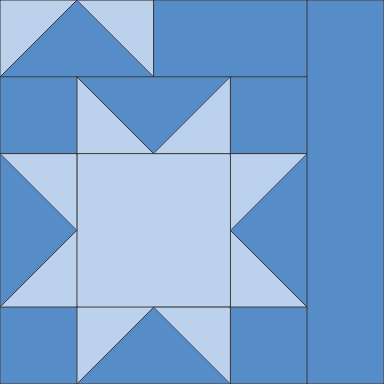
| Sew one of the 1 1/2" x 5 1/2" strip to the right edge of the unit. |
|
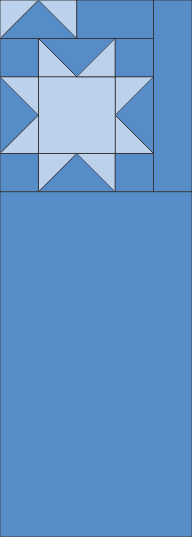
| Sew one of the 5 1/2" x 9 1/2" strips to the bottom of the working piece. The right border is done. |
|
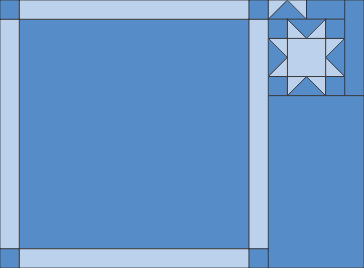
| Sew the right border to the central part of the quilt. |
|
| Upper Border: |
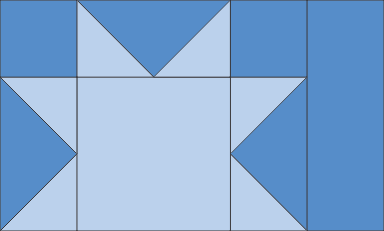
| Sew the 1 1/2" x 3 1/2" dark blue strip to the right edge of the unfinished star. |
|
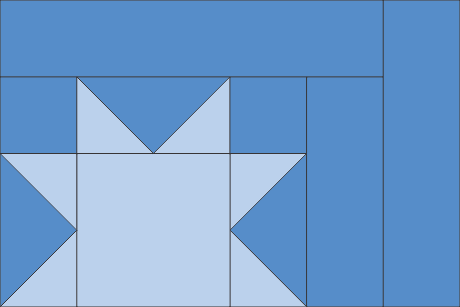
| Sew the remaining 1 1/2" x 5 1/2" dark blue strip to the upper edge of the unfinished star. |

|
| Sew the 1 1/2" x 4 1/2" dark blue strip to the right edge of the unit. |
|
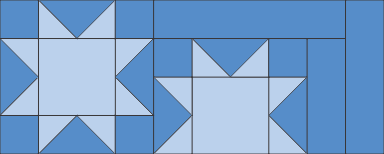
| Sew this unit to the right edge of the remaining star block. |
|
| Sew the 1 1/2" x 10 1/2" strip to the upper edge of the working unit. |
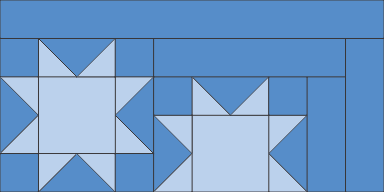
|
Sew the remaining 5 1/2" x 9 1/2" strip to the left edge of the working piece.
|

|
The upper border is done.
Sew it to the central part. |
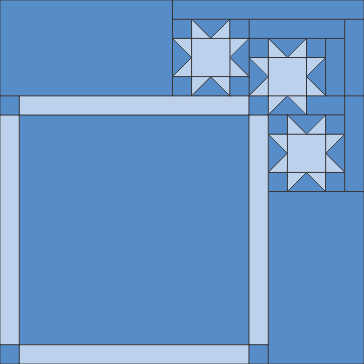
|
Sew the 5 1/2" x 19 1/2" strip to the left edge of the quilt.
Sew tge 5 1/2" x 24 1/2" strip to the lower edge of the quilt. |
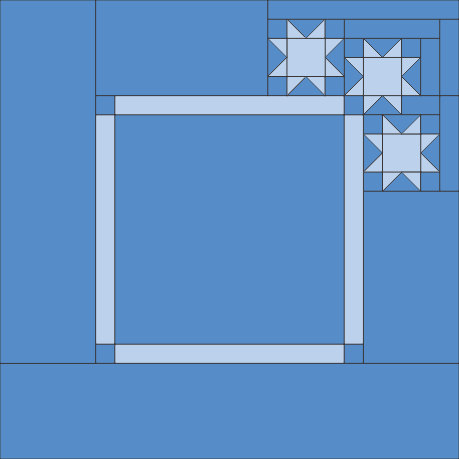
|
| Embroidery |
Upload the file of the Christmas Woods to the embroidery machine.
Select threads. Stabilize the central part.
Hoop the fabric tightly and embroider the design in the center.
Remove the excess stabilizer.
|
Upload the files from the One-Color Reindeer Set to the embroidey machine.
Mark the position of the embroidery on the borders. If you have a printer and embroidery software, print-outs of the designs can be helpful. If you do not, you can cut out rectangles of the same size as the designs and arrange them on the fabric to determine the position of the embroidery.
Working with one pattern at a time, stabilize the area. Hoop the fabric tightly and embroider the designs one by one |
Quilting and Finishing
|
Now place the backing on a flat surface (table) face down. Cover with batting. Spread your working piece over it.
Pin all layers together.
We quilted in a free-motion style all over the working piece. Start from the central part, and echo-quilt the emboidery first.
Then proceed o the borders, again echo-quilt the deer first.
|

|
Press with heavy steam. Square the piece - all angles should be 90 degrees and opposite sides of the same length.
Finish the raw edges with the binding. |

|
| Have fun! |

|

|
|
Back to Christmas Woods and Reindeer Set
|
Back to Projects Page
|
