|
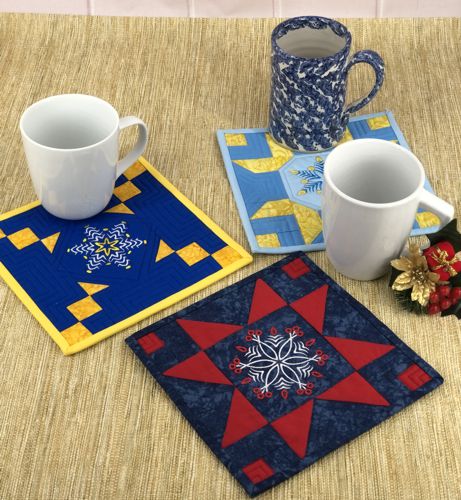
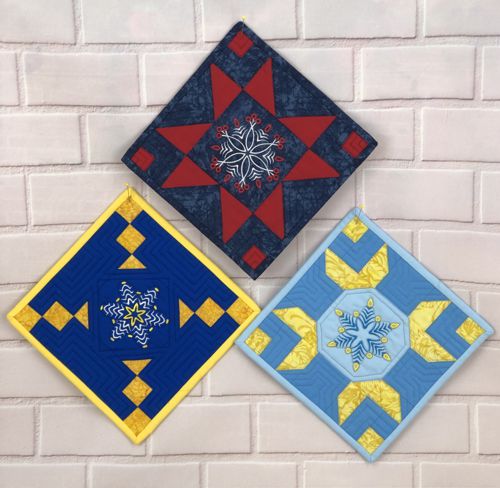
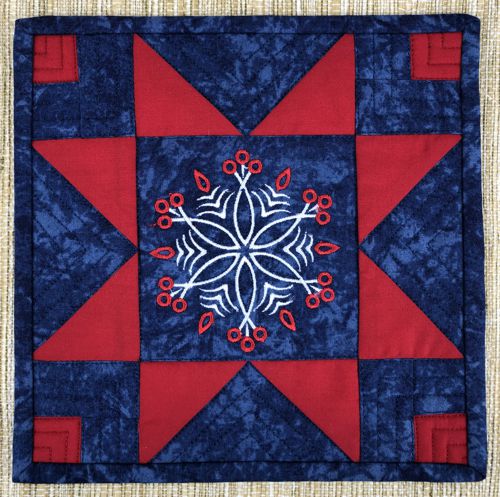
Create charming winter-themed mug rugs that double as pot holders! This tutorial shows you how to piece fabric squares, add beautiful snowflake machine embroidery, and quilt them into functional pieces. These 8" x 8" quilted squares are perfect for protecting your table from hot mugs or using as decorative pot holders in your kitchen. For these small quilts we used the designs from the Christmas Snowflake Set.
The finished size of each item is about 8" x 8".
|
|
Materials needed:
- Embroidery threads (polyester or rayon)
- Scraps of red, blue, and yellow fabrics (or your choice of colors)
- Fabric for binding, preferably in a matching color
- Fabric for backing
- Medium-weight cut-away embroidery stabilizer
- Batting
- Quilter's ruler
- Rotary cutter
- Iron
- #12 universal needle for piecing
- Quilting threads in matching colors
- #12-#14 quilting needle
|
|
Embroidery:
|
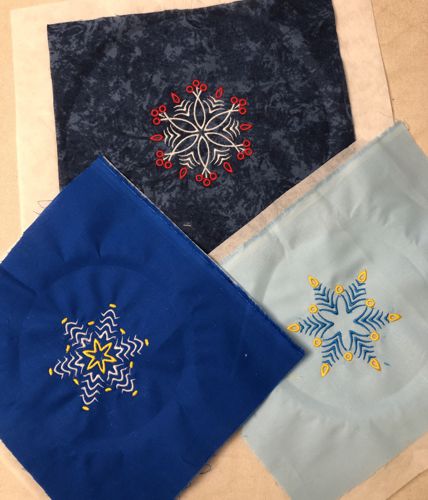
| Upload the files from the Christmas Snowflake Set into your embroidery machine. |
Select threads. Hoop the fabric tightly and embroider the designs one by one.
Remove the excess stabilizer. |
|
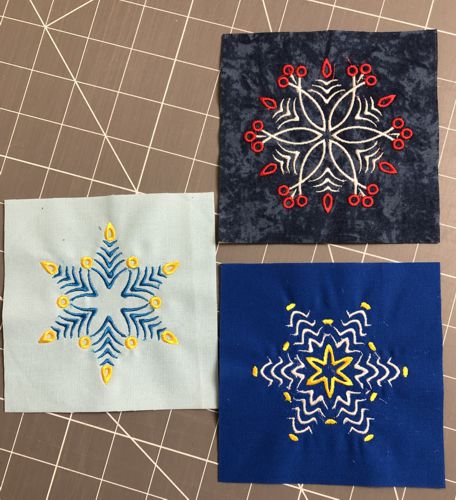
| Trim the stitch-outs to 4 1/2" squares, leaving equal margins around the embroidery. |
|
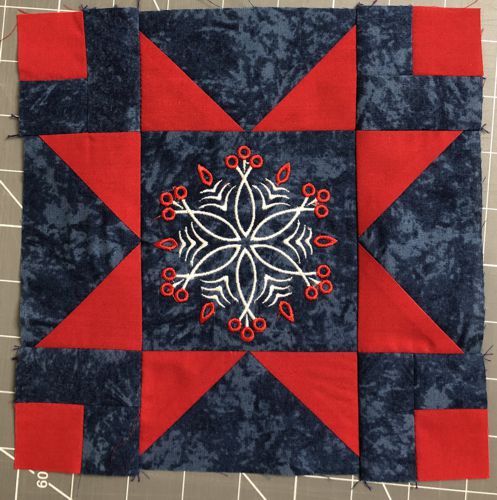
| The First Mug Rug/Pot Holder: |
| For the first mug rug/pot holder we used gray-blue and red fabrics. |
|
| Cutting: |
From blue fabric, cut:
- 4 strips measuring 2 1/2" x 4 1/2"
- 4 strips measuring 1 1/2" x 2 1/2"
- 1 strip measuring 1 1/2" x 6 1/2"
From red fabric, cut:
- 8 squares measuring 2 1/2" x 2 1/2"
- 1 strip measuring 1 1/2" x 6 1/2"
|
Assembly:
|
| Note: Seam allowance is 1/4" unless otherwise noted. Press each seam immediately after stitching. |
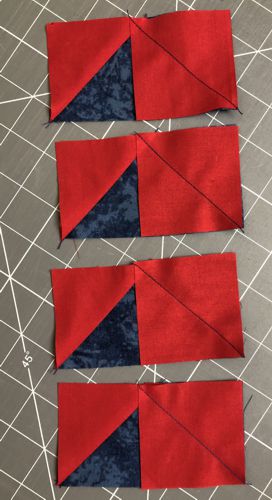
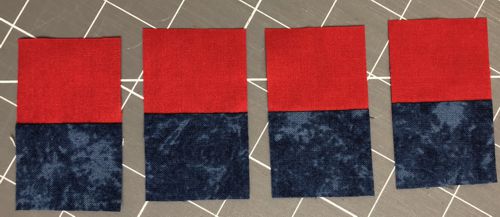
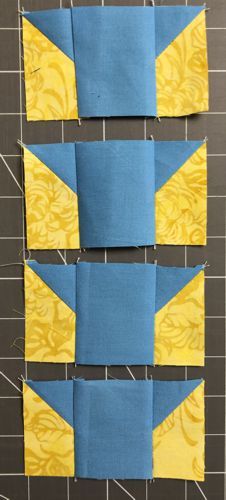
Position a 2 1/2" x 4 1/2" strip on your working table, face up. Position one of the 2 1/2" squares, face down, on the left of the rectangle. Align the sides.
With a thin graphic pencil, draw a diagonal to connect the upper right corner and the lower left corner. Machine stitch along the diagonal. |

|
| Repeat for all 2 1/2" x 4 1/2" strips. |

|
Cut the excess fabric, leaving 1/4" seam allowance.
|

|
| Unfold the square and press. |

|

|
| Repeat for the other side of the strip. |
|

|

|

|
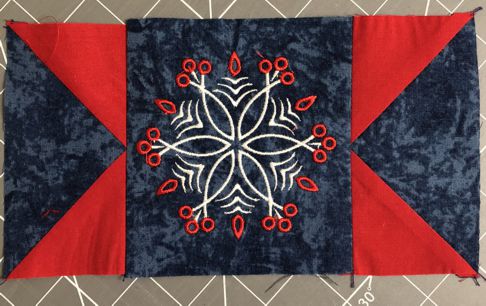
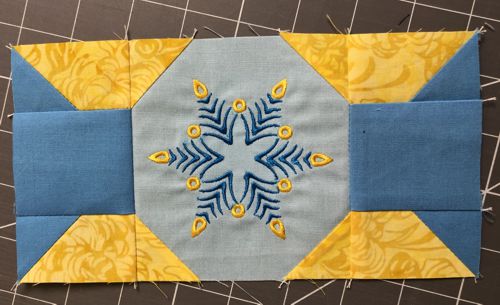
| Sew 2 of the "flying geese" units to the left and right edges of the embroidered center. |
 |
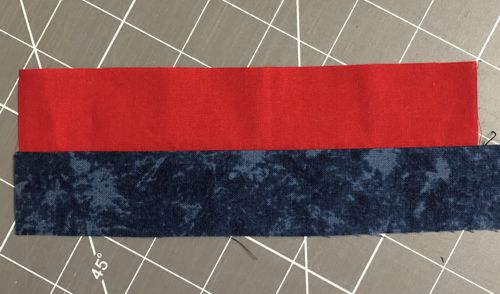
| Sew a red and blue 1 1/2" x 6 1/2" strips together along the long sides. |
|
| Subcut the 2-color strip into 4 strips 1 1/2" wide. |
|
Sew the 2-colored strips with the blue strips measuring 1 1/2" x 2 1/2".
For the left square in the upper row, sew the blue strip to the right edge of the 2-colored strip, red square looking up.
For the right square in the upper row, sew the blue strip to the left edge of the 2-colored strip, red square looking up.
|

|
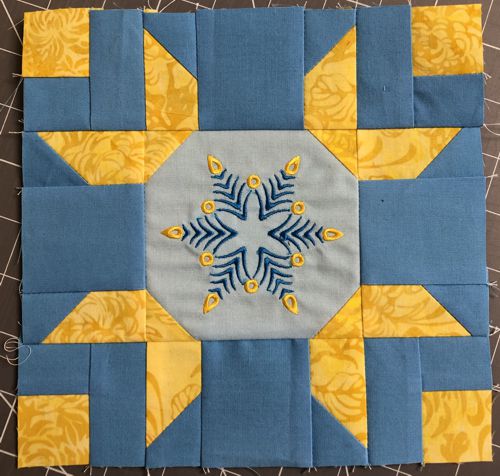
For the left square in the lower row, sew the blue strip to the right edge of the 2-colored strip, red square looking down.
For the right square in the upper row, sew the blue strip to the left edge of the 2-colored strip, red square looking down. |
| Sew the new squares to the remaining "flying geese" units. |

|
| Sew the strips to the upper and lower edges of the center. |
|
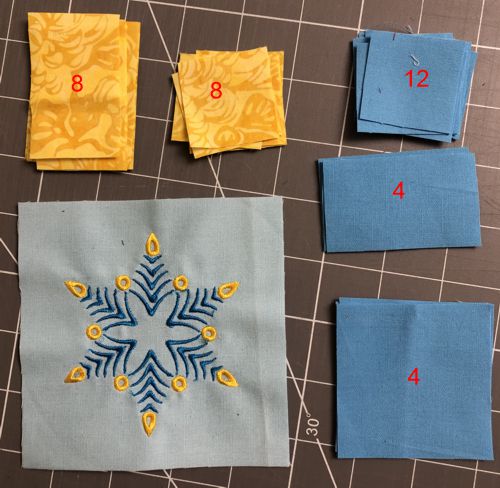
| The Second Mug Rug/Pot Holder: |
| For the second piece we used light blue and yellow fabrics. |

|
| Cutting: |
From blue fabric, cut:
- 4 squares measuring 2 1/2" x 2 1/2"
- 4 strips measuring 1 1/2" x 2 1/2"
- 12 squares measuring 1 1/2" x 1 1/2"
From yellow fabric, cut:
- 8 strips measuring 1 1/2" x 2 1/2"
- 8 squares measuring 1 1/2" x 1 1/2"
|
|
| Assembly: |
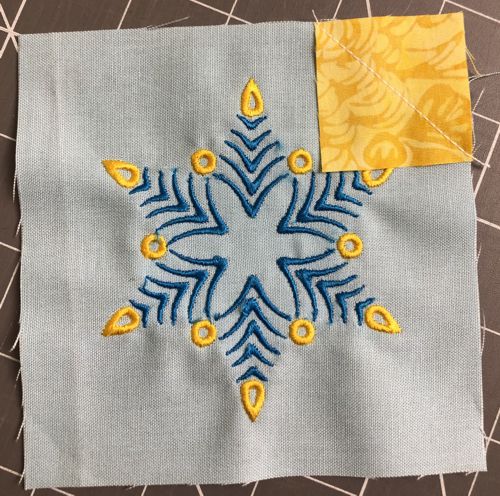
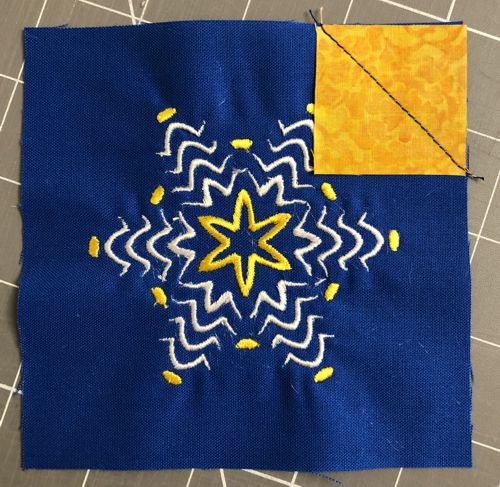
| Position one of the 1 1/2" yellow squares, face down, in the corner of the embroidered square. Align the sides. Machine stitch along the diagonal from one corner to the opposite one. |
|
| Cut the excess fabric, leaving 1/8" seam allowance. |
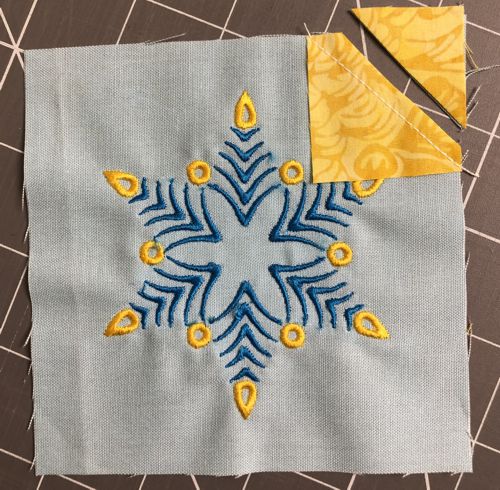
|
| Unfold the square and press. |
|
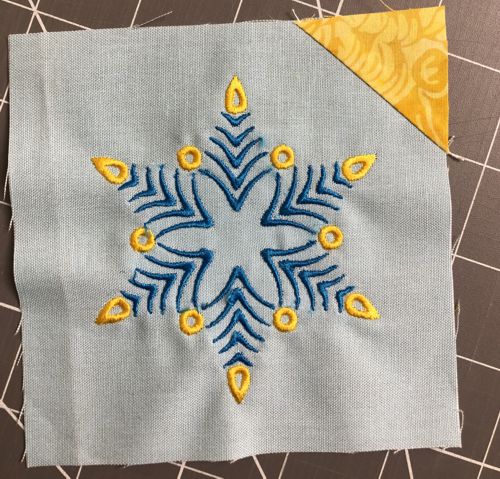
| Repeat for all corners of the embroidered central square. |
|
Position the yellow 1 1/2" x 2 1/2" strips on a working surface. Cover the upper part with blue 1 1/2" x 1 1/2" squares.
Stitch 4 of the units with the diagonal from the upper left to the lower right corners of the blue square.
Stitch the remaining 4 units with the diagonal from the upper right to the lower left corner of the blue square. |
|
| Cut away the excess fabric with seam allowance 1/8". |

|
| Unfold the squares and press. You need 4 of each unit. |

|
| Stitch the 2-color units to the left and right edges of the 2 1/2" x 2 1/2" blue squares. |
|
| Sew the new unit to the left and right edges of the central square. |
|
| Sew the yellow and blue 1 1/2" squares together. |

|
| Stitch the blue 1 1/2" x 2 1/2" strips to the left and right edges of the units, then sew the 2-colored strips to the units. |

|
| Sew the new borders to the central part. |
|
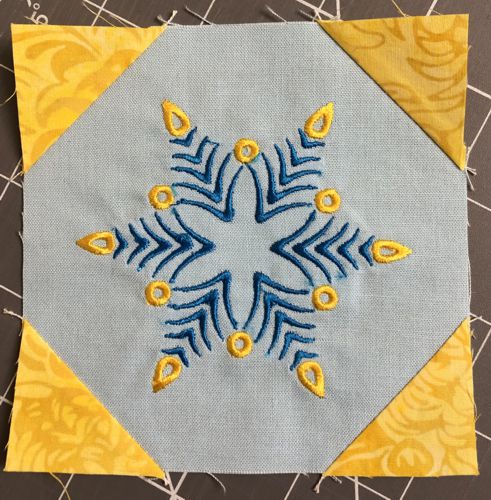
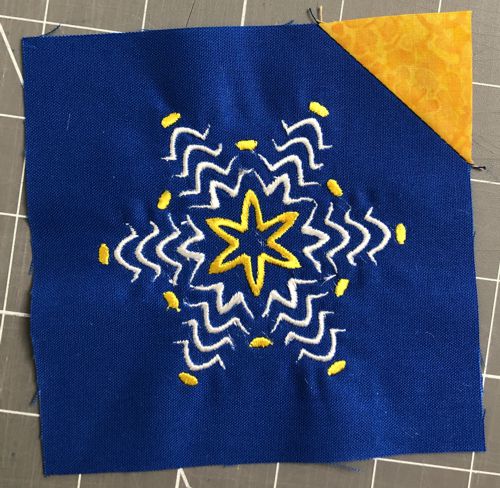
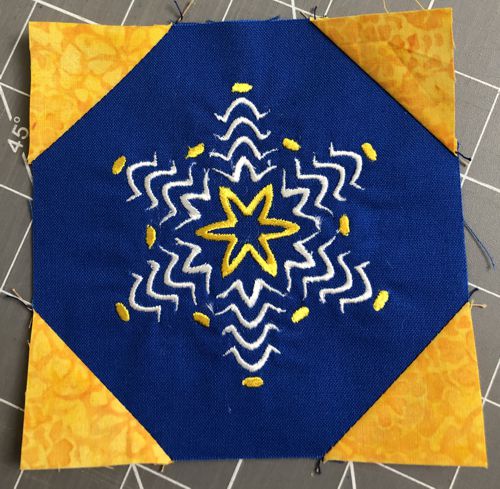
| The Third Mug Rug/Pot Holder: |
| For the third piece we used royal blue and yellow fabrics. |
| Cutting: |
From blue fabric, cut:
- 4 strips measuring 2 1/2" x 4 1/2"
- 1 strip measuring 1 1/2" x 12 1/2"
From yellow fabric, cut:
- 4 squares measuring 1 1/2" x 1 1/2"
- 1 strip measuring 1 1/2" x 12 1/2"
|

|
| Assembly: |
| Position one of the 1 1/2" yellow squares, face down, in the corner of the embroidered square. Align the sides. Machine stitch along the diagonal from one corner to the opposite one. |
|
Cut the excess fabric, leaving 1/8" seam allowance.
|

|
| Unfold the square and press. |
|
| Repeat for all corners of the embroidered central square. |
|
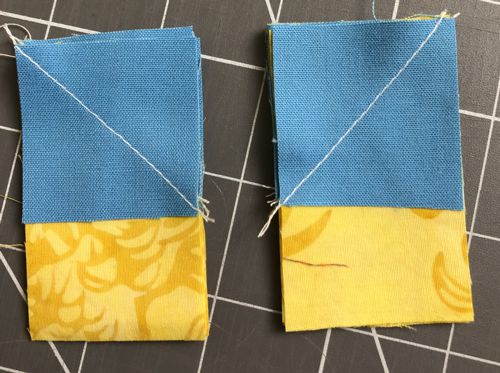
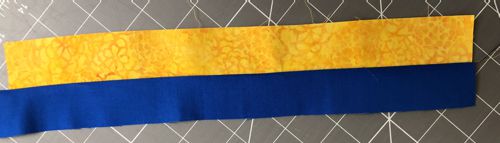
| Sew the blue and yellow 1 1/2" x 12 1/2" strips together along the long sides. |
|
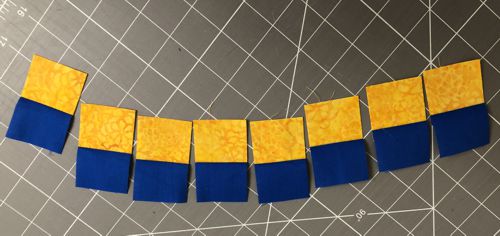
| Subcut the 2-colored strip into 8 strips 1 1/2" wide. |
|
| Using pairs of 2-colored strips, sew them into 4 squares. |

|
| Sew the 2 1/2" x 4 1/2" blue strips to the left and right edges of the central part. |

|
| For the upper and lower borders, use the 2-colored squares and the remaining blue strips. |

|

|
| Sew the upper and lower borders to the central part. |

|
Quilting and Finishing
|
Place the backing on a flat surface (table) face down. Cover with batting. Spread your working piece over it.
Pin all layers together.
Start from the central part and echo-quilt the embroidery first with matching thread.
Then quilt all over the pieces. |
Press with heavy steam. Square the pieces so all angles are 90 degrees and opposite sides are the same length.
Finish the raw edges with binding.
If you plan to use the pieces as decorative pot holders, make a loop from the end of the binding. |

|
| Have fun! |
|
Back to Christmas Snowflake Set
|
Back to Projects Page
|


