The Christmas Village wall quilt is a new variation on a traditional pattern. The bright red tones make it an instant eye-catcher. The white squares are embellished with the redwork embroidery. We used the designs from the Christmas Village Quilt Block Set.
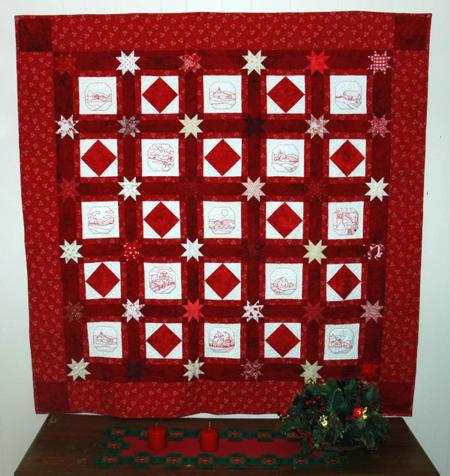
The finished size of the quilt is about ... .
For this quilt you will need:
1/2 yard of bright red fabric (fabric A);
1 1/2 yard of dark red fabric (fabric B);
4 yards of red fabric with white pattern (fabric C);
1 1/4 yard of white fabric (fabric D);
Scraps of red and white patterned fabric for the stars.
You will also need fabric for the backing and binding, and batting.
The quilt consists of two blocks, sashing and two borders. All measurements are based on fabric 42" wide and include 1/4" seam allowance.
You will need 12 A blocks. For these blocks:
Out of fabric A (bright red), cut 2 strips 6 1/2" wide and the length of the width of the fabric. Subcut the strips into 12 squares measuring 6 1/2" x 6 1/2";
Out of fabric B(dark red), cut 2 strips 1 1/2" wide and the length of the width of the fabric. Subcut the strips into 48 squares measuring 1 1/2" x 1 1/2";
Out of fabric C (red with white pattern), cut 8 strips 1 1/2" wide and the length of the width of the fabric. Subcut them into 48 strips measuring 1 1/5" x 6 1/2";
Out of fabric D (white fabric), cut 34 strips 3 1/2" wide and the length of the width of the fabric. Subcut them into 48 squares measuring 3 1/2" x 3 1/2".
To assemble Block A, position a 3 1/2" x 3 1/2" white square in the corner of a 6 1/2" x 6 1/2" bright red square. Align all sides. Sew along the diagonal as shown in the diagram below. Cut, leaving 1/4" seam allowance. Unfold the corner and press.
Repeat with the 3 other corners. Make 12 units.
Attach the 1 1/2" x 6 1/2" strips to the left and right sides of the units.
Attach the 1 1/2" x 1 1/2" squares to the remaining 1 1/2" x 6 1/2" strips.
Attach these strips to the blocks. You should get 12 A blocks.
You will need 13 B blocks. For these blocks:
Out of fabric B (dark red), cut 2 strips 1 1/2" wide and the length of the width of the fabric. Subcut the strips into 52 squares measuring 1 1/2" x 1 1/2";
Out of fabric C (red with white pattern), cut 8 strips 1 1/2" wide and the length of the width of the fabric. Subcut them into 52 strips measuring 1 1/5" x 6 1/2";
Out of fabric D (white), cut 2 strips 6 1/2" wide and the length of the width of the fabric. Subcut the strips into 13 squares measuring 6 1/2" x 6 1/2".
To assemble the B Blocks, attach the 1 1/2" x 6 1/2" strips to the left and right sides of the white 6 1/2" x 6 1/2" squares.
Attach the 1 1/2" x 1 1/2" squares to the remaining 1 1/2" x 6 1/2" strips.
Attach these strips to the blocks. You should get 13 B blocks.
For the sashing:
Out of fabric B (dark red), cut 13 strips 2 1/2" wide and the length of the width of the fabric. Subcut the strips into 60 strips measuring 2 1/2" x 8 1/2".
Out of different red and white scraps, cut 36 squares measuring 2 1/2" x 2 1/2" (these will be the centers of the stars) and 288 squares measuring 1 1/2" x 1 1/2" for the rays of the stars.
To assemble the sashing, position a 1 1/2" scrap square on one corner of a dark red 2 1/2" x 8 1/2" strip. Draw a diagonal and stitch on the line. Trim seam allowance to 1/4", unfold and press. Repeat for all the corners of the strips. Make 60 strips in this way.
You will have 48 1/2" x 1/2" scrap squares left. Put them aside, as we'll need them later.
Count out 30 strips and put them aside too.
Continue to work with the remaining 30 strips. Using the 2 1/2" scrap squares, sew together 5 sashing strips and 6 scrap squares, as shown on the diagram below. Make 6 rows.
Using the remaining 30 sashing strips, assemble the rows of the top as shown:
Attach the sashing to the rows and sew the parts together:
For the first border:
Out of the B fabric (dark red), cut 6 strips measuring 1 1/2" and the length of the width of the fabric. Subcut the strips into 20 strips measuring 1 1/2" x 8 1/2", 24 strips measuring 1 1/2" x 2 1/2" and 4 squares measuring 1 1/2" x 1 1/2".
Using the 48 remaining scrap squares and the twenty four 1 1/2" x 2 1/2" strips, assemble 24 strips as shown on the diagram below. Position a 1 1/2" scrap square on one corner of a dark red 1 1/2" x 2 1/2" strip. Draw a diagonal and stitch on the line. Trim seam allowance to 1/4", unfold and press. Repeat for the second corner.

Assemble the borders, as shown. The top and bottom borders have corner squares attached.

Attach the borders to the quilt top. First attach the left and right borders, then attach the top and bottom borders.
For the second border:
Out of fabric C (red with white pattern) cut 4 strips measuring 6 1/2" x 52 1/2".
Out of fabric B (dark red), cut 4 squares measuring 6 1/2" x 6 1/2".
Attach two of the 6 1/2" x 52 1/2" strips to the left and to the right of the quilt top.
Attach the squares to the ends of the remaining 6 1/2" x 52 1/2" strips.
Attach the new strips to the top and bottom of the quilt top.
The top is ready for embroidery. We chose redwork designs from the Christmas Village Quilt Block Set. For embroidery on quilts, we like to use low-loft DreamPoly batting, instead of stabilizer. After each design is embroidered, we cut away the excess stabilizer as close to the stitches as possible. This technique will make the embroidery puffy and you will get trapunto-like results.
Now place the backing on a flat surface (table) face down. Cover with batting. Spread your working piece over it.
Pin all three layers together with 1" pins and start quilting. We quilted along the lines of the embroidery, made stippling around the embroidery and then stitched in the ditch on the blocks and sashing. We quilted the borders in a free-motion style.
For the backing we used red fabric.
After the quilting is finished, press the work with heavy steam and square the work -- all corners should be 90 degrees and opposite sides should be of the same length.
Finish the raw edges with the binding.
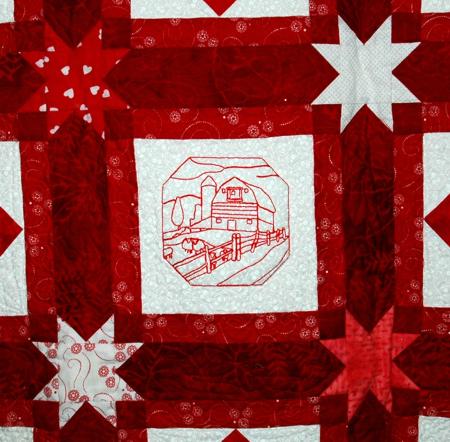
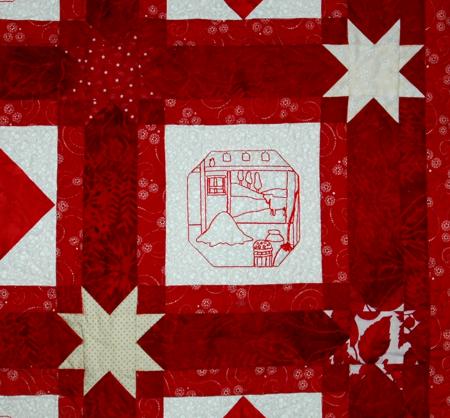
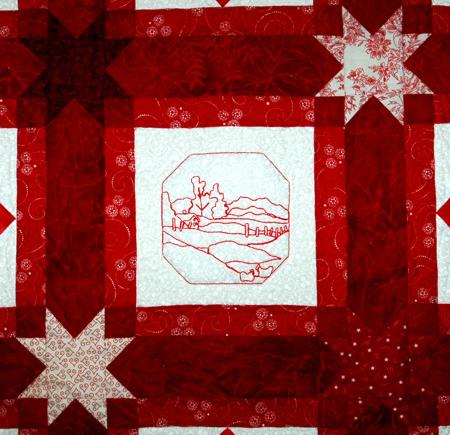
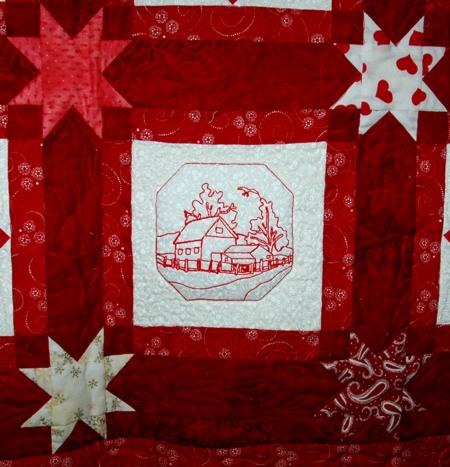
Here are some close-ups of the quilt:


