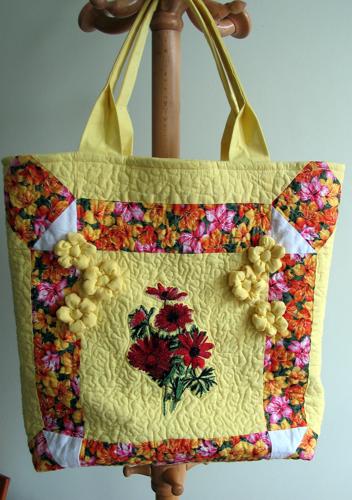
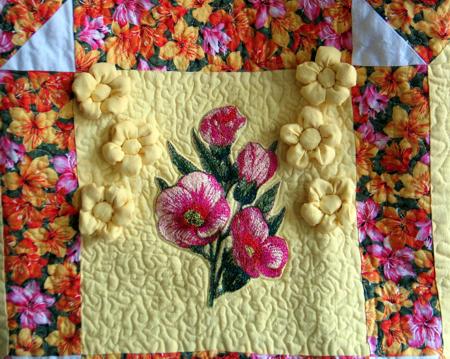
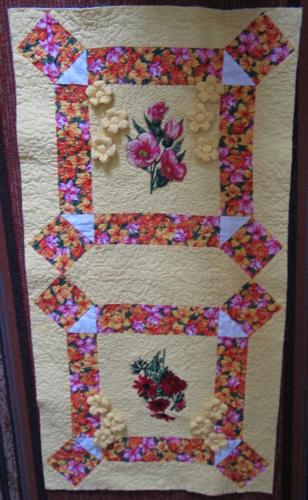
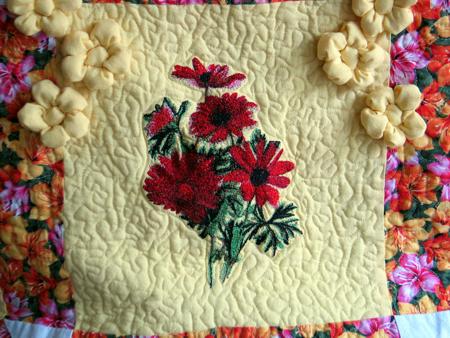
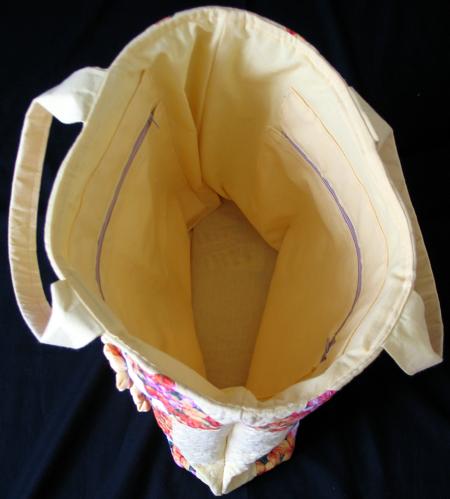
This colorful tote bag is composed of 2 quilt blocks - one on the front and one on the back. Both blocks feature flower embroidery. We used Hibiscus and Anemone for the large (5"x 7") hoop. Actually any flowers from our extensive Flower collection will work.
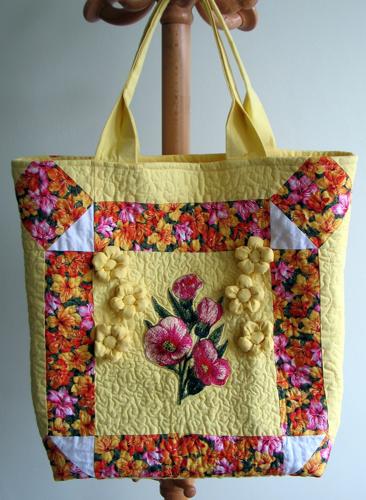
The finished size of this bag is about 18" x 18" x 3".
We used about 1 yard of solid yellow fabric, 1/4 yard of bright patterned fabric and 2 squares measuring 4" x 4" of solid white fabric for the outside of the bag; about 1 yard of light cream fabric for the lining and about 1 yard of low loft batting. You will also need two 6" long zippers for the inner pockets and iron-on medium weight sewing intefacing.
Out of solid yellow fabric cut:
2 squares measuring 10 1/2" x 10 1/2"
8 strips measuring 3" x 10 1/2"
12 squares measuring 3 5/8" x 3 5/8"
2 strips measuring 3" x 20" (for the handles)
Out of patterned fabric cut:
8 strips measuring 3" x 10 1/2"
16 squares measuring 3 5/8" x 3 5/8"
Out of white fabric cut
4 squares measuring 3 5/8"x 3 5/8"
Out of fabric for the lining, cut a rectangle measuring 19" x 38" , two strips measuring 2" x 7" and two squares measuring 7" x 7" (for the inner pockets).
Out of iron-on interfacing, cut 2 strips measuring 2" x 20" (for the handles), 2 strips measuring 1 1/2" x 6 1/2" and 2 squares measuring 6 1/2" x 6 1/2" (for the inner pockets).
For this block you will need 32 half-triangle squares. To make these units, take a 3 5/8" x 3 5/8" patterned square and cover it with a white 3 5/8" x 3 5/8" square, face-to-face. Align all edges.
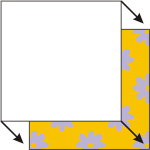
With a sharp graphic pencil draw a diagonal from one corner to the other. Stitch a scant 1/4" on each side of the line.
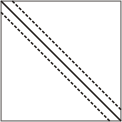
Press the unit, and cut along the line. Open the two new squares, and press the seams towards the patterned fabric.
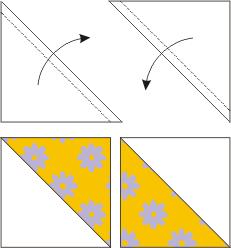
For each block, you will need 4 white half-triangle squares and 12 yellow half-triangle squares.
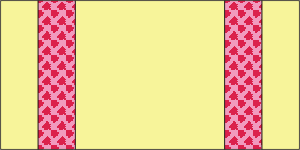
To assemble the block, attach the patterned strips to the left and right edges of the yellow square, then attach the yellow strips to the left and right edges of the piece.
Assemble the top and bottom strips (they are identical):
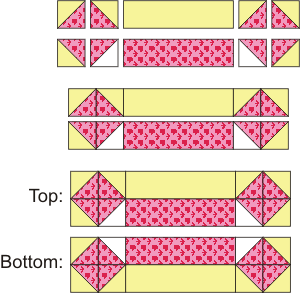
Attach the strips to the top and bottom edges:
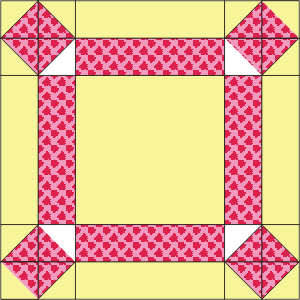
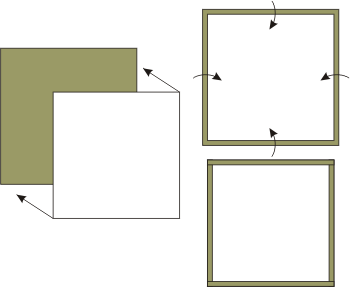
Sew the blocks together along one edge.
Stabilize the central squares of each block with iron-on cut-away stabilizer and make the embroidery. You can also use low-loft batting or polyester felt instead of the stabilizer.
Note: The bottom side of the embroidery should be directed to the seam.
Cut-away the excess stabilizer close to the embroidery.
Place the blocks onto the low-loft batting and quilt the work. First quilt around the embroidery to fix it in place. Then quilt in a free motion style all over the work.
Press with heavy sream and square the top: all corners should be 90 degrees and opposite sides should be of the same length.
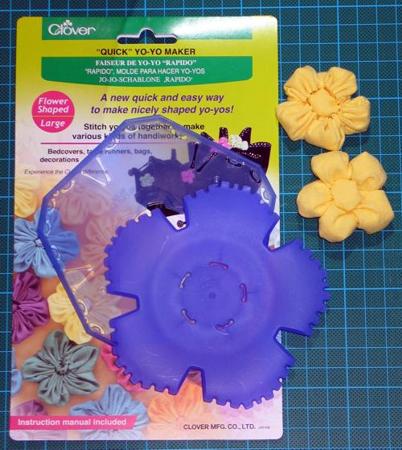
We also attached the 3D flowers at this stage.
The 3D flowers are made using Clover's templates. You can find them in your local craft or quilt shops.
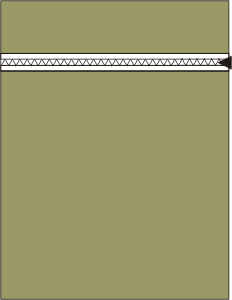
Now fold the bag's top in half by the bottom seam, face inside. Align all raw sides. Pin them together. Stitch the side seams twice - 1/4" and about 3/8" from the edges.
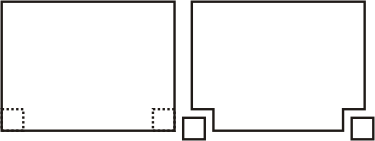
Stitch the box corners at the bottom of the bag. For this separate the front and back sides at the corners. Center the seams on each side of the corner on top of each other. Measure 1 1/2" along the seam from the corner and draw a line perpendicular to the seam across the corner and machine-stitch it. Do not trim the seam. Fold the "ears" to the side seams and hand-stitch the tips to the side seams.
Turn the bag out.
Fold the upper raw edge 1/4"-1/2" inside and pin.
For the pocket you will need the strip measuring 2" x 7" and the square measuring 7" x 7" that were cut out of the fabric for the lining, and the strip measuring 1 1/2" x 6 1/2" and the square measuring 6 1/2" x 6 1/2" that were cut out of the iron-on interfacing.
Place the 1 1/2" x 6 1/2" interfacing strip with the fusible side down onto the wrong side of the 2" x 7" strip. Leave 1/4" margins. Press the interfacing to the fabric strip to fuse it. Fold over the margins and press again.

Place the 6 1/2" x 6 1/2" interfacing square with the fusible side down onto the wrong side of the 7" x 7" fabric square. Leave 1/4" margins. Press the interfacing to the fabric strip. Fold over the margins and press again.
Pin the 6 1/2" strip to the zipper. Topstich the strip to the zipper.
Pin the 6 1/2" x 6 1/2" square to the other side of the zipper. Topstitch the square to the zipper.
Fold the lining widthwise, face inwards, and align all edges. Lightly press the folded line to mark the crease.
Cut 2 1/2" x 2 1/2" squares out of the lower corners.
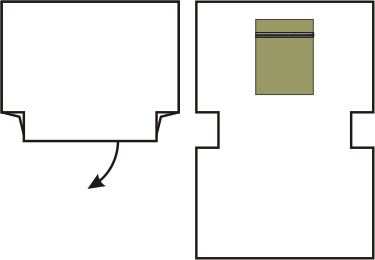
Unfold the lining. Position the pockets and pin in place. Top-stitch the pockets to the lining.
Fold the lining again, aligning all edges. Sew along the right and left edges, seam allowance 1/2".
Press the seams open.
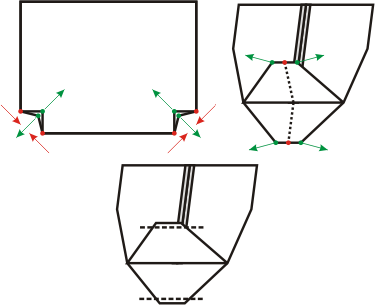
Now pinch each corner so that the end of the side seam matches the crease of the bottom (see the diagram below; the ends of the side seams and the ends of the bottom crease are marked in red). Pin. Stitch through all the layers across the bottoms of the corners (see the last picture in the diagram below). This will square the bottom of the lining. Do not turn the lining right side out.
Fold the raw upper edge of the lining back 1" and press.
Insert the lining into the bag. Align the side seams and the upper edges. Pin together along the upper edges.
Place the fabric strips measuring 3" x 20" face down. Position the interfacing strips fusible side down. Press the interfacing to the fabric. Fold the strips lengthwise, face inside, and stitch 1/4" from the raw edge. Turn the tubes out. Press.
Fold lengthwise again and topstitch about 1/8" from the edge. Leave 3" unstitched on both ends.
Insert the lining into the bag. Align the side seams and the upper edges. Pin together along the upper edges.
Insert the ends of the strips between the bag's top and the lining 5" from the side seams. Pin. Topstitch 1/4" from the bag's top edge securing the lining and the handles.