Please read the General Guidelines on Embroidering our FSL designs first.
Some points to remember from the General Guidelines:
Use Vilene water soluble stabilizer;
Use the same thread for the upper and bobbin to get two-sided embroidery.
DO NOT embroider several designs in one hoop.

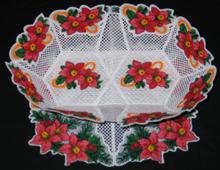
Our Christmas Hardanger FSL Table Set offers you a large number of possibilities. Using the designs from the set, you can make a tablecloth, a variety of doilies, napkins, table runners, and baskets. Actually, you can put together a complete table set of for the festival table. Here are photos with some ideas and instructions on how to make just a few of the table pieces.

Along with the embroidery files, you will get the color card, which will help you to select the threads, and also sort out the many parts of the project.
To make the FSL parts, use 2 layers of Vilene-type water-soluble stabilizer and use the same thread for both the needle and bobbin to get 2-sided embroidery. If you do not need 2-sided embroidery, use regular bobbin thread.
After you embroider the necessary parts, rinse the stabilizer and leave to air dry. Before sewing, press all parts with steam.
Impotant Note: It's very important to use as small a hoop as possible. E.g. if your design is for a small hoop, use the small hoop, not the large one; if your design is for a large hoop, use large, not mega. Do not try to embroider several freestanding lace designs in one hoop. This is because all water-soluble stabilizers stretch, and in a bigger hoop, it's going to stretch more. This can lead to the design falling apart after the stabilizer is dissolved. It's always better to embroider one part at a time.
To make this doily, you'll need a 16" x 16" piece of heavy-weight linen or cotton and removable fabric marker.

Step One: Embroider four square parts (file Star4). Zigzag them together with either invisible thread or the green thread of the embroidery.
Embroider eight triangle parts (file Star1).
Step Two: Take your fabric square. Draw two diagonals to find the center. Place the FSL square onto the fabric, aligning their centers. With a removable fabric marker, outline the borders of the FSL square. Set it aside. With sharp scissors cut out a square opening 1/4" from the marked line. Finish the raw edge with overedge or zigzag stitch.
Step Three: Cover the opening with your FSL square, baste or pin, and stitch in place.
Step Four: Now place the triangle parts on the fabric around the square insert. Mark their placement with a removable fabric marker. Set them aside, and cut away the excess fabric, 1/2" from the marked line. Fold the raw edges twice and stitch in place.
Step Five: Baste or pin the FSL triangles and then stitch them in place. The doily is ready.
The red doily is done in the same way; the only difference is the insert. We used file Star4 for it.


To make this table runner, you'll have to embroider file Star3 18 times. You'll also need a piece of fabric about 11 1/2" x 34 1/2" (heavy-weight linen or cotton).

Place the fabric face up, fold back 1/4" of the edges and finish the edges with overedge or zigzag stitch. Arrange the FSL shapes on the fabric so that they form a rectangle. Zigzag them in place along the outer edge.

Now zigzag the shapes along the inner edge. The table runner is ready!

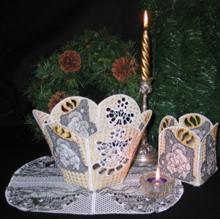
Now it's time for the placemat. We used files Star2 and Star8 to make them.

For each placemat, embroider file Star2 twice and Star8 once. You'll need a piece of fabric 20" x 14". Place the fabric on a table, face up. Fold 1/4" back from the edge where you would like to have your FSL, press and zigzag. Fold the other 3 edges bak 1/4" and press. Fold again about 1", press. Make the mittered corners. Machine-stitch with a decorative stitch.

Place the fsl parts along the edge and zigzag in place. You can also add tassels for decoration.


To make this square basket, embroider files Star7 once and Star2 four times. Place the first panel along one of the sides of the square, align the edges and zigzag over the edges. Unfold. Repeat with the remaining panels. Use either invisible thread or the same color thread as the embroidery. Insert satin ribbons in the corners and lace the corners.

Design file Star6 can be used to decorate a napkin. Just stitch it into the corner.


The part Star2 can also be used as a napkin ring, or a candle wrap.


 |
Big FSL Santa Ornament |
 |
|
 |
|


