This fun Halloween tote features the design of the Witch's Cat. It's quick and easy to make. Give it away as a gift, use it for trick-or-treating, or just carry it with you day-to-day.
The finished size of the tote is about 16" wide x 13" high x 3" deep.
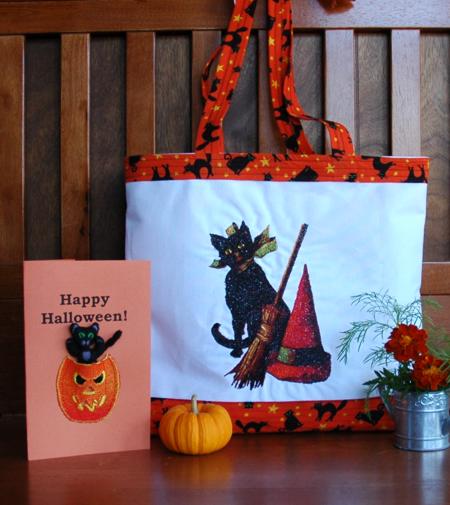
You will need a piece of plain light-colored canvas or duck cloth measuring 17" x 30" and two strips of the same material 1" x 30" each for the handles. You will also need Halloween-patterned cotton fabric: 2 strips measuring 3" x 30" (for the handles), 2 strips measuring 2 1/2" x 17" for the upper edges of the tote and a piece measuring 8" x 17" for the bottom of the tote.
Step One: On your sewing machine, finish all the raw edges of the canvas rectangle with zig-zag. Fold the rectangle in half widthwise and press the crease.
Step Two: On the embroidery machine, embroider the Witch's Cat design in the center of the upper half of the canvas rectangle. Use an iron-on tear-away stabilizer.
After the embroidery is done, tear the stabilizer away. Press the fabric.

Step Three: Place the 8" x 17" rectangle of patterned fabric right side down. Fold the long raw edges 1/4" to the wrong side and press.
Fold the piece in half lengthwise and press the crease.
Step Four: Place the patterned piece, face up, over the embroidered piece. Align the pressed creases. Pin in place. Top-stitch to join the pieces. Start with the creased line. Top-stitch several more lines about 1/2" apart.
Stitch the edges of the patterned strip with the zig-zag.

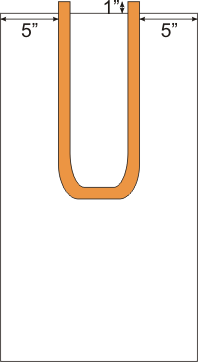
Step Five: To make the handles, place the patterned strips of fabric face down. Place the canvas strips over them. Fold one edge of the patterned fabric over the canvas and press. Then, fold the second edge back 1/2", fold again over the canvas and press.
Top-stitch 1/4" from each edge.

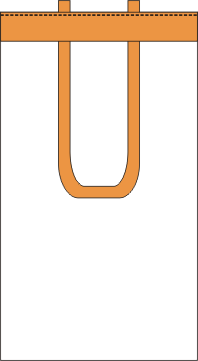
Step Six: Place the tote face down. Position a handle on top of the tote, about 5" from each side. Make the ends of the handle protrude about 1" past the top edge of the tote. Pin the handle to the tote.
Place one of the 2 1/2" x 17" strips along the upper edge of the tote, face down. Pin.
On your sewing machine, stitch along the upper edge, 1/4" from the edge.
Turn to the right side and press. Tuck the raw edge of the upper strip under by 1". Press. Top-stitch several parallel lines.

Repeat for the second handle.
Step Seven: Fold the tote in half, face inwards, aligning all edges. Pin. Stitch the sides together.
Step Eight: Stitch box corners at the bottom of the bag. For this, separate the front and back sides at the corners. Center the side seam with the central (creased) line of the bottom. Measure 2 1/2" along the seam from the corner and machine-stitch perpendicular to the seam across the corner. Do not trim the seam. Fold it onto the bottom and attach with several manual stitches. Repeat for the second corner.
Turn the tote right side out. It's ready. Enjoy!
You can read about how to make the Happy Halloween card here.


