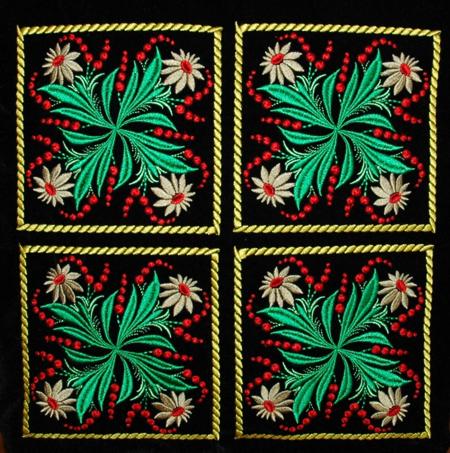
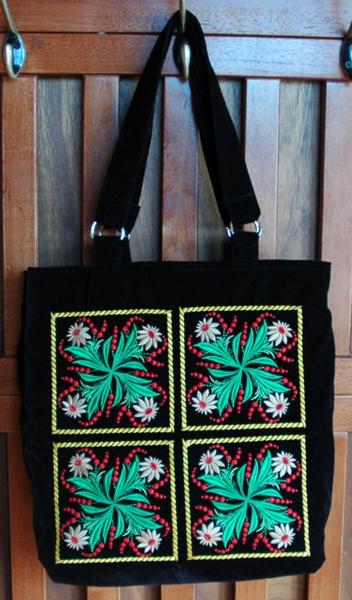
The stunning velvet tote bag features the square design from the Folk Style Decorative Motif Set. The finished size of the bag is about 13" x 13" x 5".
|

|
| We used 1 yard of black velvet, 1 yard of cotton fabric for lining, 4 rings for the handles, a 6" long zipper for the inner pocket and iron-on heavy weight intefacing, such as Pellon Peltex or similar fusible interfacing. For embroidery we used medium-weight cut-away stabilizer and embroidery polyester threads. |
|
Embroidery:
|
| Out of the fabric for the bag's top, cut a piece of about 22" x 22". On the back of the velvet, mark the center of the piece and draw horizontal and vertical lines through the center. Embroider the square motif from the Folk Style Decorative Motif Set 4 times, positioning the squares 1/4" from the drawn lines. |
|
|
Cutting:
|
| Trim the embroidered piece to a 19" x 19" square, leaving equal margins around the embroidery. Out of the fabric for the bag's top cut the second square measuring 19" x 19" , 4 strips measuring 4" x 6" and 2 strips measuring 4" x 15" (for the handles). |
| Out of Pellon Peltex interfacing cut a strip measuring 19" x 31". |
| Out of the fabric for the lining, cut a rectangle measuring 19" x 31", a strip measuring 2" x 7" and a square measuring 7" x 7" (for the inner pocket). |
| Out of iron-on interfacing, cut 4 strips measuring 2" x 6", 2 strips measuring 2" x 15" (for the handles), 1 strip measuring 1 1/2" x 6 1/2" and a square measuring 6 1/2" x 6 1/2" (for the inner pocket). |
|
Sewing the Top of the Bag
|
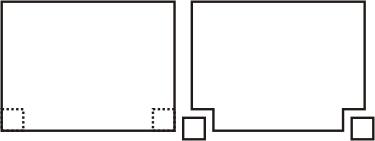
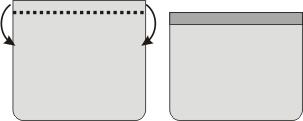
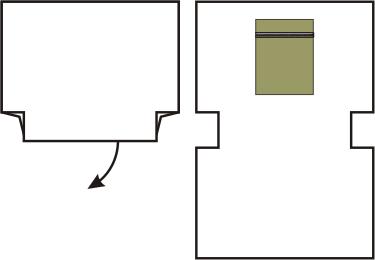
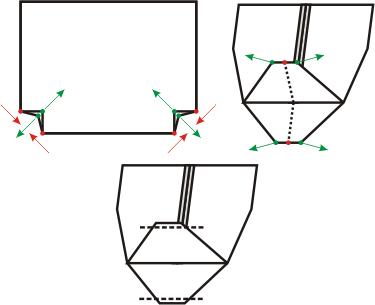
| Place the 19" x 19" fabric squares on top of each other, face-to-face. Cut 2" x 2" squares out of the lower corners. |
|
| Stitch the pieces together along the bottom edge, leaving 1/2" of seam allowance. Press the seam open. |
|
| Fold the interfacing widthwise in half and cut 2" x 2" squares out of the lower corners. Place the interfacing on the wrong side of the bag's top. Align the cut-out corners and sides. Pin the layers together. Topstitch 1/4" on each side of the bottom seam through all layers.
|
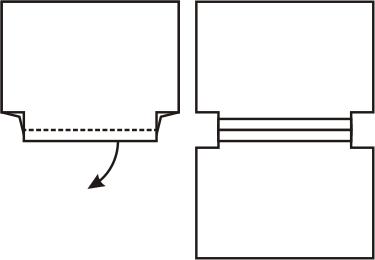
| Put the right sides together again and stitch the pieces along the two side edges, leaving 1/2" seam allowance. Cut away the interfacing allowance close to the stitches to reduce the bulk of the seam. Press the seams open and topstitch 1/4" on each side of the seam.
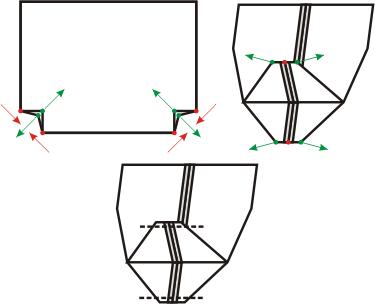
Now pinch each corner so that the end of the side seam matches the end of the bottom seam (see the diagram below; the ends of the side seams and the ends of the bottom seams are marked in red). Pin. Stitch through all the layers across the bottoms of the corners (see the last picture in the diagram below). This will square the bottom of the bag. Now you can turn the bag right side out.
|
|
| Turn the working piece right side in. Fold the raw upper edge of the bag back 2 1/2" over the interfacing. Pin in place. |
|
|
Sewing the Lining with Pocket:
|
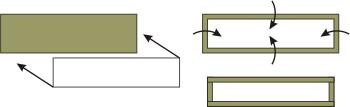
| For the pocket you will need the strip measuring 2" x 7" and the square measuring 7" x 7" that were cut out of the fabric for the lining, and the strip measuring 1 1/2" x 6 1/2" and the square measuring 6 1/2" x 6 1/2" that were cut out of the iron-on interfacing. Place the 1 1/2" x 6 1/2" interfacing strip with the fusible side down onto the wrong side of the 2" x 7" strip. Leave 1/4" margins. Press the interfacing to the fabric strip to fuse it. Fold over the margins and press again.
|
|
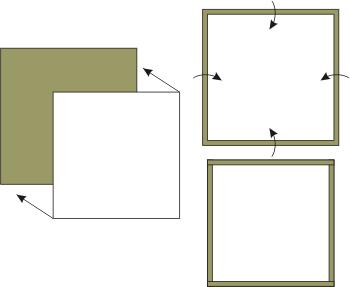
| Place the 6 1/2" x 6 1/2" interfacing square with the fusible side down onto the wrong side of the 7" x 7" fabric square. Leave 1/4" margins. Press the interfacing to the fabric strip. Fold over the margins and press again. |
|
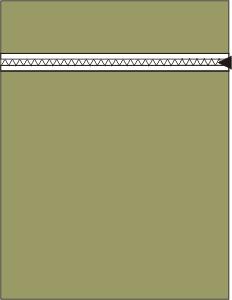
| Pin the 6 1/2" strip to the zipper. Topstich the strip to the zipper. Pin the 6 1/2" x 6 1/2" square to the other side of the zipper. Topstitch the square to the zipper.
|
|
| Fold the lining widthwise, face inwards, and align all edges. Lightly press the folded line to mark the crease. Cut 2" x 2" squares out of the lower corners.
|

|
| Unfold the lining. Position the pocket on one side of the lining and pin in place. Top-stitch the pocket to the lining. |
|
| Fold the lining again, aligning all edges. Sew along the right and left edges, using 1/2" seam allowance. Press the seams open.
Now pinch each corner so that the end of the side seam matches the crease of the bottom (see the diagram below; the ends of the side seams and the ends of the bottom crease are marked in red). Pin. Stitch through all the layers across the bottoms of the corners (see the last picture in the diagram below). This will square the bottom of the lining. Do not turn the lining right side out.
|
|
| Fold the raw upper edge of the lining back 1/2" and press. Insert the lining into the bag. Align the side seams and the upper edges. Pin along the upper edges.
|
|
Making the Handles
|
| Place 4 fabric strips measuring 4 1/2" x 6" face down. Position four interfacing strips 2" x 6" fusible side down, leaving 1/4" margin along one edge and 2 1/4" along another. Press the interfacing to the fabric. Fold the 1/4" margin over the interfacing and press. Fold the 2 1/4" margin over the interfacing and press. Tuck in 1/4" of the fabric that protrudes over the edge. Press. Topstitch in place. Insert the strips through the four rings. Fold back 2" of the strips, fold the edge under and topstitch in place.
Place 2 fabric strips measuring 4" x 15", face down. Position two interfacing strips measuring 2" x 15" with their fusible side down, leaving 1/4" margin along one edge and 2 1/4" marging along the other. Press the interfacing to the fabric. Fold the 1/4" margin over the interfacing and press. Fold the 2 1/4" margin over the interfacing and press. Tuck in 1/4" of the fabric that protrudes over the edge. Press. Topstitch in place. You will get 2 handles.
Insert the ends of each handle into the rings. Fold back 1 1/2" and topstitch in place.
|
|
Assembly:
|
| Insert the lining into the bag. Align the side seams and the upper edges. Pin along the upper edges. Insert the ends of the strips between the bag's top and the lining 5" from the side seams. Pin. Topstitch 1/4" from the bag's top edge securing the lining and the handles.
|
|
|
The tote is ready. Enjoy!
|
|
Happy Stitching!
|
|
Back to the Projects Page
|


